Sony MVCCD300 Operating Instructions - Page 82
Formatting a CD-RW, To unmark selected print, marks, To cancel marking the print, To cancel formatting
 |
UPC - 027242589223
View all Sony MVCCD300 manuals
Add to My Manuals
Save this manual to your list of manuals |
Page 82 highlights
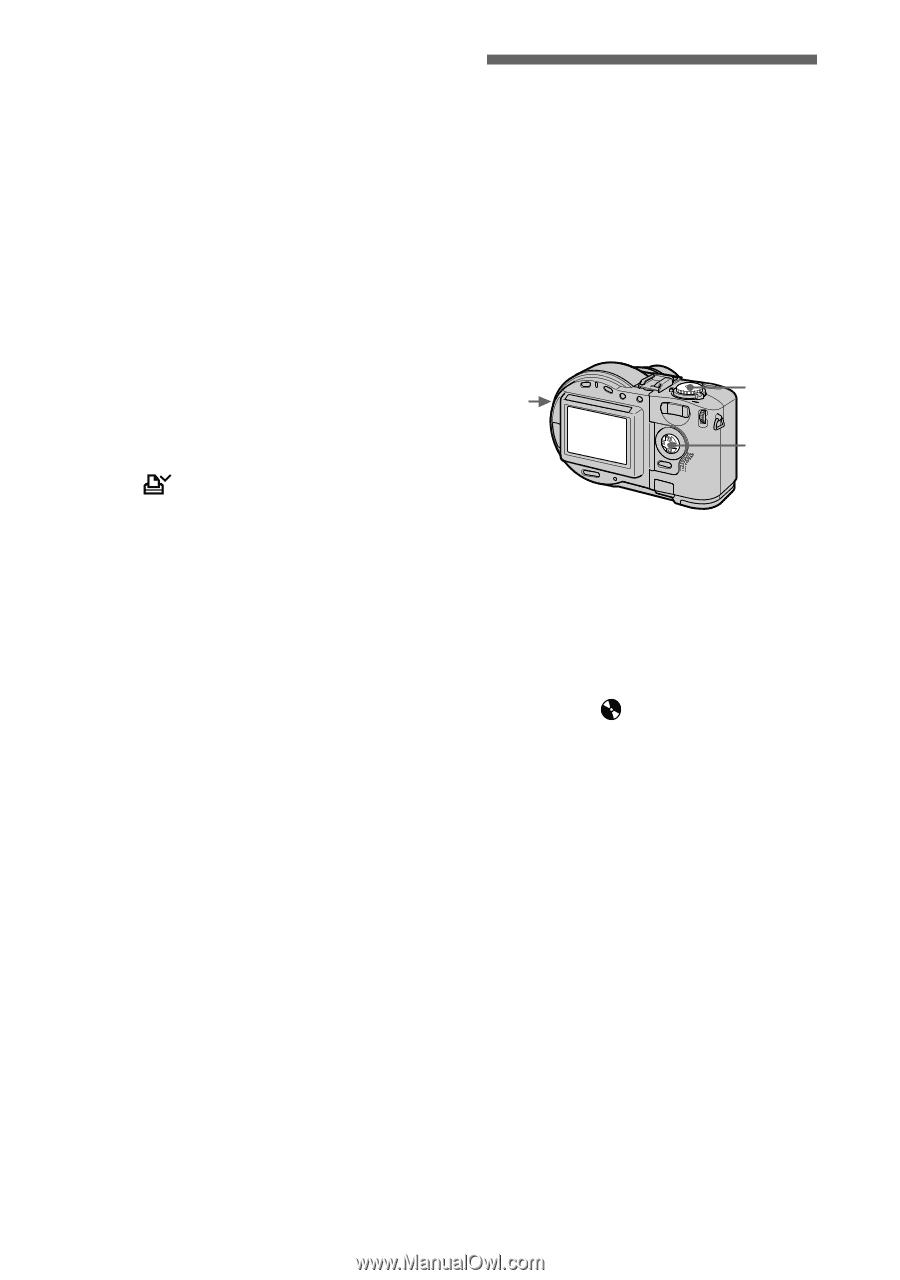
6 Press MENU. The menu appears. 7 Select [OK] with b/B, then press z. To unmark selected print marks Select the image to be unmarked in step 5 with v/V/b/B, then press z. To unmark all the print marks Select [ALL] with b/B in step 4, then press z. Select [OFF] with b/B, then press z. The marks on all images are unmarked. To cancel marking the print mark Select [CANCEL] with b/B in step 4, then press z, or select [EXIT] with b/ B in step 7, then press z. Notes • You cannot mark moving images, Clip Motion images or images recorded in TEXT mode. • If you mark an image recorded in TIFF mode with a print mark, only the uncompressed image is printed, and the JPEG image recorded at the same time is not printed. • If you mark an image with a print mark, the disc space will decrease. Also, if you unmark the print mark, the disc space will decrease. • If the disc space is not sufficient, you may not be able to mark an image with a print mark. Formatting a CD-RW When deleting all the images in the CD-RW or using the CD-RW formatted with other equipment than this camera, format the CD-RW. When you format a CD-RW, all data stored on the disc will be deleted. Check the contents of the disc before formatting. The initialization is also executed after the format. 1 2 3-5 1 Insert only the CD-RW you want to format. 2 Set the mode dial to SET UP. The setup screen appears. 3 Select [ ] (DISC TOOL) with v/V, [FORMAT] with B/v/V, then press B. 4 Select [OK] with v/V, then press z. "FORMAT PLACE ON LEVEL SURFACE" appears on the LCD screen. 5 Select [OK] with v/V, then press z. To cancel formatting Select [CANCEL] with v/V in step 3, then press z. 82
-
 1
1 -
2
-
3
-
4
-
5
-
6
-
7
-
8
-
9
-
10
-
11
-
12
-
13
-
14
-
15
-
16
-
17
-
18
-
19
-
20
-
21
-
22
-
23
-
24
-
25
-
26
-
27
-
28
-
29
-
30
-
31
-
32
-
33
-
34
-
35
-
36
-
37
-
38
-
39
-
40
-
41
-
42
-
43
-
44
-
45
-
46
-
47
-
48
-
49
-
50
-
51
-
52
-
53
-
54
-
55
-
56
-
57
-
58
-
59
-
60
-
61
-
62
-
63
-
64
-
65
-
66
-
67
-
68
-
69
-
70
-
71
-
72
-
73
-
74
-
75
-
76
-
 77
77 -
 78
78 -
 79
79 -
 80
80 -
 81
81 -
 82
82 -
 83
83 -
 84
84 -
 85
85 -
 86
86 -
 87
87 -
88
-
89
-
90
-
91
-
92
-
93
-
94
-
95
-
96
-
97
-
98
-
99
-
100
-
101
-
102
-
103
-
104
-
105
-
106
-
107
-
108
 |
 |