Sony MVCCD300 Operating Instructions - Page 40
Copying a file in the disc to a computer, Copying a file in a computer to a disc - cd mavica
 |
UPC - 027242589223
View all Sony MVCCD300 manuals
Add to My Manuals
Save this manual to your list of manuals |
Page 40 highlights
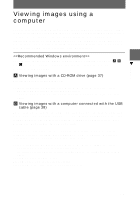
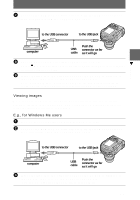
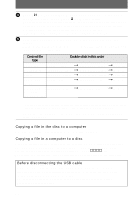
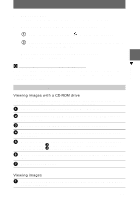
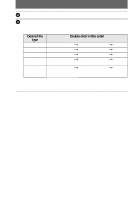
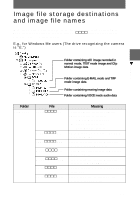
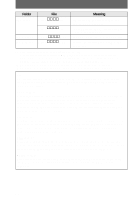
4 Open [ My Computer] on Windows and double-click the newly recognized drive. (Example: [ CD Mavica (E:)]) The folders inside the disc are displayed, and the disc cover of the camera will be locked. To remove the disc, carry out the operation for removing the disc described on the software operating instructions of DirectCD. If the drive is not recognized, see "Troubleshooting" on page 93. 5 Select and double-click the desired image/sound file from the folder. For the detailed folder and file names, see "Image file storage destinations and image file names" (page 43). Desired file type Double-click in this order Still image "DCIM" folder t "100MSDCF" folder t Image file Moving image* "MSSONY" folder t "MOML0001" folder t Image file Audio* "MSSONY" folder t "MOMLV100" folder t Audio file Clip Motion image "DCIM" folder t "100MSDCF" folder t Image file E-mail image "MSSONY" folder t "IMCIF100" folder Tiff image (uncompressed) t Image file ∗ Copying a file to the hard disk of your computer before viewing is recommended. If you play back the file directly from the disc, the image and sound may break off. Before you remove the disc, be sure to read "Before disconnecting the USB cable" on page 40. Copying a file in the disc to a computer Select the desired file, and drag it to the desired drive or folder. Copying a file in a computer to a disc Once you install DirectCD included in the supplied CD-ROM into your computer, you can drag and drop the desired file to the disc. To view the image using this camera, the file name format must be as follows, "DSC0ssss.JPG". For details, see "Image file storage destinations and image file names" (page 43). Before disconnecting the USB cable Before disconnecting the USB cable, you must carry out the operation for removing the disc. This operation is described in "Removing the disc" of the software operating instructions of DirectCD. The data in the disc may be broken if you do not carry out this operation. Refer to the procedure below. 40
-
 1
1 -
2
-
3
-
4
-
5
-
6
-
7
-
8
-
9
-
10
-
11
-
12
-
13
-
14
-
15
-
16
-
17
-
18
-
19
-
20
-
21
-
22
-
23
-
24
-
25
-
26
-
27
-
28
-
29
-
30
-
31
-
32
-
33
-
34
-
 35
35 -
 36
36 -
 37
37 -
 38
38 -
 39
39 -
 40
40 -
 41
41 -
 42
42 -
 43
43 -
 44
44 -
 45
45 -
46
-
47
-
48
-
49
-
50
-
51
-
52
-
53
-
54
-
55
-
56
-
57
-
58
-
59
-
60
-
61
-
62
-
63
-
64
-
65
-
66
-
67
-
68
-
69
-
70
-
71
-
72
-
73
-
74
-
75
-
76
-
77
-
78
-
79
-
80
-
81
-
82
-
83
-
84
-
85
-
86
-
87
-
88
-
89
-
90
-
91
-
92
-
93
-
94
-
95
-
96
-
97
-
98
-
99
-
100
-
101
-
102
-
103
-
104
-
105
-
106
-
107
-
108
 |
 |