Sony MVCCD300 Operating Instructions - Page 41
Viewing images with a CD-ROM drive, Viewing images - mac
 |
UPC - 027242589223
View all Sony MVCCD300 manuals
Add to My Manuals
Save this manual to your list of manuals |
Page 41 highlights
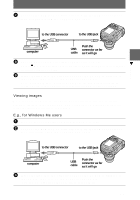
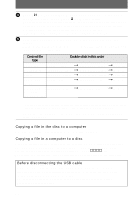
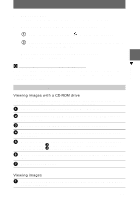
B Playback 1 Remove the disc. For details, refer to the software operating instructions of DirectCD. 2 When using Windows Me, Windows 2000 Professional: 1 Select the applicable drive from [ ] on the task bar, then stop it. 2 After the message informing you that the drive has been removed safely appears, disconnect the USB cable. When using other operating systems than above: Simply, disconnect the USB cable. C Viewing images using a CD-R/CD-RW drive You do not need to finalize the disc. You have to install DirectCD included in the supplied CD-ROM. For details on DirectCD, refer to the software operating instructions of DirectCD. Viewing images on a Macintosh computer Viewing images with a CD-ROM drive Finalize the disc beforehand (page 32). You have to install the driver, Adaptec UDF Volume Access included in the supplied CD-ROM (SPVD-006). 1 Start up your computer and allow the Mac OS to load. 2 Insert the supplied CD-ROM (SPVD-006) in the CD-ROM drive of your computer. 3 Double-click the CD-ROM drive icon to open the window. 4 Double-click the icon of the hard disk containing the OS to open the window. 5 Move the driver, "Adaptec UDF Volume Access" from the window opened in step 3 to the "System Folder" folder in the window opened in step 4 (drag and drop). 6 When "Put these items into the Extensions folder?" appears, click "OK." 7 Restart your computer. Viewing images 1 Start up your computer and insert the disc into the CD-ROM drive of your computer. 41
-
 1
1 -
2
-
3
-
4
-
5
-
6
-
7
-
8
-
9
-
10
-
11
-
12
-
13
-
14
-
15
-
16
-
17
-
18
-
19
-
20
-
21
-
22
-
23
-
24
-
25
-
26
-
27
-
28
-
29
-
30
-
31
-
32
-
33
-
34
-
35
-
 36
36 -
 37
37 -
 38
38 -
 39
39 -
 40
40 -
 41
41 -
 42
42 -
 43
43 -
 44
44 -
 45
45 -
 46
46 -
47
-
48
-
49
-
50
-
51
-
52
-
53
-
54
-
55
-
56
-
57
-
58
-
59
-
60
-
61
-
62
-
63
-
64
-
65
-
66
-
67
-
68
-
69
-
70
-
71
-
72
-
73
-
74
-
75
-
76
-
77
-
78
-
79
-
80
-
81
-
82
-
83
-
84
-
85
-
86
-
87
-
88
-
89
-
90
-
91
-
92
-
93
-
94
-
95
-
96
-
97
-
98
-
99
-
100
-
101
-
102
-
103
-
104
-
105
-
106
-
107
-
108
 |
 |
