Sony MVCCD300 Operating Instructions - Page 27
press the shutter button again.
 |
UPC - 027242589223
View all Sony MVCCD300 manuals
Add to My Manuals
Save this manual to your list of manuals |
Page 27 highlights
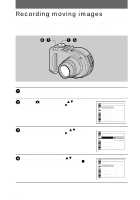
B Recording 5 Set the mode dial to . The preparation for recording a moving image is complete. 6 Press the shutter button fully down. "REC" appears on the LCD screen and the image and sound are recorded on the disc. 7 Press the shutter button fully down again to stop recording. The recording automatically stops in the following time even if you do not press the shutter button again. When selecting the 320 (HQ) size: Approximate 15 seconds When selecting the 320×240 size: Approximate 1 minute When selecting the 160×112 size: Approximate 4 minutes For details on the image size, see "Setting the image size (IMAGE SIZE)" on page 53. Adjusting the brightness of the LCD screen, zooming or using the self-timer See pages 22 to 24. The indicators on the LCD screen during recording Press DISPLAY/LCD BACK LIGHT ON/OFF to turn on/off the indicators on the LCD screen. These indicators are not recorded. See page 105 for a detailed description of the indicators. 27
-
 1
1 -
2
-
3
-
4
-
5
-
6
-
7
-
8
-
9
-
10
-
11
-
12
-
13
-
14
-
15
-
16
-
17
-
18
-
19
-
20
-
21
-
 22
22 -
 23
23 -
 24
24 -
 25
25 -
 26
26 -
 27
27 -
 28
28 -
 29
29 -
 30
30 -
 31
31 -
 32
32 -
33
-
34
-
35
-
36
-
37
-
38
-
39
-
40
-
41
-
42
-
43
-
44
-
45
-
46
-
47
-
48
-
49
-
50
-
51
-
52
-
53
-
54
-
55
-
56
-
57
-
58
-
59
-
60
-
61
-
62
-
63
-
64
-
65
-
66
-
67
-
68
-
69
-
70
-
71
-
72
-
73
-
74
-
75
-
76
-
77
-
78
-
79
-
80
-
81
-
82
-
83
-
84
-
85
-
86
-
87
-
88
-
89
-
90
-
91
-
92
-
93
-
94
-
95
-
96
-
97
-
98
-
99
-
100
-
101
-
102
-
103
-
104
-
105
-
106
-
107
-
108
 |
 |
