Sony STR-DA3700ES Operating Instructions - Page 94
Automatic Phase Matching, Speaker Connection, Speaker Setup
 |
View all Sony STR-DA3700ES manuals
Add to My Manuals
Save this manual to your list of manuals |
Page 94 highlights
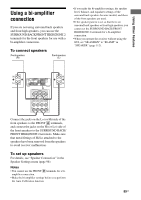
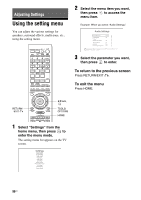
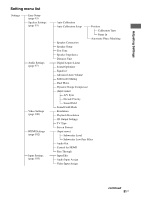
To set a compensation type for the speakers You can select the compensation type to be used for the speakers for each Position. 1 Select the "Position" for which you want to set the speaker compensation type, then press . 2 Select the "Calibration Type" you want, then press . • Full Flat Makes the measurement of frequency from each speaker flat. • Engineer Sets the frequency to match that of the Sony listening room standard. • Front Reference Adjusts the characteristics of all the speakers to match the characteristics of the front speakers. • Off Sets the Auto Calibration EQ to off. Note You cannot set the "Calibration Type" for "Position" for which the measurement results have not been registered. To name the Position 1 Select the "Position" for which you want to name, then press . 2 Select "Name In," then press . The soft keyboard appears on the screen. 3 Press V/v/B/b and to select a character one by one. 4 Select "Finish," then press . Automatic Phase Matching Lets you set the A.P.M. (Automatic Phase Matching) function in the D.C.A.C. (Digital Cinema Auto Calibration) function (page 93). x OFF Does not activate the A.P.M. function. x AUTO Switches the A.P.M. function on or off automatically. Notes • This function does not work in the following cases. - "OFF" is selected for the calibration type (page 93). - Analog audio signals are input. - "2ch Analog Direct" is being used. • The receiver may play back signals at a lower sampling frequency than the actual sampling frequency of the input signals, depending on the audio format. Speaker Connection Lets you adjust each speaker manually. You can also adjust the speaker levels after the Easy Setup is completed. The Speaker Settings are only for the current "Position." You can make the following settings using the wizard. - Settings for the speaker pattern for the speaker system you are using - Settings for the SURROUND BACK/ FRONT HIGH/ZONE 2 terminals for a biamplifier connection or a zone 2 connection ("SB Assign") Note If the speaker pattern is set so that there are surround back speakers or front high speakers, you cannot set the SURROUND BACK/FRONT HIGH/ZONE 2 terminals for a bi-amplifier connection or a zone 2 connection. Speaker Setup Lets you adjust each speaker manually on the Manual Setup screen. You can also adjust the speaker levels after "Auto Calibration" is completed. Select "Level/Distance/Size," then press . 94US
-
 1
1 -
2
-
3
-
4
-
5
-
6
-
7
-
8
-
9
-
10
-
11
-
12
-
13
-
14
-
15
-
16
-
17
-
18
-
19
-
20
-
21
-
22
-
23
-
24
-
25
-
26
-
27
-
28
-
29
-
30
-
31
-
32
-
33
-
34
-
35
-
36
-
37
-
38
-
39
-
40
-
41
-
42
-
43
-
44
-
45
-
46
-
47
-
48
-
49
-
50
-
51
-
52
-
53
-
54
-
55
-
56
-
57
-
58
-
59
-
60
-
61
-
62
-
63
-
64
-
65
-
66
-
67
-
68
-
69
-
70
-
71
-
72
-
73
-
74
-
75
-
76
-
77
-
78
-
79
-
80
-
81
-
82
-
83
-
84
-
85
-
86
-
87
-
88
-
 89
89 -
 90
90 -
 91
91 -
 92
92 -
 93
93 -
 94
94 -
 95
95 -
 96
96 -
 97
97 -
 98
98 -
 99
99 -
100
-
101
-
102
-
103
-
104
-
105
-
106
-
107
-
108
-
109
-
110
-
111
-
112
-
113
-
114
-
115
-
116
-
117
-
118
-
119
-
120
-
121
-
122
-
123
-
124
-
125
-
126
-
127
-
128
-
129
-
130
-
131
-
132
-
133
-
134
-
135
-
136
-
137
-
138
-
139
-
140
-
141
-
142
-
143
-
144
-
145
-
146
 |
 |
