Sony STR-DH710 Operating Instructions - Page 33
Preparing the Receiver, Initializing the receiver, Selecting the speaker system
 |
UPC - 027242779976
View all Sony STR-DH710 manuals
Add to My Manuals
Save this manual to your list of manuals |
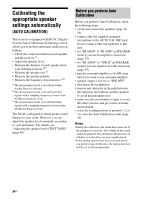
Page 33 highlights
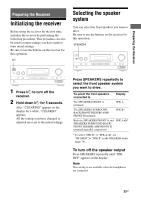
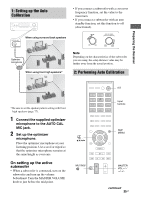
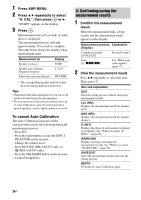
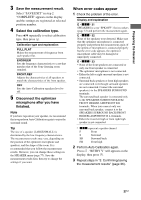
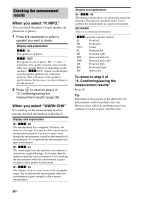
Preparing the Receiver Preparing the Receiver Initializing the receiver Before using the receiver for the first time, initialize the receiver by performing the following procedure. This procedure can also be used to return settings you have made to their initial settings. Be sure to use the buttons on the receiver for this operation. ?/1 ?/1 SPEAKERS TONE INPUT SELECTOR PHONES TONE MODE INPUT MODE TUNING MODE TUNING MEMORY/ 2CH/ ENTER A.DIRECT A.F.D. MOVIE MUSIC MASTER VOLUME DISPLAY DIMMER MUTING VIDEO 2 IN AUTO CAL MIC VIDEO L AUDIO R 1 Press ?/1 to turn off the receiver. 2 Hold down ?/1 for 5 seconds. After "CLEARING" appears on the display for a while, "CLEARED" appears. All the settings you have changed or adjusted are reset to the initial settings. Selecting the speaker system You can select the front speakers you want to drive. Be sure to use the buttons on the receiver for this operation. SPEAKERS ?/1 Press SPEAKERS repeatedly to select the front speaker system you want to drive. To select the front speakers connected to Display The SPEAKERS FRONT A terminals The SPEAKERS SURROUND BACK/FRONT HIGH/BI-AMP/ FRONT B terminals SPK A SPK B* Both the SPEAKERS FRONT A and SPK A+B* SPEAKERS SURROUND BACK/ FRONT HIGH/BI-AMP/FRONT B terminals (parallel connection) * To select "SPK B" or "SPK A+B", set "SB ASGN" to "SPK B" in the SPEAKER menu (page 79). To turn off the speaker output Press SPEAKERS repeatedly until "SPK OFF" appears on the display. Note This setting is not available when the headphones are connected. 33GB
-
 1
1 -
2
-
3
-
4
-
5
-
6
-
7
-
8
-
9
-
10
-
11
-
12
-
13
-
14
-
15
-
16
-
17
-
18
-
19
-
20
-
21
-
22
-
23
-
24
-
25
-
26
-
27
-
 28
28 -
 29
29 -
 30
30 -
 31
31 -
 32
32 -
 33
33 -
 34
34 -
 35
35 -
 36
36 -
 37
37 -
 38
38 -
39
-
40
-
41
-
42
-
43
-
44
-
45
-
46
-
47
-
48
-
49
-
50
-
51
-
52
-
53
-
54
-
55
-
56
-
57
-
58
-
59
-
60
-
61
-
62
-
63
-
64
-
65
-
66
-
67
-
68
-
69
-
70
-
71
-
72
-
73
-
74
-
75
-
76
-
77
-
78
-
79
-
80
-
81
-
82
-
83
-
84
-
85
-
86
-
87
-
88
-
89
-
90
-
91
-
92
-
93
-
94
-
95
-
96
-
97
-
98
-
99
-
100
 |
 |