Sony STR-DH710 Operating Instructions - Page 68
Advanced Operations, Switching between digital and analog audio (INPUT MODE)
 |
UPC - 027242779976
View all Sony STR-DH710 manuals
Add to My Manuals
Save this manual to your list of manuals |
Page 68 highlights
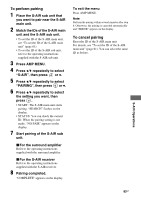
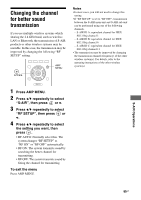
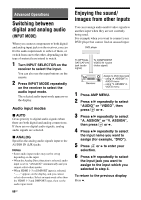
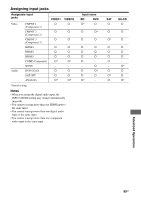
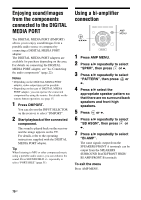
Advanced Operations Switching between digital and analog audio (INPUT MODE) When you connect components to both digital and analog input jacks on the receiver, you can fix the audio input mode to either of them, or switch from one to the other, depending on the type of material you intend to watch. 1 Turn INPUT SELECTOR on the receiver to select the input. You can also use the input buttons on the remote. 2 Press INPUT MODE repeatedly on the receiver to select the audio input mode. The selected audio input mode appears on the display. Audio input modes x AUTO Gives priority to digital audio signals when there are both digital and analog connections. If there are no digital audio signals, analog audio signals are selected. x ANALOG Specifies the analog audio signals input to the AUDIO IN (L/R) jacks. Notes • Some audio input modes may not be set up depending on the input. • When the Analog Direct function is selected, audio input is set to "ANALOG" automatically and you cannot select other modes. • When HDMI 1-3 or DMPORT input is selected, "------" appears on the display, and you cannot select other modes. Select an input mode other than the HDMI 1-3 and DMPORT input, then set the audio input mode. 68GB Enjoying the sound/ images from other inputs You can reassign audio and/or video signals to another input when they are not currently being used. For example when you want to connect your DVD player but cannot find an unused input: DVD player To OPTICAL SAT/CATV IN jack (audio signal) To COMPONENT VIDEO IN 1 jacks (video signal) ?/1 Receiver Assign to DVD input jack - using "A. ASSIGN" in AUDIO menu - using "V. ASSIGN" in VIDEO menu 1 Press AMP MENU. 2 Press V/v repeatedly to select "AUDIO" or "VIDEO", then press or b. 3 Press V/v repeatedly to select "A. ASSIGN" or "V. ASSIGN", then press or b. 4 Press V/v repeatedly to select the input name you want to assign (for example, "DVD"). 5 Press or b to enter your selection. 6 Press V/v repeatedly to select the input jack you want to assign to the input which you selected in step 4. To return to the previous display Press B.
-
 1
1 -
2
-
3
-
4
-
5
-
6
-
7
-
8
-
9
-
10
-
11
-
12
-
13
-
14
-
15
-
16
-
17
-
18
-
19
-
20
-
21
-
22
-
23
-
24
-
25
-
26
-
27
-
28
-
29
-
30
-
31
-
32
-
33
-
34
-
35
-
36
-
37
-
38
-
39
-
40
-
41
-
42
-
43
-
44
-
45
-
46
-
47
-
48
-
49
-
50
-
51
-
52
-
53
-
54
-
55
-
56
-
57
-
58
-
59
-
60
-
61
-
62
-
 63
63 -
 64
64 -
 65
65 -
 66
66 -
 67
67 -
 68
68 -
 69
69 -
 70
70 -
 71
71 -
 72
72 -
 73
73 -
74
-
75
-
76
-
77
-
78
-
79
-
80
-
81
-
82
-
83
-
84
-
85
-
86
-
87
-
88
-
89
-
90
-
91
-
92
-
93
-
94
-
95
-
96
-
97
-
98
-
99
-
100
 |
 |