Sony XAVW1 Operating Instructions - Page 29
Advanced Operations - Radio, Storing and receiving stations, Storing automatically - BTM - xplod
 |
UPC - 027242706484
View all Sony XAVW1 manuals
Add to My Manuals
Save this manual to your list of manuals |
Page 29 highlights
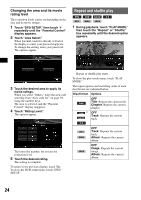
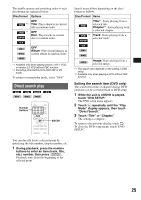
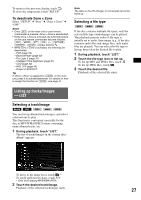
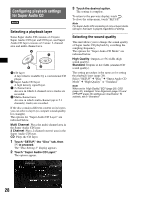
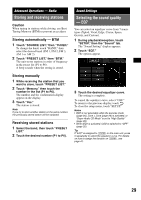
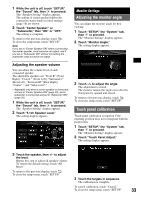
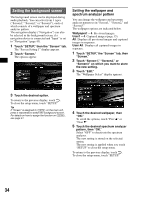
Advanced Operations - Radio Storing and receiving stations Caution When tuning in stations while driving, use Best Tuning Memory (BTM) to prevent an accident. Storing automatically - BTM 1 Touch "SOURCE LIST," then "TUNER." To change the band, touch "BAND," then select the desired band (FM 1, FM 2, FM 3, AM 1 or AM 2). 2 Touch "PRESET LIST," then "BTM." The unit stores stations in order of frequency in the preset list (P1 to P6). A beep sounds when the setting is stored. Sound Settings Selecting the sound quality - EQ7 You can select an equalizer curve from 7 music types (Xplod, Vocal, Edge, Cruise, Space, Gravity, and Custom). 1 During playback/reception, touch "SETUP," then the "Sound" tab. The "Sound Setting" display appears. 2 Touch "EQ7." The options appear. Storing manually 1 While receiving the station that you want to store, touch "PRESET LIST." 2 Touch "Memory," then touch the number in the list (P1 to P6). The number and the confirmation display appear on the display. 3 Touch "Yes." The station is stored. Note If you try to store another station on the same number, the previously stored station will be replaced. Receiving stored stations 1 Select the band, then touch "PRESET LIST." 2 Touch the desired number (P1 to P6). 3 Touch the desired equalizer curve. The setting is complete. To cancel the equalizer curve, select "OFF." To return to the previous display, touch . To close the setup menu, touch "SETUP." Notes • EQ7 is not selectable while the karaoke mode (page 26), Zone × Zone (page 26) is activated, or "Super Audio CD Mode" is set to "High Quality" (page 28). • When EQ7 is activated, CSO is switched to "OFF" (page 32). Tip If "EQ7" is assigned to (CSTM) on the main unit, press it repeatedly to select the equalizer curve. For details on how to assign the function on (CSTM), see page 41. 29
-
 1
1 -
2
-
3
-
4
-
5
-
6
-
7
-
8
-
9
-
10
-
11
-
12
-
13
-
14
-
15
-
16
-
17
-
18
-
19
-
20
-
21
-
22
-
23
-
 24
24 -
 25
25 -
 26
26 -
 27
27 -
 28
28 -
 29
29 -
 30
30 -
 31
31 -
 32
32 -
 33
33 -
 34
34 -
35
-
36
-
37
-
38
-
39
-
40
-
41
-
42
-
43
-
44
-
45
-
46
-
47
-
48
-
49
-
50
-
51
-
52
-
53
-
54
-
55
-
56
-
57
-
58
-
59
-
60
-
61
-
62
-
63
-
64
-
65
-
66
-
67
-
68
-
69
-
70
-
71
-
72
-
73
-
74
-
75
-
76
-
77
-
78
-
79
-
80
-
81
-
82
-
83
-
84
-
85
-
86
-
87
-
88
-
89
-
90
-
91
-
92
-
93
-
94
-
95
-
96
-
97
-
98
-
99
-
100
-
101
-
102
-
103
-
104
-
105
-
106
-
107
-
108
-
109
-
110
-
111
-
112
-
113
-
114
-
115
-
116
-
117
-
118
-
119
-
120
-
121
-
122
-
123
-
124
-
125
-
126
-
127
-
128
-
129
-
130
-
131
-
132
-
133
-
134
-
135
-
136
-
137
-
138
-
139
-
140
-
141
-
142
-
143
-
144
-
145
-
146
-
147
-
148
-
149
-
150
-
151
-
152
-
153
-
154
-
155
-
156
-
157
-
158
-
159
-
160
-
161
-
162
-
163
-
164
-
165
-
166
-
167
-
168
-
169
-
170
-
171
-
172
-
173
-
174
-
175
-
176
-
177
-
178
-
179
-
180
-
181
-
182
-
183
-
184
-
185
-
186
-
187
-
188
-
189
-
190
-
191
-
192
-
193
-
194
-
195
-
196
 |
 |
