Sony XAVW1 Operating Instructions - Page 34
Setting the background screen, Setting the wallpaper and spectrum analyzer pattern
 |
UPC - 027242706484
View all Sony XAVW1 manuals
Add to My Manuals
Save this manual to your list of manuals |
Page 34 highlights
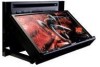
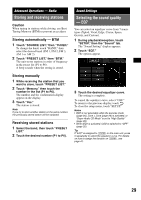
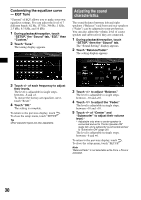
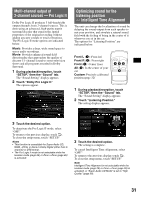
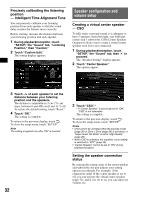
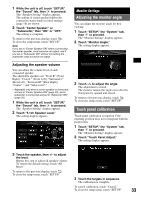
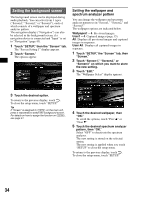
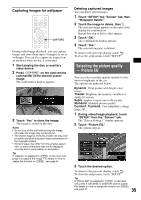
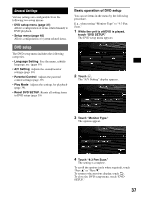
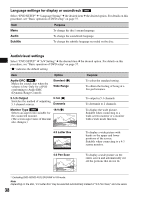
Setting the background screen The background screen can be displayed during audio playback. You can select from 3 types ("Screen1," "Screen2," or "Screen3"), each of which consists of a wallpaper and spectrum analyzer pattern. The navigation display ("Navigation") can also be selected as the background screen, if a navigation device is connected and "Input" is set to "Navigation" (page 43). 1 Touch "SETUP," then the "Screen" tab. The "Screen Setting 1" display appears. 2 Touch "Screen." The options appear. Setting the wallpaper and spectrum analyzer pattern You can change the wallpaper and spectrum analyzer pattern set in "Screen1," "Screen2," and "Screen3." The wallpaper options are indicated below. Wallpaper1 - 4: Pre-stored images. User1 - 4: Captured images (page 35). All: Displays all pre-stored images and captured images in sequence. User All: Displays all captured images in sequence. 1 Touch "SETUP," the "Screen" tab, then "Screen." 2 Touch "Screen1," "Screen2," or "Screen3" on which you want to store the new setting. 3 Touch "Edit." The "Wallpaper Select" display appears. 3 Touch the desired option. To return to the previous display, touch . To close the setup menu, touch "SETUP." Tip If "Screen" is assigned to (CSTM) on the main unit, press it repeatedly to switch the background screen. For details on how to assign the function on (CSTM), see page 41. 4 Touch the desired wallpaper, then "OK." To scroll the options, touch "Prev v" or "Next V." 5 Touch the desired spectrum analyzer pattern, then "OK." Select "OFF" to deactivate the spectrum analyzer. The new setting is stored on the selected option. The new setting is applied when you touch "SETUP" to close the setup menu. To return to the previous display, touch . To close the setup menu, touch "SETUP." 34
-
 1
1 -
2
-
3
-
4
-
5
-
6
-
7
-
8
-
9
-
10
-
11
-
12
-
13
-
14
-
15
-
16
-
17
-
18
-
19
-
20
-
21
-
22
-
23
-
24
-
25
-
26
-
27
-
28
-
 29
29 -
 30
30 -
 31
31 -
 32
32 -
 33
33 -
 34
34 -
 35
35 -
 36
36 -
 37
37 -
 38
38 -
 39
39 -
40
-
41
-
42
-
43
-
44
-
45
-
46
-
47
-
48
-
49
-
50
-
51
-
52
-
53
-
54
-
55
-
56
-
57
-
58
-
59
-
60
-
61
-
62
-
63
-
64
-
65
-
66
-
67
-
68
-
69
-
70
-
71
-
72
-
73
-
74
-
75
-
76
-
77
-
78
-
79
-
80
-
81
-
82
-
83
-
84
-
85
-
86
-
87
-
88
-
89
-
90
-
91
-
92
-
93
-
94
-
95
-
96
-
97
-
98
-
99
-
100
-
101
-
102
-
103
-
104
-
105
-
106
-
107
-
108
-
109
-
110
-
111
-
112
-
113
-
114
-
115
-
116
-
117
-
118
-
119
-
120
-
121
-
122
-
123
-
124
-
125
-
126
-
127
-
128
-
129
-
130
-
131
-
132
-
133
-
134
-
135
-
136
-
137
-
138
-
139
-
140
-
141
-
142
-
143
-
144
-
145
-
146
-
147
-
148
-
149
-
150
-
151
-
152
-
153
-
154
-
155
-
156
-
157
-
158
-
159
-
160
-
161
-
162
-
163
-
164
-
165
-
166
-
167
-
168
-
169
-
170
-
171
-
172
-
173
-
174
-
175
-
176
-
177
-
178
-
179
-
180
-
181
-
182
-
183
-
184
-
185
-
186
-
187
-
188
-
189
-
190
-
191
-
192
-
193
-
194
-
195
-
196
 |
 |
