Sony XAVW1 Operating Instructions - Page 48
Using Optional Equipment, Auxiliary audio/video equipment, Back camera/navigation device
 |
UPC - 027242706484
View all Sony XAVW1 manuals
Add to My Manuals
Save this manual to your list of manuals |
Page 48 highlights
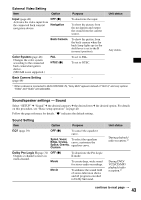
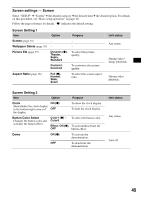
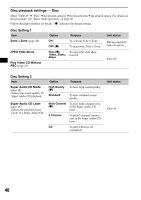
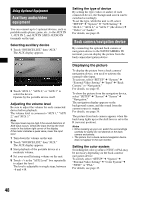
Using Optional Equipment Auxiliary audio/video equipment You can connect up to 3 optional devices, such as portable media player, game, etc., to the AUX IN 1, AUX IN 2, and AUX IN 3/BUS AUDIO IN terminals on the unit. Selecting auxiliary device 1 Touch "SOURCE LIST," then "AUX." The AUX display appears. 2 Touch "AUX 1," "AUX 2," or "AUX 3" to select the device. Operate by the portable device itself. Adjusting the volume level Be sure to adjust the volume for each connected device before playback. The volume level is common to "AUX 1," "AUX 2," and "AUX 3." Note The input level may be high if the sound distortion of AUX input occurs. Check the input level by the level meter in the bottom right corner of the display. If the meter indicates a peak value, lower the input level. 1 Turn down the volume on the unit. 2 Touch "SOURCE LIST," then "AUX." The AUX display appears. 3 Start playback of the portable device at a moderate volume. 4 Set your usual listening volume on the unit. 5 Touch -/+ in the "AUX Level" box repeatedly to adjust the level. The level is adjustable in single steps, between -6 and +18. Setting the type of device By setting the type (video or audio) of each connected device, the background screen can be switched accordingly. To set the type, while the unit is off, select "SETUP" c "System" c "AUX Setting" c "AUX 1," "AUX 2," or "AUX 3" (the device) c "Video" or "Audio." For details, see page 42. Back camera/navigation device By connecting the optional back camera or navigation device to the NAVI/CAMERA IN terminal, you can display the picture from the back camera/navigation device. Displaying the picture To display the picture from a back camera/ navigation device, you need to activate the external video input. To activate, select "SETUP" c "System" c "External Video Setting" c "Input" c "Back Camera" or "Navigation." For details, see page 43. To show the picture from the navigation device, select "SETUP" c "Screen" c "Screen" c "Navigation." The navigation display appears on the background screen, and the sound from the current source is output. For details, see page 34. The picture from back camera appears when the back lamp lights up (or the shift lever is set to the R (reverse) position). Notes • When backing up your car, watch the surroundings carefully for safety. Do not depend on the back camera exclusively. • The picture from a back camera/navigation device does not appear in the rear monitor. Setting the color system Switching the color system to NTSC or PAL may be necessary depending on the back camera/ navigation device. To switch, select "SETUP" c "System" c "External Video Setting" c "Color System" c "NTSC" or "PAL." For details, see page 43. 48
-
 1
1 -
2
-
3
-
4
-
5
-
6
-
7
-
8
-
9
-
10
-
11
-
12
-
13
-
14
-
15
-
16
-
17
-
18
-
19
-
20
-
21
-
22
-
23
-
24
-
25
-
26
-
27
-
28
-
29
-
30
-
31
-
32
-
33
-
34
-
35
-
36
-
37
-
38
-
39
-
40
-
41
-
42
-
 43
43 -
 44
44 -
 45
45 -
 46
46 -
 47
47 -
 48
48 -
 49
49 -
 50
50 -
 51
51 -
 52
52 -
 53
53 -
54
-
55
-
56
-
57
-
58
-
59
-
60
-
61
-
62
-
63
-
64
-
65
-
66
-
67
-
68
-
69
-
70
-
71
-
72
-
73
-
74
-
75
-
76
-
77
-
78
-
79
-
80
-
81
-
82
-
83
-
84
-
85
-
86
-
87
-
88
-
89
-
90
-
91
-
92
-
93
-
94
-
95
-
96
-
97
-
98
-
99
-
100
-
101
-
102
-
103
-
104
-
105
-
106
-
107
-
108
-
109
-
110
-
111
-
112
-
113
-
114
-
115
-
116
-
117
-
118
-
119
-
120
-
121
-
122
-
123
-
124
-
125
-
126
-
127
-
128
-
129
-
130
-
131
-
132
-
133
-
134
-
135
-
136
-
137
-
138
-
139
-
140
-
141
-
142
-
143
-
144
-
145
-
146
-
147
-
148
-
149
-
150
-
151
-
152
-
153
-
154
-
155
-
156
-
157
-
158
-
159
-
160
-
161
-
162
-
163
-
164
-
165
-
166
-
167
-
168
-
169
-
170
-
171
-
172
-
173
-
174
-
175
-
176
-
177
-
178
-
179
-
180
-
181
-
182
-
183
-
184
-
185
-
186
-
187
-
188
-
189
-
190
-
191
-
192
-
193
-
194
-
195
-
196
 |
 |
