Sony XAVW1 Operating Instructions - Page 33
Adjusting the speaker volume, Monitor Settings, Adjusting the monitor angle, Touch panel calibration
 |
UPC - 027242706484
View all Sony XAVW1 manuals
Add to My Manuals
Save this manual to your list of manuals |
Page 33 highlights
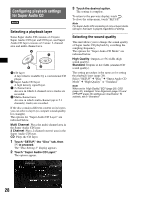
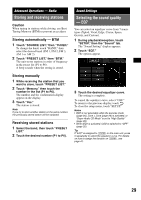
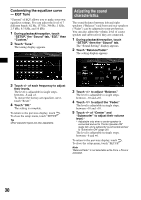
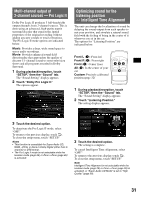
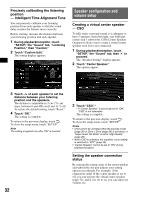
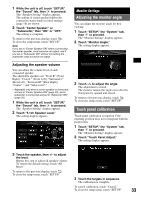
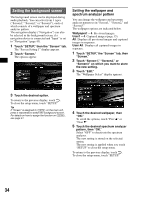
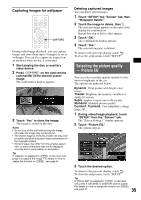
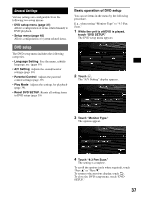
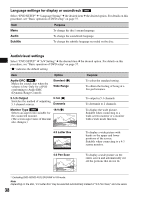
1 While the unit is off, touch "SETUP," the "Sound" tab, then to proceed. The "Speaker Setting" display appears. The setting of center speaker/subwoofer connection status made in initial settings (page 14) are shown. 2 Touch "Center Speaker" or "Subwoofer," then "ON" or "OFF." The setting is complete. To return to the previous display, touch . To close the setup menu, touch "SETUP." Note If you set to "Center Speaker ON" without connecting the center speaker, vocal sound is not output, and if you set to "Subwoofer ON" without connecting the subwoofer, bass sound is not output. Adjusting the speaker volume You can adjust the volume level of each connected speaker. The adjustable speakers are "Front R" (Front Right), "Front L" (Front Left), "Surround L" (Rear Left), "Surround R" (Rear Right), "Center*," and "Subwoofer*." * Adjustable only when a center speaker is connected and set to "Center Speaker ON" (page 32), and a subwoofer is connected and set to "Subwoofer ON" (page 32). 1 While the unit is off, touch "SETUP," the "Sound" tab, then to proceed. The "Speaker Setting" display appears. 2 Touch "5.1ch Speaker Level." The setting display appears. Monitor Settings Adjusting the monitor angle You can adjust the monitor angle for best viewing. 1 Touch "SETUP," the "System" tab, then to proceed. The "Monitor Setting" display appears. 2 Touch "Monitor Angle." The setting display appears. 3 Touch -/+ to adjust the angle. The adjustment is stored. The monitor retains the angle even after the front panel is opened and closed. To return to the previous display, touch . To close the setup menu, touch "SETUP." Touch panel calibration Touch panel calibration is required if the touching position does not correspond with the proper item. 1 Touch "SETUP," the "System" tab, then to proceed. The "Monitor Setting" display appears. 2 Touch "Touch Panel Adjust." The setting display appears. 3 Touch the speaker, then +/- to adjust the level. Repeat this step to adjust all speaker volume. To restore the default setting, touch "All Reset." To return to the previous display, touch . To close the setup menu, touch "SETUP." 3 Touch the targets in sequence. The calibration is complete. To cancel calibration, touch "Cancel." To close the setup menu, touch "SETUP." 33
-
 1
1 -
2
-
3
-
4
-
5
-
6
-
7
-
8
-
9
-
10
-
11
-
12
-
13
-
14
-
15
-
16
-
17
-
18
-
19
-
20
-
21
-
22
-
23
-
24
-
25
-
26
-
27
-
 28
28 -
 29
29 -
 30
30 -
 31
31 -
 32
32 -
 33
33 -
 34
34 -
 35
35 -
 36
36 -
 37
37 -
 38
38 -
39
-
40
-
41
-
42
-
43
-
44
-
45
-
46
-
47
-
48
-
49
-
50
-
51
-
52
-
53
-
54
-
55
-
56
-
57
-
58
-
59
-
60
-
61
-
62
-
63
-
64
-
65
-
66
-
67
-
68
-
69
-
70
-
71
-
72
-
73
-
74
-
75
-
76
-
77
-
78
-
79
-
80
-
81
-
82
-
83
-
84
-
85
-
86
-
87
-
88
-
89
-
90
-
91
-
92
-
93
-
94
-
95
-
96
-
97
-
98
-
99
-
100
-
101
-
102
-
103
-
104
-
105
-
106
-
107
-
108
-
109
-
110
-
111
-
112
-
113
-
114
-
115
-
116
-
117
-
118
-
119
-
120
-
121
-
122
-
123
-
124
-
125
-
126
-
127
-
128
-
129
-
130
-
131
-
132
-
133
-
134
-
135
-
136
-
137
-
138
-
139
-
140
-
141
-
142
-
143
-
144
-
145
-
146
-
147
-
148
-
149
-
150
-
151
-
152
-
153
-
154
-
155
-
156
-
157
-
158
-
159
-
160
-
161
-
162
-
163
-
164
-
165
-
166
-
167
-
168
-
169
-
170
-
171
-
172
-
173
-
174
-
175
-
176
-
177
-
178
-
179
-
180
-
181
-
182
-
183
-
184
-
185
-
186
-
187
-
188
-
189
-
190
-
191
-
192
-
193
-
194
-
195
-
196
 |
 |
