Sony XBR-49X950H User Manual - Page 54
To view content stored on a digital still camera/camcorder, To check the supported file formats, Hint
 |
View all Sony XBR-49X950H manuals
Add to My Manuals
Save this manual to your list of manuals |
Page 54 highlights
To view content stored on a digital still camera/camcorder 1 After connecting the digital still camera/camcorder, turn it on. 2 Press the INPUT button repeatedly to select the connected digital still camera/camcorder. 3 Start playback on the connected digital still camera/camcorder. To check the supported file formats Supported files and formats Hint If you connect a BRAVIA Sync-compatible device, you can operate it by simply using the TV's remote control. Make sure that the device is BRAVIA Sync-compatible. Some devices may not be compatible with BRAVIA Sync even though they have an HDMI jack (socket). Related topics BRAVIA Sync-compatible devices [65] Using the TV with Other Devices | Computers, cameras, and camcorders Computer video signal specifications (Resolution, Horizontal frequency/Vertical frequency) 640 x 480, 31.5 kHz/60 Hz 800 x 600, 37.9 kHz/60 Hz 1024 x 768, 48.4 kHz/60 Hz 1152 x 864, 67.5 kHz/75 Hz 1280 x 1024, 64.0 kHz/60 Hz 1600 x 900, 56.0 kHz/60 Hz 1680 x 1050, 65.3 kHz/60 Hz 1920 x 1080, 67.5 kHz/60 Hz * 3840 x 2160, 67.5 kHz/30 Hz 3840 x 2160, 135.0 kHz/60 Hz (8 bits) * 1920 x 1080 timing, when applied to the HDMI input, will be treated as a video timing and not computer timing. This will affect the [Screen] settings in [Display & Sound]. To view computer content, set [Wide mode] to [Full], and [Display area] to [+1] . ([Display area] is configurable only when [Auto display area] is disabled.) Note The picture may be blurry and may not be displayed correctly depending on your connection status. In this case, change the computer's settings and select a different input signal in "Supported computer input signals". [66] Using the TV with Other Devices Audio system (such as an AV receiver or sound bar) Outputting audio from an audio system Connecting an audio system Adjusting an audio system
-
 1
1 -
2
-
3
-
4
-
5
-
6
-
7
-
8
-
9
-
10
-
11
-
12
-
13
-
14
-
15
-
16
-
17
-
18
-
19
-
20
-
21
-
22
-
23
-
24
-
25
-
26
-
27
-
28
-
29
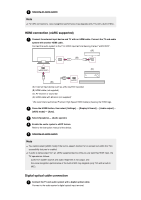
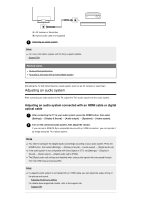
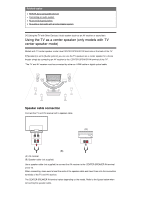
-
30
-
31
-
32
-
33
-
34
-
35
-
36
-
37
-
38
-
39
-
40
-
41
-
42
-
43
-
44
-
45
-
46
-
47
-
48
-
 49
49 -
 50
50 -
 51
51 -
 52
52 -
 53
53 -
 54
54 -
 55
55 -
 56
56 -
 57
57 -
 58
58 -
 59
59 -
60
-
61
-
62
-
63
-
64
-
65
-
66
-
67
-
68
-
69
-
70
-
71
-
72
-
73
-
74
-
75
-
76
-
77
-
78
-
79
-
80
-
81
-
82
-
83
-
84
-
85
-
86
-
87
-
88
-
89
-
90
-
91
-
92
-
93
-
94
-
95
-
96
-
97
-
98
-
99
-
100
-
101
-
102
 |
 |
