Sony XBR-49X950H User Manual - Page 56
Note, HDMI connection (eARC supported), Digital optical cable connection
 |
View all Sony XBR-49X950H manuals
Add to My Manuals
Save this manual to your list of manuals |
Page 56 highlights
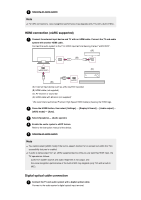
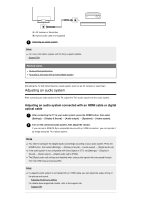
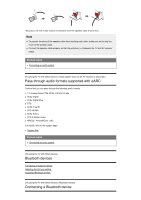
2 Adjusting an audio system Note For ARC connections, voice recognition performance may degrade (only TVs with a built-in MIC). HDMI connection (eARC supported) 1 Connect the external input device and TV with an HDMI cable. Connect the TV and audio system with another HDMI cable. Connect the audio system to the TV's HDMI input terminal bearing the text "eARC/ARC". (A) (B) (eARC/ARC) (C) (eARC) (D) (A) External input device (such as a Blu-ray/DVD recorder) (B) HDMI cable (not supplied) (C) AV receiver or sound bar (D) HDMI cable with Ethernet (not supplied)* * We recommend authorized Premium High Speed HDMI Cable(s) bearing the HDMI logo. 2 Press the HOME button, then select [Settings] - [Display & Sound] - [Audio output] - [eARC mode] - [Auto]. 3 Select [Speakers] - [Audio system]. 4 Enable the audio system's eARC feature. Refer to the instruction manual of the device. 5 Adjusting an audio system Note You cannot select [eARC mode] if the text-to-speech function for on-screen text within the TV's accessibility features is enabled. If audio is being output from an eARC supported device while you are watching HDMI input, the TV operates as follows: audio from system sounds and audio responses is not output, and the voice recognition performance of the built-in MIC may degrade (only TVs with a built-in MIC). Digital optical cable connection 1 Connect the TV and audio system with a digital optical cable. Connect to the audio system's digital optical input terminal.
-
 1
1 -
2
-
3
-
4
-
5
-
6
-
7
-
8
-
9
-
10
-
11
-
12
-
13
-
14
-
15
-
16
-
17
-
18
-
19
-
20
-
21
-
22
-
23
-
24
-
25
-
26
-
27
-
28
-
29
-
30
-
31
-
32
-
33
-
34
-
35
-
36
-
37
-
38
-
39
-
40
-
41
-
42
-
43
-
44
-
45
-
46
-
47
-
48
-
49
-
50
-
 51
51 -
 52
52 -
 53
53 -
 54
54 -
 55
55 -
 56
56 -
 57
57 -
 58
58 -
 59
59 -
 60
60 -
 61
61 -
62
-
63
-
64
-
65
-
66
-
67
-
68
-
69
-
70
-
71
-
72
-
73
-
74
-
75
-
76
-
77
-
78
-
79
-
80
-
81
-
82
-
83
-
84
-
85
-
86
-
87
-
88
-
89
-
90
-
91
-
92
-
93
-
94
-
95
-
96
-
97
-
98
-
99
-
100
-
101
-
102
 |
 |
