TASCAM DA-6400 DA-6400dp Owners Manual - Page 9
– Names and Functions of Parts, Front panel
 |
View all TASCAM DA-6400 manuals
Add to My Manuals
Save this manual to your list of manuals |
Page 9 highlights
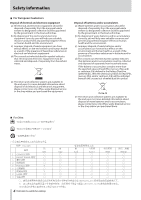
Front panel 88 DA-6400 front panel 2 - Names and Functions of Parts 88 DA-6400dp front panel 1 STANDBY/ON switch Use to turn the unit on and to put it into standby. Press and hold it when the power is on to open a pop-up message confirming that you want to put the unit into standby. When the pop-up is open, press and hold the MULTI JOG dial to put the unit into standby. CAUTION Before turning the unit on, lower the volumes of connected equipment to their minimum levels. Failure to do so could result in a sudden loud noise that could harm hearing, for example. 2 SSD/HDD SLOT Use this bay to insert and remove SSD/HDD cases. (See "Loading and removing SSD/HDD cases" on page 17.) CAUTION Do not remove the SSD/HDD case from the unit when the SSD/HDD is being accessed (during recording, playback, when data is being written or at other times when the SSD/ HDD case indicator is blinking orange). 3 RELEASE switch Slide the RELEASE switch toward > to unlock the loaded SSD/HDD case so that it can be removed. 4 Color display Shows a variety of information. 5 INFO button and indicator The INFO indicator lights blue when the unit is functioning properly. The INFO indicator lights red when an error or warning has occurred with the unit. Press this button when the INFO indicator is lit blue to show the unit's operation status on the display. Press this button when the INFO indicator is lit red to show the message on the display. (See "INFO button and indicator appearance" on page 51.) Press this button while pressing and holding the SHIFT button to open the MARK INFO screen. (See "Using marks" on page 45.) 6 HOME [METER] button oo Press when the Home Screen is open to change the time display mode. oo When a Menu Screen is open, press this button to return to the Home Screen. oo While pressing and holding this button, turn the MULTI JOG dial to adjust the brightness of the color display and the various indicators. (See "Adjusting the brightness" on page 19.) oo While pressing and holding this button, press and turn the MULTI JOG dial to adjust the brightness of just the color display. (See "Adjusting the brightness" on page 19.) oo When the meter mode setting is 32ch, press this button while pressing and holding the SHIFT button to switch between showing level meters for channels 1-32 and 33-64 on the Home Screen. (See "Setting the meter mode" on page 53.) 7 MULTI JOG dial This dial functions both as a dial when turned and as a button when pressed. Dial functions oo When the white solo selection frame is shown on the Home Screen, turn the MULTI JOG dial to move the solo selection frame for headphone output left and right to select the channel(s) output from the PHONES jack. oo When the gray solo selection frame is shown on the Home Screen, turn the MULTI JOG dial to move between marks in the current take. When there are no marks, turn to skip between takes. oo When a Menu Screen is open, turn to select items and change setting values. oo When editing names, use to select characters. oo While pressing and holding the HOME [METER] button, turn the MULTI JOG dial to adjust the brightness of the color display and the various indicators. oo While pressing and holding the HOME [METER] button, press and turn this dial to adjust the brightness of just the color display. 9 TASCAM DA-6400/DA-6400dp
-
 1
1 -
2
-
3
-
 4
4 -
 5
5 -
 6
6 -
 7
7 -
 8
8 -
 9
9 -
 10
10 -
 11
11 -
 12
12 -
 13
13 -
 14
14 -
15
-
16
-
17
-
18
-
19
-
20
-
21
-
22
-
23
-
24
-
25
-
26
-
27
-
28
-
29
-
30
-
31
-
32
-
33
-
34
-
35
-
36
-
37
-
38
-
39
-
40
-
41
-
42
-
43
-
44
-
45
-
46
-
47
-
48
-
49
-
50
-
51
-
52
-
53
-
54
-
55
-
56
-
57
-
58
-
59
-
60
-
61
-
62
-
63
-
64
 |
 |
