Toshiba Portege R400 PPR40C Users Manual Canada; English - Page 36
Display hinge, Display screen, Touch Pad, Touch Pad control, buttons, Keyboard, Speaker, Power button
 |
View all Toshiba Portege R400 PPR40C manuals
Add to My Manuals
Save this manual to your list of manuals |
Page 36 highlights
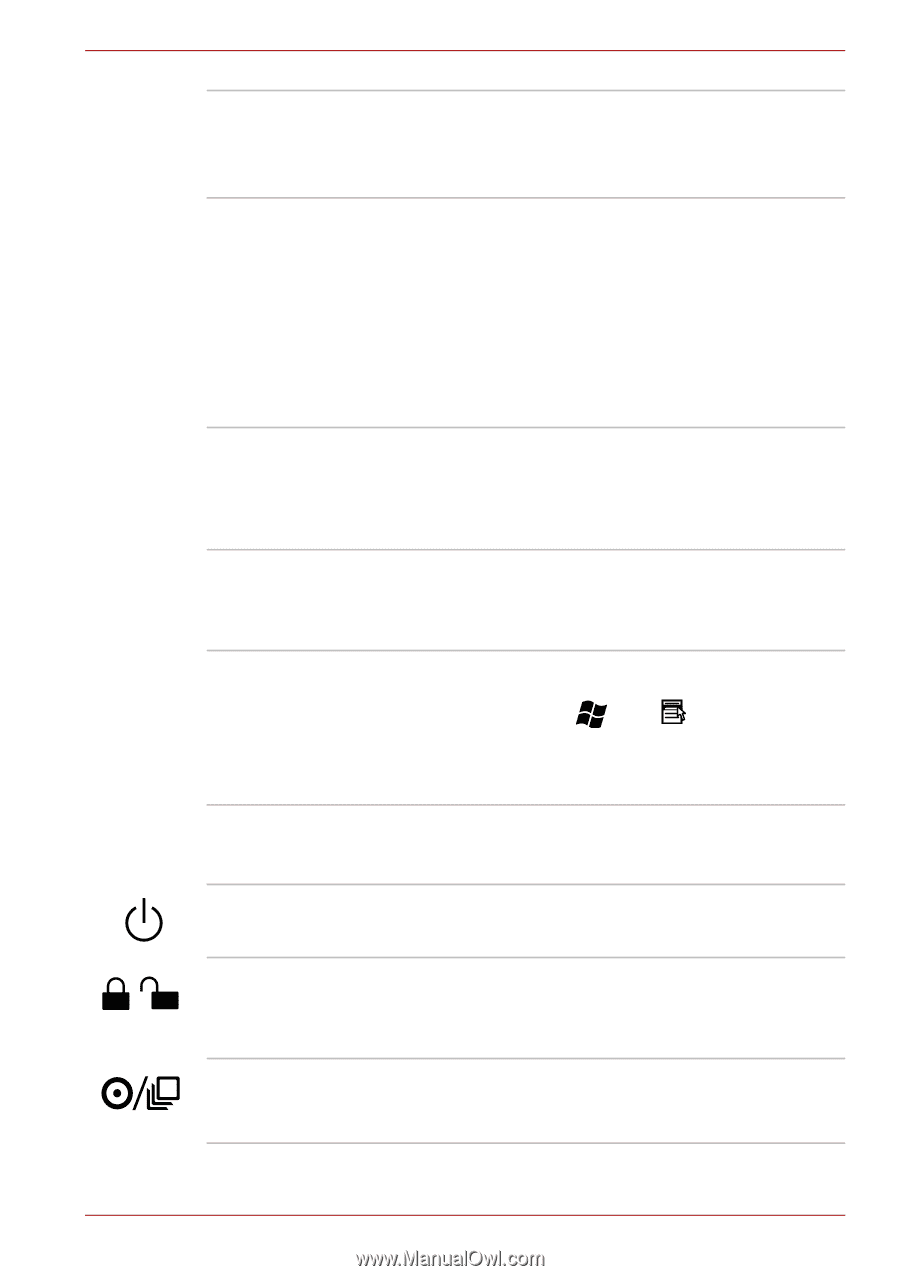
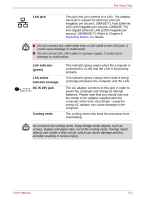
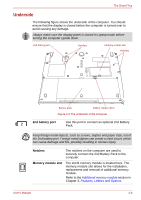
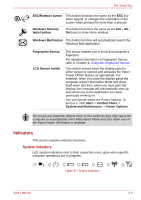
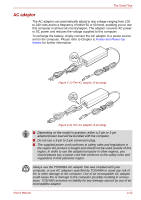
The Grand Tour Display hinge Display screen Touch Pad Touch Pad control buttons Keyboard Speaker Power button The display hinge allows the display panel to be position at a variety of easy-to-view angles. Rotate the computer on this fulcrum point when switching between Tablet and Laptop modes. Please be aware that, when the computer is operating on the AC adaptor, the image displayed on the internal screen will be somewhat brighter than when it operates on battery power. This difference in brightness levels is intended to save power when running on batteries. For more information on the computer's display, please refer to the Display Controller and Video mode section in Appendix B. The Touch Pad mouse control device located in the center of the palm rest is used to control the movement of the on-screen pointer. For more information, please refer to the Using the Touch Pad section in Chapter 4, Operating Basics. The control buttons located below the Touch Pad allow you to select menu items or manipulate text and graphics as designated by the on-screen pointer. The internal keyboard provides the embedded numeric overlay keys, dedicated cursor control overlay keys, and and Keys. The keyboard is compatible with the IBM® enhanced keyboard. Refer to Chapter 5, The Keyboard, for details. The internal monaural speaker emit sound generated by your software as well as audio alarms, generated by the system. Press this button to turn the computer's power on and off. Power Button Lock Switch Cross Function button This switch locks the Power button in order to prevent them from being accidentally pressed. Slide the switch to the left to lock the Power button. This button function will automatically open the Windows Mobility Center window. User's Manual 2-8
-
 1
1 -
2
-
3
-
4
-
5
-
6
-
7
-
8
-
9
-
10
-
11
-
12
-
13
-
14
-
15
-
16
-
17
-
18
-
19
-
20
-
21
-
22
-
23
-
24
-
25
-
26
-
27
-
28
-
29
-
30
-
 31
31 -
 32
32 -
 33
33 -
 34
34 -
 35
35 -
 36
36 -
 37
37 -
 38
38 -
 39
39 -
 40
40 -
 41
41 -
42
-
43
-
44
-
45
-
46
-
47
-
48
-
49
-
50
-
51
-
52
-
53
-
54
-
55
-
56
-
57
-
58
-
59
-
60
-
61
-
62
-
63
-
64
-
65
-
66
-
67
-
68
-
69
-
70
-
71
-
72
-
73
-
74
-
75
-
76
-
77
-
78
-
79
-
80
-
81
-
82
-
83
-
84
-
85
-
86
-
87
-
88
-
89
-
90
-
91
-
92
-
93
-
94
-
95
-
96
-
97
-
98
-
99
-
100
-
101
-
102
-
103
-
104
-
105
-
106
-
107
-
108
-
109
-
110
-
111
-
112
-
113
-
114
-
115
-
116
-
117
-
118
-
119
-
120
-
121
-
122
-
123
-
124
-
125
-
126
-
127
-
128
-
129
-
130
-
131
-
132
-
133
-
134
-
135
-
136
-
137
-
138
-
139
-
140
-
141
-
142
-
143
-
144
-
145
-
146
-
147
-
148
-
149
-
150
-
151
-
152
-
153
-
154
-
155
-
156
-
157
-
158
-
159
-
160
-
161
-
162
-
163
-
164
-
165
-
166
-
167
-
168
-
169
-
170
-
171
-
172
-
173
-
174
-
175
-
176
-
177
-
178
-
179
-
180
-
181
-
182
-
183
-
184
-
185
-
186
-
187
-
188
-
189
-
190
 |
 |