Toshiba Satellite P35 Satellite P30/P35 User's Guide (PDF) - Page 55
Using the TouchPad
 |
View all Toshiba Satellite P35 manuals
Add to My Manuals
Save this manual to your list of manuals |
Page 55 highlights
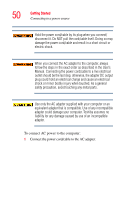
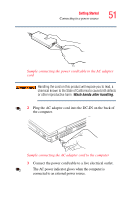
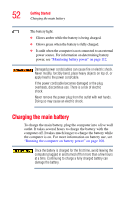
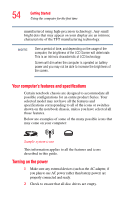
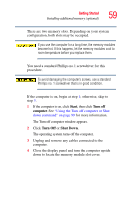
Getting Started Using the TouchPad™ 55 3 Turn on the computer by pressing and releasing the power button located on the top of the keyboard. NOTE When you turn on the computer for the first time, do not turn off the power again until the operating system has loaded completely. The preinstalled operating system loads automatically. The hard disk drive indicator flashes to indicate that the hard disk drive is currently in use. Never turn off the computer while any drive is in use. Using the TouchPad™ The TouchPad, the small, smooth square cutout located in front of the keyboard, is sensitive to touch and enables you to move the cursor with the stroke of a finger. Simply move your finger on the TouchPad in the direction you would like to move the cursor: ❖ To move the cursor to the top of the page, push your finger forward on the TouchPad. ❖ To move the cursor to the bottom of the page, drag your finger toward yourself. ❖ To move the cursor to the right side of the page, slide your finger across the TouchPad from left to right. ❖ To move it to the left side, slide your finger from right to left.
-
 1
1 -
2
-
3
-
4
-
5
-
6
-
7
-
8
-
9
-
10
-
11
-
12
-
13
-
14
-
15
-
16
-
17
-
18
-
19
-
20
-
21
-
22
-
23
-
24
-
25
-
26
-
27
-
28
-
29
-
30
-
31
-
32
-
33
-
34
-
35
-
36
-
37
-
38
-
39
-
40
-
41
-
42
-
43
-
44
-
45
-
46
-
47
-
48
-
49
-
 50
50 -
 51
51 -
 52
52 -
 53
53 -
 54
54 -
 55
55 -
 56
56 -
 57
57 -
 58
58 -
 59
59 -
 60
60 -
61
-
62
-
63
-
64
-
65
-
66
-
67
-
68
-
69
-
70
-
71
-
72
-
73
-
74
-
75
-
76
-
77
-
78
-
79
-
80
-
81
-
82
-
83
-
84
-
85
-
86
-
87
-
88
-
89
-
90
-
91
-
92
-
93
-
94
-
95
-
96
-
97
-
98
-
99
-
100
-
101
-
102
-
103
-
104
-
105
-
106
-
107
-
108
-
109
-
110
-
111
-
112
-
113
-
114
-
115
-
116
-
117
-
118
-
119
-
120
-
121
-
122
-
123
-
124
-
125
-
126
-
127
-
128
-
129
-
130
-
131
-
132
-
133
-
134
-
135
-
136
-
137
-
138
-
139
-
140
-
141
-
142
-
143
-
144
-
145
-
146
-
147
-
148
-
149
-
150
-
151
-
152
-
153
-
154
-
155
-
156
-
157
-
158
-
159
-
160
-
161
-
162
-
163
-
164
-
165
-
166
-
167
-
168
-
169
-
170
-
171
-
172
-
173
-
174
-
175
-
176
-
177
-
178
-
179
-
180
-
181
-
182
-
183
-
184
-
185
-
186
-
187
-
188
-
189
-
190
-
191
-
192
-
193
-
194
-
195
-
196
-
197
-
198
-
199
-
200
-
201
-
202
-
203
-
204
-
205
-
206
-
207
-
208
-
209
-
210
-
211
-
212
-
213
-
214
-
215
-
216
-
217
-
218
-
219
-
220
-
221
-
222
-
223
-
224
-
225
-
226
-
227
-
228
-
229
-
230
 |
 |
