Western Digital WDBABX0000NBK User Manual - Page 15
Installation Procedure, Start, Windows Update, Apple, Software Update - network a v player
 |
UPC - 718037764542
View all Western Digital WDBABX0000NBK manuals
Add to My Manuals
Save this manual to your list of manuals |
Page 15 highlights
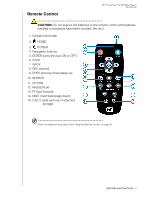
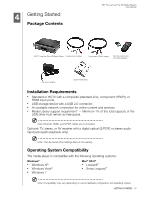
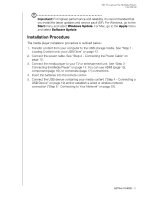
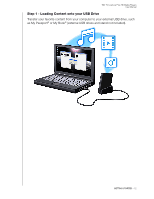
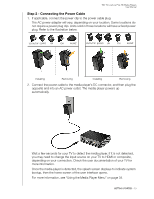
WD TV Live/Live Plus HD Media Players User Manual Important: For highest performance and reliability, it is recommended that you install the latest updates and service pack (SP). For Windows, go to the Start menu and select Windows Update. For Mac, go to the Apple menu and select Software Update. Installation Procedure The media player installation procedure is outlined below: 1. Transfer content from your computer to the USB storage media. See "Step 1 - Loading Content onto your USB Drive" on page 12. 2. Connect the power cable. See "Step 2 - Connecting the Power Cable" on page 13. 3. Connect the media player to your TV or entertainment unit. See "Step 3 - Connecting the Media Player" on page 14. You can use HDMI (page 15), component (page 16), or composite (page 17) connections. 4. Insert the batteries into the remote control. 5. Connect the USB device containing your media content ("Step 4 - Connecting a USB Device" on page 19) and/or establish a wired or wireless network connection ("Step 5 - Connecting to Your Network" on page 22). GETTING STARTED - 11
-
 1
1 -
2
-
3
-
4
-
5
-
6
-
7
-
8
-
9
-
 10
10 -
 11
11 -
 12
12 -
 13
13 -
 14
14 -
 15
15 -
 16
16 -
 17
17 -
 18
18 -
 19
19 -
 20
20 -
21
-
22
-
23
-
24
-
25
-
26
-
27
-
28
-
29
-
30
-
31
-
32
-
33
-
34
-
35
-
36
-
37
-
38
-
39
-
40
-
41
-
42
-
43
-
44
-
45
-
46
-
47
-
48
-
49
-
50
-
51
-
52
-
53
-
54
-
55
-
56
-
57
-
58
-
59
-
60
-
61
-
62
-
63
-
64
-
65
-
66
-
67
-
68
-
69
-
70
-
71
-
72
-
73
-
74
-
75
-
76
-
77
-
78
-
79
-
80
-
81
-
82
-
83
-
84
-
85
-
86
-
87
-
88
-
89
-
90
-
91
-
92
-
93
-
94
-
95
-
96
-
97
-
98
-
99
-
100
-
101
-
102
-
103
-
104
-
105
-
106
-
107
-
108
-
109
-
110
-
111
-
112
-
113
-
114
-
115
-
116
-
117
-
118
-
119
-
120
-
121
-
122
-
123
-
124
-
125
-
126
-
127
-
128
-
129
-
130
-
131
-
132
-
133
-
134
-
135
-
136
-
137
-
138
-
139
-
140
-
141
-
142
-
143
-
144
-
145
-
146
-
147
-
148
-
149
-
150
-
151
-
152
-
153
-
154
-
155
-
156
-
157
-
158
-
159
-
160
-
161
-
162
-
163
-
164
-
165
-
166
-
167
-
168
-
169
-
170
 |
 |