Western Digital WDBABX0000NBK User Manual - Page 72
Moving Files Between the Media Player and a Windows Computer, Start
 |
UPC - 718037764542
View all Western Digital WDBABX0000NBK manuals
Add to My Manuals
Save this manual to your list of manuals |
Page 72 highlights
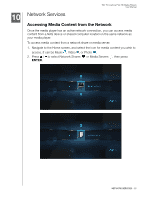
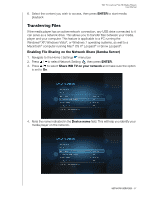
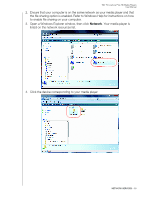
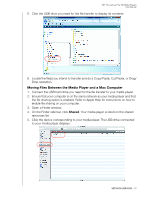
WD TV Live/Live Plus HD Media Players User Manual Moving Files Between the Media Player and a Windows Computer 1. Connect the USB hard drive you need for the file transfer to your media player. 2. Ensure that your computer is on the same network as your media player and that the file sharing option is enabled. Refer to Windows Help for instructions on how to enable file sharing on your computer. 3. Download the WD Discovery tool from http://products.wdc.com/WDTVLive. 4. Double-click on the downloaded installer file and follow the on-screen prompts to install WD Discovery. 5. Click or Start, then click Programs > WD Discovery > WD Discovery. 6. Click WDTVLive in the Network Drives Found list and Browse Network Shares in the Things To Do list. 7. The USB drive connected to your media player displays. 8. Click the USB drive you need for the file transfer. The USB drive contents display in a Windows Explorer window. 9. Locate the file(s) you intend to transfer and do a Copy/Paste, Cut/Paste, or Drag/ Drop operation. Moving Files Between the Media Player and a Windows Vista / Windows 7 Computer 1. Connect the USB hard drive you need for the file transfer to your media player. NETWORK SERVICES - 68
-
 1
1 -
2
-
3
-
4
-
5
-
6
-
7
-
8
-
9
-
10
-
11
-
12
-
13
-
14
-
15
-
16
-
17
-
18
-
19
-
20
-
21
-
22
-
23
-
24
-
25
-
26
-
27
-
28
-
29
-
30
-
31
-
32
-
33
-
34
-
35
-
36
-
37
-
38
-
39
-
40
-
41
-
42
-
43
-
44
-
45
-
46
-
47
-
48
-
49
-
50
-
51
-
52
-
53
-
54
-
55
-
56
-
57
-
58
-
59
-
60
-
61
-
62
-
63
-
64
-
65
-
66
-
 67
67 -
 68
68 -
 69
69 -
 70
70 -
 71
71 -
 72
72 -
 73
73 -
 74
74 -
 75
75 -
 76
76 -
 77
77 -
78
-
79
-
80
-
81
-
82
-
83
-
84
-
85
-
86
-
87
-
88
-
89
-
90
-
91
-
92
-
93
-
94
-
95
-
96
-
97
-
98
-
99
-
100
-
101
-
102
-
103
-
104
-
105
-
106
-
107
-
108
-
109
-
110
-
111
-
112
-
113
-
114
-
115
-
116
-
117
-
118
-
119
-
120
-
121
-
122
-
123
-
124
-
125
-
126
-
127
-
128
-
129
-
130
-
131
-
132
-
133
-
134
-
135
-
136
-
137
-
138
-
139
-
140
-
141
-
142
-
143
-
144
-
145
-
146
-
147
-
148
-
149
-
150
-
151
-
152
-
153
-
154
-
155
-
156
-
157
-
158
-
159
-
160
-
161
-
162
-
163
-
164
-
165
-
166
-
167
-
168
-
169
-
170
 |
 |
