Xerox XDM5205DWU User Guide - Page 8
Universal Serial Bus USB port, Automatic Document Feeder ADF
 |
UPC - 785414106011
View all Xerox XDM5205DWU manuals
Add to My Manuals
Save this manual to your list of manuals |
Page 8 highlights
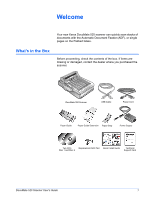
Welcome Scanner Cover-Protects the document from light and contamination during scanning. Close the cover to put a stack of documents in the Automatic Document Feeder (ADF). Document Pad-Holds documents in place on the scanner glass. Glass-Documents are placed face down, aligned at the arrow symbol in the upper-left corner. Reference Frame-Marks on the border of the glass show where to align various paper sizes. Paper Stop-Holds items in place as they are ejected from the Automatic Document Feeder. Adjust for letter-sized or legal-sized pages. Paper Guide Extension-Unfolds to support multiple document lengths. Paper guides-Holds documents in place. Adjusts to fit the paper size. Automatic Document Feeder (ADF)-Feeds a stack of documents onto the glass for scanning. The ADF can hold up to 50 pages at a time. Scanner lock-Locks or unlocks the scanning head. The lock must be unlocked for the scanner to scan. The lock should always be locked when transporting the scanner. DocuMate Buttons-Press to start scanning. Status Light-Shows the scanner's status. A steady green light indicates the scanner is available to scan. A rapidly flashing green light indicates the scanner is preparing to scan. Refer to "Error Light Troubleshooting Codes" on page 132 for additional details. Universal Serial Bus (USB) port-Connects the scanner to the computer. ADF port-Connects the ADF cable from the Automatic Document Feeder to the scanner body. Power Jack-Connects the power cord to the scanner. Power switch-On/Off power switch. ADF cable-Supplies power from the scanner body to the Automatic Document Feeder. The cable must be securely plugged into the ADF port for the Automatic Document Feeder to work. DocuMate 520 Scanner User's Guide 3
-
 1
1 -
2
-
 3
3 -
 4
4 -
 5
5 -
 6
6 -
 7
7 -
 8
8 -
 9
9 -
 10
10 -
 11
11 -
 12
12 -
 13
13 -
14
-
15
-
16
-
17
-
18
-
19
-
20
-
21
-
22
-
23
-
24
-
25
-
26
-
27
-
28
-
29
-
30
-
31
-
32
-
33
-
34
-
35
-
36
-
37
-
38
-
39
-
40
-
41
-
42
-
43
-
44
-
45
-
46
-
47
-
48
-
49
-
50
-
51
-
52
-
53
-
54
-
55
-
56
-
57
-
58
-
59
-
60
-
61
-
62
-
63
-
64
-
65
-
66
-
67
-
68
-
69
-
70
-
71
-
72
-
73
-
74
-
75
-
76
-
77
-
78
-
79
-
80
-
81
-
82
-
83
-
84
-
85
-
86
-
87
-
88
-
89
-
90
-
91
-
92
-
93
-
94
-
95
-
96
-
97
-
98
-
99
-
100
-
101
-
102
-
103
-
104
-
105
-
106
-
107
-
108
-
109
-
110
-
111
-
112
-
113
-
114
-
115
-
116
-
117
-
118
-
119
-
120
-
121
-
122
-
123
-
124
-
125
-
126
-
127
-
128
-
129
-
130
-
131
-
132
-
133
-
134
-
135
-
136
-
137
-
138
-
139
-
140
-
141
-
142
-
143
-
144
-
145
-
146
-
147
-
148
-
149
 |
 |
