Yamaha CLP-611 Owner's Manual - Page 25
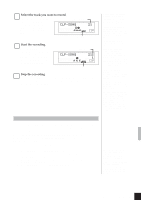
Select the track you want to record., Start the recording., Stop the recording.
 |
View all Yamaha CLP-611 manuals
Add to My Manuals
Save this manual to your list of manuals |
Page 25 highlights
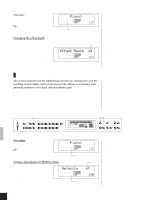
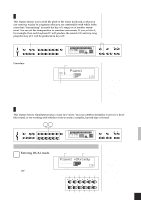
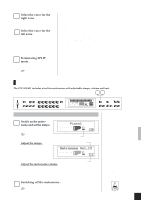
4 Select the track you want to record. The red indicator shows the currently selected track. If Remaining memory you wish to change the selection, press the appro- priate track button ([1] or ROOM NORMAL MEDIUM TEMPO [2]). BRILLIANCE REVERB EFFECT TOUCH Flashing 5 Start the recording. Recording begins automatically when you play a note at the keyboard. As an alternative, you can begin the recording by pressing the [START/STOP] button. Measure count ROOM NORMAL MEDIUM BRILLIANCE REVERB EFFECT TOUCH MEASURE TEMPO Beat 6 Stop the recording. You can stop the recording by pressing either [REC] or [START/STOP]. The indicator above the recorded track will change to green, to indicate that the track contains data. If the selected track already contains recorded data... That data will be lost when you begin actual recording as described in Step 5 below. The approximate amount of remaining memory... appears at the upper right of the screen (in kilobytes). The starting value (with both tracks empty) is 21. The first metronome dot flashes in time with the current tempo setting. Using the left pedal as a START/STOP switch... You can set the left pedal to operate in the same way as the [START/STOP] button, so that you can start and stop recording without using your hands. Leftpedal operation is determined by function F9; see page 33 for details. The screen counts the measures (in accordance with the TEMPO setting) as recording proceeds. The metronome dot display keeps track of the beat. You are free to switch the metronome sound on or off. The metronome sound is not included in the recording. Maximum recording capacity... is approximately 4,200 notes, but varies somewhat according to pedal usage and other such factors. The recording indicator begins flash when memory is almost full. If memory becomes completely full, recording stops and the Memory Full! message appears. Changing initial settings After recording is completed, it remains possible to modify the initial settings that you selected at Step 1 above. (It is not possible, however, to modify SPLIT or DUAL settings.) When making such a change, BE CAREFUL! DO NOT hit any keys on the keyboard and do not press the [START/STOP] button, as doing so will cause erasure of all your data. To make a change, proceed as follows. (a) Press [REC] to enter RECORDING mode. (b) If necessary, press the track button for the track you want to change (so that the indicator is red). (c) Make the changes. To change the voice selection, for example, you would press the appropriate voice selector. (d) Press [REC] again to exit RECORDING mode. If you begin making a change at Step (c) but then wish to cancel it, you can do so by pressing the other track button and then pressing [REC]. Tempo, reverb type/depth, and effect type settings... apply to both tracks. If you change the value for one track, the change automatically applies to both. CLP-811/611 Using the Recorder 21
-
 1
1 -
2
-
3
-
4
-
5
-
6
-
7
-
8
-
9
-
10
-
11
-
12
-
13
-
14
-
15
-
16
-
17
-
18
-
19
-
 20
20 -
 21
21 -
 22
22 -
 23
23 -
 24
24 -
 25
25 -
 26
26 -
 27
27 -
 28
28 -
 29
29 -
 30
30 -
31
-
32
-
33
-
34
-
35
-
36
-
37
-
38
-
39
-
40
-
41
-
42
-
43
-
44
-
45
-
46
-
47
-
48
-
49
-
50
-
51
-
52
-
53
-
54
-
55
-
56
-
57
-
58
-
59
-
60
-
61
-
62
-
63
-
64
-
65
-
66
-
67
-
68
-
69
-
70
-
71
-
72
 |
 |
