Yamaha ELS-02 Owner's Manual - Page 114
Recording, Recording your performance, Re-recording (Retry)
 |
View all Yamaha ELS-02 manuals
Add to My Manuals
Save this manual to your list of manuals |
Page 114 highlights
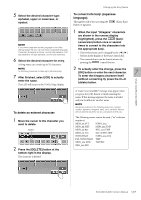
Recording Recording Recording your performance Set the desired Registrations on the Electone. Make all the Electone settings necessary for the Song you will record. This means entering the all Registrations you will need for the entire performance in the Registration Memory. Make sure also to select the Registration that you will use at the beginning of the Song. NOTICE Never attempt to remove the USB flash memory or turn the power off during recording, reading or playback. NOTE This instrument does not feature audio file playback or audio recording. Also, audio signals created via your keyboard performance cannot be transferred to a computer even if one is properly connected to the [USB TO HOST] terminal of this instrument by the method of "Connection with Computer" (page 194). 1 Insert a USB flash memory to the [USB TO DEVICE] terminal. 2 Select a blank Song for recording your performance. For details on selecting a Song, see page 112. If you want to overwrite an existing Song already containing performance data, you will need to delete it beforehand. 3 Press the [SONG] button at the top right of the display to call up the SONG Page, then select the [*] (Record) button. The following display appears, indicating that you can record your performance. 4 Press the [3] (Play) button. An hourglass icon appears at the bottom left of the display, indicating that Registration data is currently being read. NOTE Regardless of the currently selected Unit number, the recording operation will save data other than your performance to the first Unit of the Song. This is why pressing the [*] (Record) button will call up the dialog to confirm whether OK or not to save data to the first Unit when the Registration Unit other than the first Unit is loaded. In this situation, pressing [OK] will go to the Recording Standby mode while pressing [CANCEL] will exit from the Recording mode. 5 After the hourglass disappears, begin playing. 6 When you finish playing, press the [+] (Stop) button in the display. The recording is finished and the LCD returns to the MDR display. The Song to which your performance is recorded is automatically named "SONG_XXX" (XXX indicates Song number). You can change the Song name as desired. (For details, see page 116.) NOTICE Do not remove the USB flash memory from the Electone while data is being recorded (while the hourglass icon or other message is shown). Re-recording (Retry) If you make a mistake during recording, you can rerecord the Song from the beginning. 1 Press the [*] (Record) button while the Song is still running. This automatically stops recording and returns you to the starting point of the Song. NOTE If a message appears indicating there is not enough free space in USB flash memory, press the [CANCEL] button, then delete any unnecessary Songs if possible or insert new USB flash memory. To continue recording your performance on USB flash memory that does not have enough space, press the [CONTINUE] button. 114 ELS-02/ELS-02C Owner's Manual
-
 1
1 -
2
-
3
-
4
-
5
-
6
-
7
-
8
-
9
-
10
-
11
-
12
-
13
-
14
-
15
-
16
-
17
-
18
-
19
-
20
-
21
-
22
-
23
-
24
-
25
-
26
-
27
-
28
-
29
-
30
-
31
-
32
-
33
-
34
-
35
-
36
-
37
-
38
-
39
-
40
-
41
-
42
-
43
-
44
-
45
-
46
-
47
-
48
-
49
-
50
-
51
-
52
-
53
-
54
-
55
-
56
-
57
-
58
-
59
-
60
-
61
-
62
-
63
-
64
-
65
-
66
-
67
-
68
-
69
-
70
-
71
-
72
-
73
-
74
-
75
-
76
-
77
-
78
-
79
-
80
-
81
-
82
-
83
-
84
-
85
-
86
-
87
-
88
-
89
-
90
-
91
-
92
-
93
-
94
-
95
-
96
-
97
-
98
-
99
-
100
-
101
-
102
-
103
-
104
-
105
-
106
-
107
-
108
-
 109
109 -
 110
110 -
 111
111 -
 112
112 -
 113
113 -
 114
114 -
 115
115 -
 116
116 -
 117
117 -
 118
118 -
 119
119 -
120
-
121
-
122
-
123
-
124
-
125
-
126
-
127
-
128
-
129
-
130
-
131
-
132
-
133
-
134
-
135
-
136
-
137
-
138
-
139
-
140
-
141
-
142
-
143
-
144
-
145
-
146
-
147
-
148
-
149
-
150
-
151
-
152
-
153
-
154
-
155
-
156
-
157
-
158
-
159
-
160
-
161
-
162
-
163
-
164
-
165
-
166
-
167
-
168
-
169
-
170
-
171
-
172
-
173
-
174
-
175
-
176
-
177
-
178
-
179
-
180
-
181
-
182
-
183
-
184
-
185
-
186
-
187
-
188
-
189
-
190
-
191
-
192
-
193
-
194
-
195
-
196
-
197
-
198
-
199
-
200
-
201
-
202
-
203
-
204
-
205
-
206
 |
 |
