Yamaha ELS-02 Owner's Manual - Page 169
Editing an existing Registration Sequence, Entering Next Unit, To move an entry
 |
View all Yamaha ELS-02 manuals
Add to My Manuals
Save this manual to your list of manuals |
Page 169 highlights
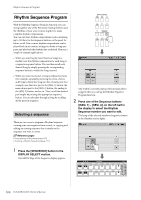
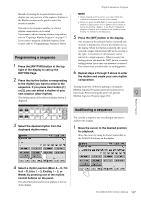
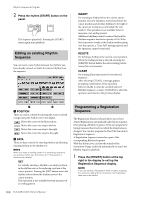
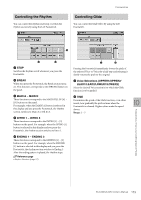
Rhythm Sequence Program Entering Next Unit: When you program the Next Unit function in Registration Sequence, the next registration data in current Song can be loaded automatically just by playing the Rhythm Sequence. The Registration Sequence is programmed from this display. The entered Registration number is shown along the Registration row in the middle of the display. 2 Select a Bank, then press the desired numbered button in the Registration Memory section. 1 Using the buttons in the display or the Data Control dial, set the Measure/Beat/Clock position at which you want to enter the Next Unit (1 beat = 96 clocks). 2 Press the NEXT UNIT [INSERT] button in the display. The Next Unit mark appears at the timing point you set in step 1, indicating that the Next Unit is entered. 3 Using the buttons in the Next Unit Loading Time • Loading a Next Unit may take a few seconds (the time display or the Data Control dial, set the may differ depending on the size of the data to be Measure/Beat/Clock position at which loaded). you want to change the Registration (1 beat = 96 clocks). • Next Unit data can be loaded by two ways: using the right footswitch and programming Next Unit in the Registration Sequence. Loading time is the same regardless of which way you load the Next Unit data. 9 Rhythm Program Editing an existing Registration Sequence When using the Data Control dial, first press the number you wish to change in the display, then turn the dial. 4 Press the DATA [SET] button in the display. The Registration number appears in the display (in the timing order), indicating that the Registration is entered. Up to 140 Registrations can be entered. If some Registration numbers are entered to the same Measure/Beat/Clock, the last entered one takes priority. 5 Repeat steps 2 through 4 above to set the Registration Sequence. You can move or delete the entered Registration Sequence (Registration number or Next Unit data) from the sequence. To move an entry: 1 Using the POSITION buttons, move the cursor and select the data (Registration number or Next Unit) you want to move. 2 Change the position by pressing the Bar/Beat/Clock buttons in the display. 3 To move the Registration number timing, press the DATA [SET] button. To move the Next Unit timing, press the NEXT UNIT [SET] button. The position of the Registration number or Next Unit is changed and displayed in the proper order. ELS-02/ELS-02C Owner's Manual 169
-
 1
1 -
2
-
3
-
4
-
5
-
6
-
7
-
8
-
9
-
10
-
11
-
12
-
13
-
14
-
15
-
16
-
17
-
18
-
19
-
20
-
21
-
22
-
23
-
24
-
25
-
26
-
27
-
28
-
29
-
30
-
31
-
32
-
33
-
34
-
35
-
36
-
37
-
38
-
39
-
40
-
41
-
42
-
43
-
44
-
45
-
46
-
47
-
48
-
49
-
50
-
51
-
52
-
53
-
54
-
55
-
56
-
57
-
58
-
59
-
60
-
61
-
62
-
63
-
64
-
65
-
66
-
67
-
68
-
69
-
70
-
71
-
72
-
73
-
74
-
75
-
76
-
77
-
78
-
79
-
80
-
81
-
82
-
83
-
84
-
85
-
86
-
87
-
88
-
89
-
90
-
91
-
92
-
93
-
94
-
95
-
96
-
97
-
98
-
99
-
100
-
101
-
102
-
103
-
104
-
105
-
106
-
107
-
108
-
109
-
110
-
111
-
112
-
113
-
114
-
115
-
116
-
117
-
118
-
119
-
120
-
121
-
122
-
123
-
124
-
125
-
126
-
127
-
128
-
129
-
130
-
131
-
132
-
133
-
134
-
135
-
136
-
137
-
138
-
139
-
140
-
141
-
142
-
143
-
144
-
145
-
146
-
147
-
148
-
149
-
150
-
151
-
152
-
153
-
154
-
155
-
156
-
157
-
158
-
159
-
160
-
161
-
162
-
163
-
 164
164 -
 165
165 -
 166
166 -
 167
167 -
 168
168 -
 169
169 -
 170
170 -
 171
171 -
 172
172 -
 173
173 -
 174
174 -
175
-
176
-
177
-
178
-
179
-
180
-
181
-
182
-
183
-
184
-
185
-
186
-
187
-
188
-
189
-
190
-
191
-
192
-
193
-
194
-
195
-
196
-
197
-
198
-
199
-
200
-
201
-
202
-
203
-
204
-
205
-
206
 |
 |
