Yamaha ELS-02 Owner's Manual - Page 171
Copying a Rhythm Sequence, Saving Rhythm Pattern and Rhythm Sequence Data to a USB Flash Memory
 |
View all Yamaha ELS-02 manuals
Add to My Manuals
Save this manual to your list of manuals |
Page 171 highlights
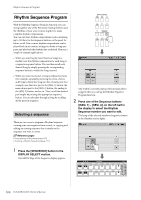
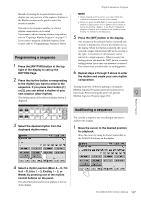
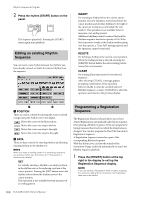
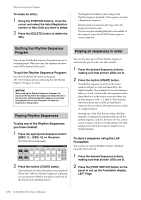
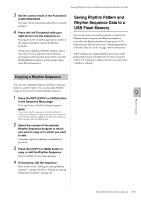
Saving Rhythm Pattern and Rhythm Sequence Data to a USB 3 Set the control mode of the Footswitch to RHYTHM STOP. (See page 172 for information about the Footswitch settings.) 4 Press the Left Footswitch with your right foot to turn the sequence on. Pressing the Left Footswitch again in the middle of the sequence playback cancels the Rhythm Sequence. When you are playing a Rhythm Sequence that is made up of several sequences (SEQ. buttons), pressing the Left footswitch turns off the currently playing Rhythm Sequence, and pressing it again starts the next sequence. Saving Rhythm Pattern and Rhythm Sequence Data to a USB Flash Memory You can save your own rhythm patterns (created in the Rhythm Pattern Program) and Rhythm Sequences (created in the Rhythm Sequence Program) to a USB flash memory. Refer to the section "Saving Registrations and Other Data to a Unit" on page 118 for instructions. When loading your original Rhythm data from a USB flash memory back to the Electone, be sure to stop the rhythm if it is playing. Loading cannot be executed when a rhythm is running. Copying a Rhythm Sequence You can copy a Rhythm Sequence stored on a sequence button to another button. You can also add a Rhythm Sequence to the end of another Rhythm Sequence. 9 1 Press the EDIT [COPY] or [ADD] button in the Sequence Menu page. Rhythm Program The Copy From or Add From display appears. NOTE If you add a Rhythm Sequence to another Rhythm Sequence that has an ending at the end, the section will automatically change to MAIN A and the new sequence will be added after the MAIN A part. 2 Select the number of the desired Rhythm Sequence program to which you want to copy or to which you want to add. A message appears prompting confirmation of operation. 3 Press the [COPY] or [ADD] button to copy or add the Rhythm Sequence. Press [CANCEL] to abort the operation. 4 If necessary, edit the sequence. Refer to the section "Editing an existing Rhythm Sequence" on page 168 and/or "Editing an existing Registration Sequence" on page 169. ELS-02/ELS-02C Owner's Manual 171
-
 1
1 -
2
-
3
-
4
-
5
-
6
-
7
-
8
-
9
-
10
-
11
-
12
-
13
-
14
-
15
-
16
-
17
-
18
-
19
-
20
-
21
-
22
-
23
-
24
-
25
-
26
-
27
-
28
-
29
-
30
-
31
-
32
-
33
-
34
-
35
-
36
-
37
-
38
-
39
-
40
-
41
-
42
-
43
-
44
-
45
-
46
-
47
-
48
-
49
-
50
-
51
-
52
-
53
-
54
-
55
-
56
-
57
-
58
-
59
-
60
-
61
-
62
-
63
-
64
-
65
-
66
-
67
-
68
-
69
-
70
-
71
-
72
-
73
-
74
-
75
-
76
-
77
-
78
-
79
-
80
-
81
-
82
-
83
-
84
-
85
-
86
-
87
-
88
-
89
-
90
-
91
-
92
-
93
-
94
-
95
-
96
-
97
-
98
-
99
-
100
-
101
-
102
-
103
-
104
-
105
-
106
-
107
-
108
-
109
-
110
-
111
-
112
-
113
-
114
-
115
-
116
-
117
-
118
-
119
-
120
-
121
-
122
-
123
-
124
-
125
-
126
-
127
-
128
-
129
-
130
-
131
-
132
-
133
-
134
-
135
-
136
-
137
-
138
-
139
-
140
-
141
-
142
-
143
-
144
-
145
-
146
-
147
-
148
-
149
-
150
-
151
-
152
-
153
-
154
-
155
-
156
-
157
-
158
-
159
-
160
-
161
-
162
-
163
-
164
-
165
-
 166
166 -
 167
167 -
 168
168 -
 169
169 -
 170
170 -
 171
171 -
 172
172 -
 173
173 -
 174
174 -
 175
175 -
 176
176 -
177
-
178
-
179
-
180
-
181
-
182
-
183
-
184
-
185
-
186
-
187
-
188
-
189
-
190
-
191
-
192
-
193
-
194
-
195
-
196
-
197
-
198
-
199
-
200
-
201
-
202
-
203
-
204
-
205
-
206
 |
 |
