Yamaha ELS-02 Owner's Manual - Page 118
Saving Registrations and Other Data to a Unit, Creating two or more Registration Units in a Song
 |
View all Yamaha ELS-02 manuals
Add to My Manuals
Save this manual to your list of manuals |
Page 118 highlights
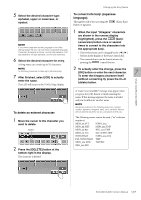
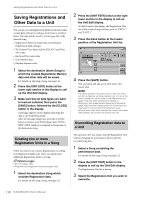
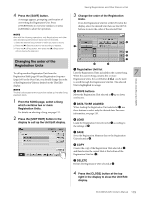
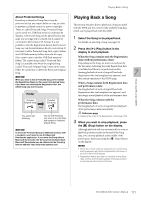
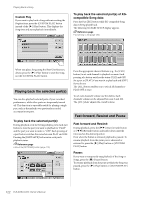
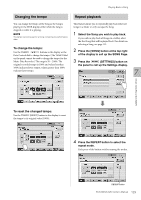
Saving Registrations and Other Data to a Unit Saving Registrations and Other Data to a Unit You can also record Registration Memory data and other created data without recording a performance, as listed below. The data will be saved to a Unit (page 98) of the selected Song. • Registration Memory related data (including the Registration Shift settings) • VA Custom Voice data (only for ELS-02C) and User Voice data • Keyboard Percussion data • User Rhythm data • Rhythm Sequence data 1 Select the destination (blank Song) to which the created Registration Memory data and other data will be saved. For details on selecting a Song, see page 112. 2 Press the [UNIT EDIT] button at the lower right section in the display to call up the Unit Edit display. 3 Make sure that all data types you want to load are selected, then press the [SAVE] button, followed by the [CLOSE] button in the display. A message appears on the display, indicating the data is currently being saved. After the message disappears, press the [CLOSE] button to return to the SONG page, then "SONG XXX" (XXX: number) is assigned as Song name to the destination Song. Creating two or more Registration Units in a Song When you want to use various Registrations exceeding five Registration Banks (one Unit), you should save additional Registration Units to a Song. Reference pages • Next Unit (page 100) • Programming a Registration Sequence (page 168) 1 Select the destination Song which includes Registration data. For details on selecting a Song, see page 112. 2 Press the [UNIT EDIT] button at the right lower section in the display to call up the Unit Edit display. At the left side in the display, the Registration Unit list of the current Song is shown, such as "UNIT 1" and "UNIT 2." 3 Press the blank button at the lowest position of the Registration Unit list. 4 Press the [SAVE] button. This operation will add a new Unit next to the lowest Unit. NOTE The above operation will simply create a new Unit which will not be called up via Song playback, etc. To call up the newly created Unit, set the order of the Registration Unit (page 119), then make the Next Unit settings of Registration Shift (page 99) and Registration Sequence (page 168). Note that changing the Unit via the Next Unit may result in no sound from the Electone for a few seconds when User Voice data and VA Custom Voice data differ between the current Unit and the next Unit. Overwriting Registration data to a Unit This operation lets you replace just the Registration Unit without changing the performance data in already recorded Song data. 1 Select a Song containing the performance data. For details on selecting a Song, see page 112. 2 Press the [UNIT EDIT] button in the display to call up the Unit Edit display. The Registration Unit list is shown. 3 Select the Registration Unit you wish to overwrite. 118 ELS-02/ELS-02C Owner's Manual
-
 1
1 -
2
-
3
-
4
-
5
-
6
-
7
-
8
-
9
-
10
-
11
-
12
-
13
-
14
-
15
-
16
-
17
-
18
-
19
-
20
-
21
-
22
-
23
-
24
-
25
-
26
-
27
-
28
-
29
-
30
-
31
-
32
-
33
-
34
-
35
-
36
-
37
-
38
-
39
-
40
-
41
-
42
-
43
-
44
-
45
-
46
-
47
-
48
-
49
-
50
-
51
-
52
-
53
-
54
-
55
-
56
-
57
-
58
-
59
-
60
-
61
-
62
-
63
-
64
-
65
-
66
-
67
-
68
-
69
-
70
-
71
-
72
-
73
-
74
-
75
-
76
-
77
-
78
-
79
-
80
-
81
-
82
-
83
-
84
-
85
-
86
-
87
-
88
-
89
-
90
-
91
-
92
-
93
-
94
-
95
-
96
-
97
-
98
-
99
-
100
-
101
-
102
-
103
-
104
-
105
-
106
-
107
-
108
-
109
-
110
-
111
-
112
-
 113
113 -
 114
114 -
 115
115 -
 116
116 -
 117
117 -
 118
118 -
 119
119 -
 120
120 -
 121
121 -
 122
122 -
 123
123 -
124
-
125
-
126
-
127
-
128
-
129
-
130
-
131
-
132
-
133
-
134
-
135
-
136
-
137
-
138
-
139
-
140
-
141
-
142
-
143
-
144
-
145
-
146
-
147
-
148
-
149
-
150
-
151
-
152
-
153
-
154
-
155
-
156
-
157
-
158
-
159
-
160
-
161
-
162
-
163
-
164
-
165
-
166
-
167
-
168
-
169
-
170
-
171
-
172
-
173
-
174
-
175
-
176
-
177
-
178
-
179
-
180
-
181
-
182
-
183
-
184
-
185
-
186
-
187
-
188
-
189
-
190
-
191
-
192
-
193
-
194
-
195
-
196
-
197
-
198
-
199
-
200
-
201
-
202
-
203
-
204
-
205
-
206
 |
 |
