Yamaha ELS-02 Owner's Manual - Page 51
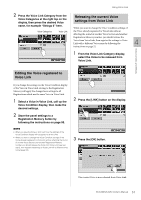
Editing the Voice registered to Voice Link, Releasing the current Voice settings from Voice Link
 |
View all Yamaha ELS-02 manuals
Add to My Manuals
Save this manual to your list of manuals |
Page 51 highlights
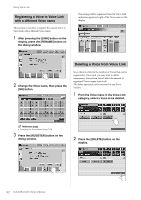
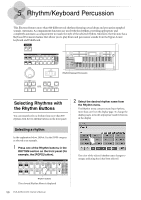
Using Voice Link 2 Press the Voice Link Category from the Voice Categories at the right top on the display, then press the desired Voice Releasing the current Voice settings from Voice Link name, for example "Strings 2" here. When you want to change the Voice Condition settings of Voice Categories Voice Link the Voice already registered to Voice Link without affecting the sound of another Voice Section and another Registration Memory number, you should release the Voice from Voice Link, then register the settings to Voice Link with a different Voice name by following the 4 instructions on page 52. 1 From the Voice Link Category display, select the Voice to be released from Voice Link. Voice Controls and Effects Editing the Voice registered to Voice Link If you change the settings on the Voice Condition display of the Voice in Voice Link, storing to the Registration Memory will apply the changed new settings to all Registrations which use the same Voice in Voice Link. 1 Select a Voice in Voice Link, call up the Voice Condition display, then make the desired settings. 2 Store the panel settings to a Registration Memory button by following the instructions on page 95. NOTE • When you save the Song or Unit next time, the settings of the Voice Condition display will be applied to all the Units. • When you want to change the Voice Condition settings of the Voice already registered to Voice Link without affecting the sound of another Voice Section and another Registration Memory number, you should release the Voice from Voice Link (see next topic), then register the settings to Voice Link with a different Voice name (page 52). 2 Press the [LINK] button on the display. 3 Press the [OK] button. The current Voice is now released from Voice Link. ELS-02/ELS-02C Owner's Manual 51
-
 1
1 -
2
-
3
-
4
-
5
-
6
-
7
-
8
-
9
-
10
-
11
-
12
-
13
-
14
-
15
-
16
-
17
-
18
-
19
-
20
-
21
-
22
-
23
-
24
-
25
-
26
-
27
-
28
-
29
-
30
-
31
-
32
-
33
-
34
-
35
-
36
-
37
-
38
-
39
-
40
-
41
-
42
-
43
-
44
-
45
-
 46
46 -
 47
47 -
 48
48 -
 49
49 -
 50
50 -
 51
51 -
 52
52 -
 53
53 -
 54
54 -
 55
55 -
 56
56 -
57
-
58
-
59
-
60
-
61
-
62
-
63
-
64
-
65
-
66
-
67
-
68
-
69
-
70
-
71
-
72
-
73
-
74
-
75
-
76
-
77
-
78
-
79
-
80
-
81
-
82
-
83
-
84
-
85
-
86
-
87
-
88
-
89
-
90
-
91
-
92
-
93
-
94
-
95
-
96
-
97
-
98
-
99
-
100
-
101
-
102
-
103
-
104
-
105
-
106
-
107
-
108
-
109
-
110
-
111
-
112
-
113
-
114
-
115
-
116
-
117
-
118
-
119
-
120
-
121
-
122
-
123
-
124
-
125
-
126
-
127
-
128
-
129
-
130
-
131
-
132
-
133
-
134
-
135
-
136
-
137
-
138
-
139
-
140
-
141
-
142
-
143
-
144
-
145
-
146
-
147
-
148
-
149
-
150
-
151
-
152
-
153
-
154
-
155
-
156
-
157
-
158
-
159
-
160
-
161
-
162
-
163
-
164
-
165
-
166
-
167
-
168
-
169
-
170
-
171
-
172
-
173
-
174
-
175
-
176
-
177
-
178
-
179
-
180
-
181
-
182
-
183
-
184
-
185
-
186
-
187
-
188
-
189
-
190
-
191
-
192
-
193
-
194
-
195
-
196
-
197
-
198
-
199
-
200
-
201
-
202
-
203
-
204
-
205
-
206
 |
 |
