Yamaha MMP1 MMP1 Operation Manual [English] - Page 9
-2a. Meters, 1-2b. Channel strips
 |
View all Yamaha MMP1 manuals
Add to My Manuals
Save this manual to your list of manuals |
Page 9 highlights
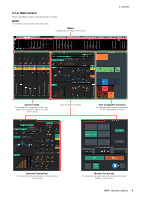
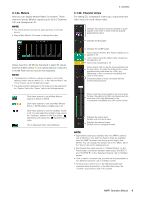
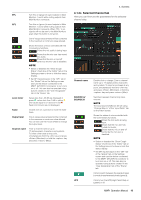
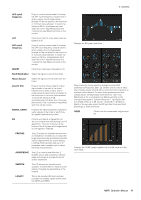
4-1-2a. Meters Here you can display Monitor Matrix Out meters. These channels include Monitor outputs (up to 32 ch), Downmix L/R, and Headphone L/R. NOTE • The meters shown here are the same as those on the Sub screen. • Drag a Main Monitor Out meter to change the order. Values less than -20 dB are displayed in green , values less than 0 dB in yellow , and values equal to or above 0 in red . Peak hold circuits are not displayed. NOTE • The breakdown of Monitor outputs is based on the format selected under "Monitor Matrix Out" in the "Monitor Matrix" tab of the "Scene" tab on the Settings screen. • The signal position displayed on the meters can be selected in the "System" tab of the "Scene" tab on the Settings screen. Click these buttons to set all Main Monitor outputs to SOLO or MUTE. / Click these buttons to turn each Main Monitor SOLO or MUTE setting on (lights up) or off. Click these buttons to turn the oscillator on (lit) or off. You can select the oscillator type used in the "Oscillator" section on the Sub screen. represents sine waves and represents pink noise. This is displayed when using Talkback. 4. Screens 4-1-2b. Channel strips For setting EQ, compressor, insert, pan, output level and other values for each channel strip. Displays the signal processors applied to audio signals in the order in which they are applied (descending order). Displays the EQ graph. Displays the COMP graph. Turns output to the PFL (Pre Fader Listen) bus on (green) or off. Turns output to the AFL (After Fader Listen) bus on (green) or off. Turns mute on (yellow) or off. Drag, double click or use the mouse wheel to set the pan value. To return the setting to the center, simultaneously hold down the key (Windows) or the key (Mac) and click on the control. Shows the status of mics controlled with the Commentary functions. Drag or use the mouse wheel to set output level. To return the setting to 0 dB, simultaneously hold down the key (Windows) or the key (Mac) and click on the control. Displays the output level. Double click to enter a value. Displays the channel name. Double click to change the name. NOTE • Eight channel strips are available when the MMP1's sample rate is 96 kHz or less, and four channel strips are available when the MMP1's sample rate being used is higher than 96 kHz. You can change the sample rate in the "MISC" tab of the "Scene" tab on the Settings screen. • Set channel strip input sources in "Channel Strip In" on the Patch screen, and switch between these using "SOURCE A" and "SOURCE B" on the "Selected Channel" tab on the Main screen. • Click to select a channel strip, and then set the parameters in the "Selected Channel" tab on the Main screen. • To bring up the context menu, (for Windows) right click anywhere within the section, or (for Mac) hold down the key and then click in the section. MMP1 Operation Manual 9
-
 1
1 -
2
-
3
-
 4
4 -
 5
5 -
 6
6 -
 7
7 -
 8
8 -
 9
9 -
 10
10 -
 11
11 -
 12
12 -
 13
13 -
 14
14 -
15
-
16
-
17
-
18
-
19
-
20
-
21
-
22
-
23
-
24
-
25
-
26
-
27
-
28
-
29
-
30
-
31
-
32
-
33
-
34
-
35
-
36
-
37
-
38
-
39
-
40
-
41
-
42
-
43
-
44
-
45
-
46
-
47
-
48
-
49
-
50
-
51
-
52
-
53
-
54
-
55
-
56
-
57
-
58
-
59
-
60
-
61
-
62
-
63
-
64
-
65
-
66
-
67
-
68
 |
 |
