Yamaha MT1X Owner's Manual - Page 23
At this point, if the track is recorded properly and there
 |
View all Yamaha MT1X manuals
Add to My Manuals
Save this manual to your list of manuals |
Page 23 highlights
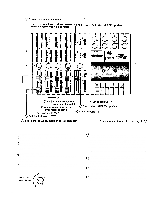
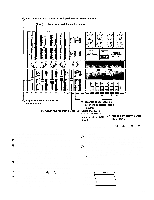
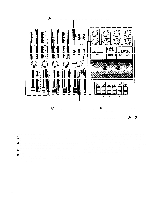
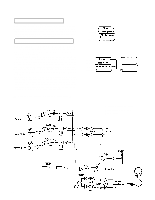
Make sure this switch is in the "4 TRK" position. Set this so you can monitor track 1. Press to check the recording on track 1, then rewind. *Explanation diagram of steps t o 8. Post recording check Return all switches and controls to their normal positions. Set the PHONES SELECT switch to the "MONITOR" position, turn MONITOR LEVEL control 1 to "7': then turn the PHONES volume control to about "7". Make sure the METER SELECT switch is set to "4 TRK". Press the PLAY switch, and check the sound recorded on track 1 by headphones, and by looking at the level meter. At this point, if the track is recorded properly and there doesn't seem to be any problems, press the REW switch and reset all the knobs and controls to their normal positions. Now it's time to record the bass. If the recording is not to your satisfaction, you can rerecord the whole track. Or you can use the "punchin/punch-out" technique to record over a certain spot on the tape. It's explained on page 27. 21
-
 1
1 -
2
-
3
-
4
-
5
-
6
-
7
-
8
-
9
-
10
-
11
-
12
-
13
-
14
-
15
-
16
-
17
-
 18
18 -
 19
19 -
 20
20 -
 21
21 -
 22
22 -
 23
23 -
 24
24 -
 25
25 -
 26
26 -
 27
27 -
 28
28 -
29
-
30
-
31
-
32
-
33
-
34
-
35
-
36
-
37
-
38
-
39
-
40
-
41
-
42
 |
 |
