Yamaha MT1X Owner's Manual - Page 34
AUX MASTER SEND, and AUX RTN controls.
 |
View all Yamaha MT1X manuals
Add to My Manuals
Save this manual to your list of manuals |
Page 34 highlights
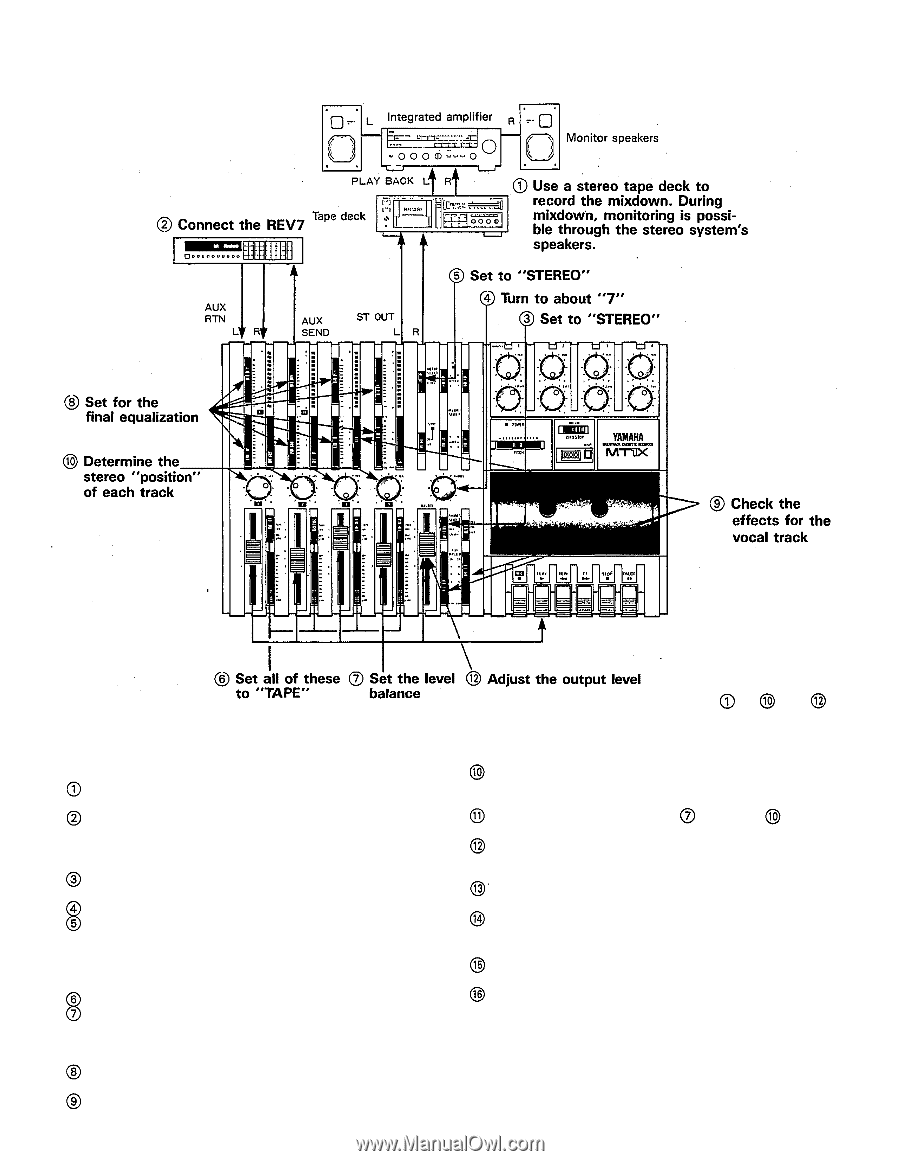
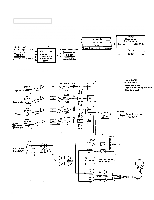
- Mixdown Procedure - *Explanation diagram for steps to and 1. Connections Connect a stereo tape deck to the ST OUT jack, and insert a blank tape to record the final mix in stereo. Connect the REV7 Digital Reverberator through the AUX SEND jack and AUX RETURN jacks. 2. Setting the meter and monitor sections Set the PHONES SELECT switch to "STEREO" in order to monitor the mixed down sound. Turn the PHONES volume to about "7". Set the METER SELECT switch to "STEREO" so that the level of the mixed down signal will be indicated. 3. Adjust the level balance and sound characteristics Set all the input select switches 1 - 4 to "TAPE". Press the PLAY switch to start the tape, and adjust the level balance of each track. Push the MASTER fader up to "7': and then set the level balance with each channel fader. Adjust the sound characteristics for each track with the equalizer controls for channels 1 - 4. Add the effects to the vocal track using the AUX 3, AUX MASTER SEND, and AUX RTN controls. Determine the stereo positioning of the instruments recorded on each track using the PAN controls 1 - 4. If necessary, repeat steps through until everything sounds right. Watching level meters 1 and 2, use the MASTER fader to set the output level of the signal sent from the ST OUT jacks. Watching the level meters of the stereo tape deck, set its proper recording level. Rewind the tape. 4. Recording Press the PLAY switch of the MT1X at the same time you start recording with the stereo tape deck. After the recording is finished, play back the mixed down tape. How does it sound? You can keep repeating the mixdown process, varying the levels, equalizations, and effect level balance until you're fully satisfied with the results. When you make that "perfect" mix, congratulations. You've finished your stereo master. - Mixdown Completed - 32
-
 1
1 -
2
-
3
-
4
-
5
-
6
-
7
-
8
-
9
-
10
-
11
-
12
-
13
-
14
-
15
-
16
-
17
-
18
-
19
-
20
-
21
-
22
-
23
-
24
-
25
-
26
-
27
-
28
-
 29
29 -
 30
30 -
 31
31 -
 32
32 -
 33
33 -
 34
34 -
 35
35 -
 36
36 -
 37
37 -
 38
38 -
 39
39 -
40
-
41
-
42
 |
 |