Yamaha MT1X Owner's Manual - Page 28
Ping-pong Recording Procedure
 |
View all Yamaha MT1X manuals
Add to My Manuals
Save this manual to your list of manuals |
Page 28 highlights
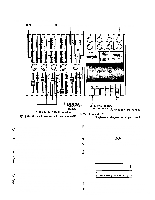
- Ping-pong Recording Procedure - Equalizer controls Make sure it's set to "4 TRK" Set the "R" position Turn to about "7" 1. Setting the recorder Set the RECORD SELECT switch to the "R" position to mix the sound of the drums, bass guitar, and rhythm guitar through the stereo buss. The REC indicator will flash. Press the PAUSE switch, then the REC switch to put the recorder into the REC PAUSE mode. The REC indicator will light. 2. Setting the monitor and meter sections Set the PHONES SELECT switch to the "MONITOR" position to monitor the sound recorded onto track 4. Turn the MONITOR LEVEL 4 control to about "7". Turn the PHONES volume control to about "7". Make sure the METER SELECT switch is set to "4 TRK": 3. Adjusting the level balance and sound characteristics Set input selector switches 1 - 3 to the "TAPE" position. Press the PAUSE switch to start the tape. Adjust the input balance of each track with the in- put faders 1 through 3. Set the overall level with the MASTER fader. Use the, level meter on the far right as the reference. Set the equalizer controls for each, channel, 1-3, to get the desired tone for each instrument. AFTER PING-PONGING IT WILL BE IMPOSSIBLE TO CHANGE THE TONE OR LEVEL BALANCE FOR EACH INSTRUMENT SEPARATELY. If necessary, repeat steps as many times as you like until everything sounds right. Rewind the tape, and reset to the REC PAUSE mode. 4. Recording Push the PAUSE switch to start recording. When ping-pong recording is finished, rewind the tape. - Ping-pong Recording Completed - Track 1 Track 2 Track 3 5. Post recording check Just press the PLAY switch to check if everything was recorded properly. Return all switches and controls to their normal positions, and rewind the tape Next, we will record 26 the keyboards.
-
 1
1 -
2
-
3
-
4
-
5
-
6
-
7
-
8
-
9
-
10
-
11
-
12
-
13
-
14
-
15
-
16
-
17
-
18
-
19
-
20
-
21
-
22
-
 23
23 -
 24
24 -
 25
25 -
 26
26 -
 27
27 -
 28
28 -
 29
29 -
 30
30 -
 31
31 -
 32
32 -
 33
33 -
34
-
35
-
36
-
37
-
38
-
39
-
40
-
41
-
42
 |
 |
