Yamaha MT1X Owner's Manual - Page 25
Bass guitar recording procedure, Connections, Setting the recorder, Setting the monitor and meter
 |
View all Yamaha MT1X manuals
Add to My Manuals
Save this manual to your list of manuals |
Page 25 highlights
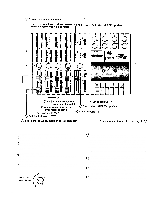
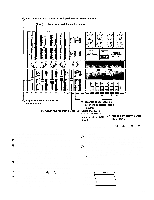
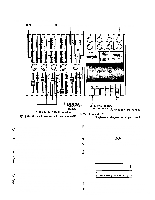
- Bass guitar recording procedure - 1. Connections Connect everything through input jack 2 as follows. If the GC2020 is being used, connect it between the amplifier and input jack 2. When not using a bass amp, the use of a direct box is recommended. 2. Setting the recorder Make sure the tape has been rewound to the "999" point on the counter. (This also goes for the rest of the steps.) Keep the ZERO STOP switch "ON" until mixdown. (This also goes for the rest of the steps.) Keep the dbx switch "ON" until mixdown. (This also goes for the rest of the steps) Set the RECORD SELECT position to "2", the REC indicator will flash to show that the bass guitar con- nected to input jack 2 will be recorded on track 2. Press the pause switch to start the recording. The REC indicator will light up completely. Connect the monitor headphones. Until the mixdown process, only use headphones and avoid using monitor speakers. (This also goes for the rest of the steps.) 3. Setting the monitor and meter sections Set the PHONES SELECT switch to the "MONITOR" position. Turn MONITOR LEVEL controls 1 and 2 to about "7': Set the PHONES volume level to about "7". Make sure the METER SELECT switch is in the "4 TRK" position. 23
-
 1
1 -
2
-
3
-
4
-
5
-
6
-
7
-
8
-
9
-
10
-
11
-
12
-
13
-
14
-
15
-
16
-
17
-
18
-
19
-
 20
20 -
 21
21 -
 22
22 -
 23
23 -
 24
24 -
 25
25 -
 26
26 -
 27
27 -
 28
28 -
 29
29 -
 30
30 -
31
-
32
-
33
-
34
-
35
-
36
-
37
-
38
-
39
-
40
-
41
-
42
 |
 |
