Yamaha MT1X Owner's Manual - Page 32
Punch-in/Punch-out Completed
 |
View all Yamaha MT1X manuals
Add to My Manuals
Save this manual to your list of manuals |
Page 32 highlights
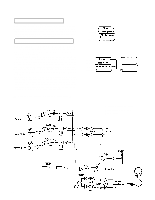
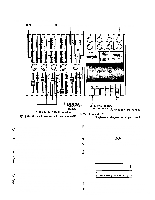
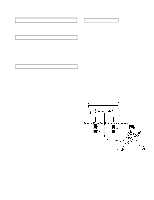
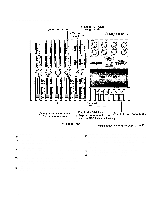
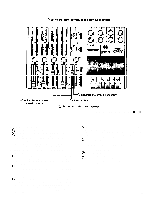
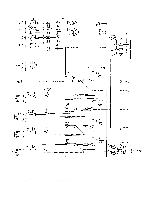
*Explanation diagram for steps to 4. Setting input levels Set input select switch 3 to "MIC/LlNE". Set both input fader 3 and the MASTER fader to "7". Slide gain control 3 in the "MIC" direction, stopping when the "+3" LED indicator on the. level meter third from the left flashes occasionally on music peaks. (Setting the same as when the vocals were initially recorded is recommended.) 5. Adjusting the recording level and sound characteristics Using the equalizer controls for channel 3, adjust for the desired sound characteristics. It's a good idea to set them where they were for the initial recording. After setting the equalization, set the recording level, preferably at the same level as the initial recording. 6. Recording Press the PAUSE switch to start the recording. "Punch-in" when you reach the passage that must be redone by sliding the RECORD SELECT switch to the "3" position. When using the FS-1, press on the foot switch. In both cases, the REC indicator will light. "Punch-out" when you have finished redoing the passage by sliding the RECORD SELECT switch to the "OFF" position. When using the FS-1, press on the foot switch again. In both cases, the REC indicator will begin flashing. Rewind the tape. - Punch-in/Punch-out Completed - 7. Post recording check Press the PLAY switch to make sure the passage was redone correctly. Return all controls and switches to their normal positions, and rewind the tape. We're now ready for mixdown recording. 30
-
 1
1 -
2
-
3
-
4
-
5
-
6
-
7
-
8
-
9
-
10
-
11
-
12
-
13
-
14
-
15
-
16
-
17
-
18
-
19
-
20
-
21
-
22
-
23
-
24
-
25
-
26
-
 27
27 -
 28
28 -
 29
29 -
 30
30 -
 31
31 -
 32
32 -
 33
33 -
 34
34 -
 35
35 -
 36
36 -
 37
37 -
38
-
39
-
40
-
41
-
42
 |
 |
