Yamaha MT1X Owner's Manual - Page 26
Bass Guitar Recording completed
 |
View all Yamaha MT1X manuals
Add to My Manuals
Save this manual to your list of manuals |
Page 26 highlights
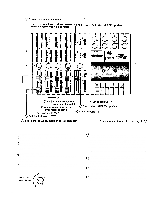
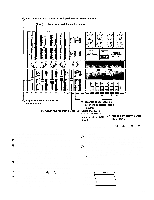
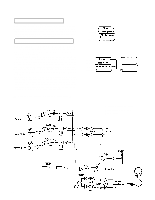
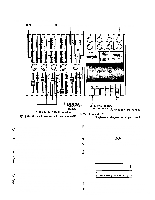
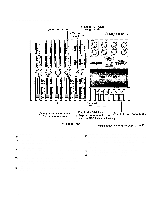
Equalizer controls Press the PAUSE button and adjust the monitor levels Set to the MIC/LINE position Set by the reading on the level meter Push up to about "7" Set after setting equalization *Explanation diagram for steps to 4. Adjusting the Input level Set the input selector switch to the MIC/LINE position. Push input fader 2 up to about "7". Start playing the bass guitar, and slide gain control 2 towards the "MIC" direction, stopping when the "+3" indicator on the level meter second from the left flashes occasionally on the sound peaks. 5. Adjusting the recording level and sound characteristics Operate the equalizer controls for channel 2 to get the desired tone. (If you plan to ping-pong this track later, boost up the treble a little bit with the HIGH EQ control.) Use input fader 2 to adjust the recording level according to the reading on the meter second from the left. 6. Adjusting the monitor sound Press the PAUSE switch to start the tape, and set the sound balance of the bass guitar and drums. If necessary, control the combined volume level with the PHONES volume control. Now, using MONITOR PAN controls 1 and 2, decide the left/ right stereo positioning of the two tracks. (During this, the bass guitar will be recorded on track 2.) After you have adjusted the monitor levels and pans to your satisfaction, rewind the tape and set the recorder into the REC PAUSE mode. 7. Recording Press the PAUSE switch to start recording. While monitoring through headphones, the bass player should play along in synch with the drum track. When the musical segment is over, stop and rewind the tape. - Bass Guitar Recording completed - Track 1 Track 2 Track 3 Track 4 8. Post recording check Just press the play switch to check to see that the track was recorded properly. Set all switches and controls back to their normal positions. 24
-
 1
1 -
2
-
3
-
4
-
5
-
6
-
7
-
8
-
9
-
10
-
11
-
12
-
13
-
14
-
15
-
16
-
17
-
18
-
19
-
20
-
 21
21 -
 22
22 -
 23
23 -
 24
24 -
 25
25 -
 26
26 -
 27
27 -
 28
28 -
 29
29 -
 30
30 -
 31
31 -
32
-
33
-
34
-
35
-
36
-
37
-
38
-
39
-
40
-
41
-
42
 |
 |
