ZyXEL P-320W User Guide - Page 137
Dynamic DNS Screen, Time Setting Screen
 |
View all ZyXEL P-320W manuals
Add to My Manuals
Save this manual to your list of manuals |
Page 137 highlights
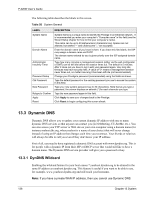
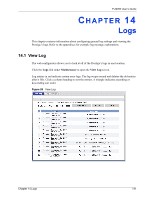
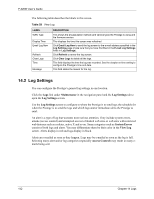
P-320W User's Guide 13.4 Dynamic DNS Screen To change your Prestige's DDNS, click the System link under Maintenance and the Dynamic DNS tab. The screen appears as shown. Figure 87 Dynamic DNS The following table describes the labels in this screen. Table 57 Dynamic DNS LABEL DESCRIPTION Enable Dynamic DNS Select this check box to use dynamic DNS. Service Provider Select the name of your Dynamic DNS service provider. Host Name Enter a host namesin the feld provided. You can specify up to two host names in the field separated by a comma (","). User Name Enter your user name. Password Enter the password assigned to you. Enable Wildcard Option Select the check box to enable DynDNS Wildcard. Apply Click Apply to save your changes back to the Prestige. Reset Click Reset to begin configuring this screen afresh. 13.5 Time Setting Screen To change your Prestige's time and date, click the System link under Maintenance and the Time Setting tab. The screen appears as shown. Use this screen to configure the Prestige's time based on your local time zone. Chapter 13 System 137
-
 1
1 -
2
-
3
-
4
-
5
-
6
-
7
-
8
-
9
-
10
-
11
-
12
-
13
-
14
-
15
-
16
-
17
-
18
-
19
-
20
-
21
-
22
-
23
-
24
-
25
-
26
-
27
-
28
-
29
-
30
-
31
-
32
-
33
-
34
-
35
-
36
-
37
-
38
-
39
-
40
-
41
-
42
-
43
-
44
-
45
-
46
-
47
-
48
-
49
-
50
-
51
-
52
-
53
-
54
-
55
-
56
-
57
-
58
-
59
-
60
-
61
-
62
-
63
-
64
-
65
-
66
-
67
-
68
-
69
-
70
-
71
-
72
-
73
-
74
-
75
-
76
-
77
-
78
-
79
-
80
-
81
-
82
-
83
-
84
-
85
-
86
-
87
-
88
-
89
-
90
-
91
-
92
-
93
-
94
-
95
-
96
-
97
-
98
-
99
-
100
-
101
-
102
-
103
-
104
-
105
-
106
-
107
-
108
-
109
-
110
-
111
-
112
-
113
-
114
-
115
-
116
-
117
-
118
-
119
-
120
-
121
-
122
-
123
-
124
-
125
-
126
-
127
-
128
-
129
-
130
-
131
-
 132
132 -
 133
133 -
 134
134 -
 135
135 -
 136
136 -
 137
137 -
 138
138 -
 139
139 -
 140
140 -
 141
141 -
 142
142 -
143
-
144
-
145
-
146
-
147
-
148
-
149
-
150
-
151
-
152
-
153
-
154
-
155
-
156
-
157
-
158
-
159
-
160
-
161
-
162
-
163
-
164
-
165
-
166
-
167
-
168
-
169
-
170
-
171
-
172
-
173
-
174
-
175
-
176
-
177
-
178
-
179
-
180
-
181
-
182
-
183
-
184
-
185
-
186
-
187
-
188
-
189
-
190
-
191
-
192
-
193
-
194
-
195
-
196
-
197
-
198
-
199
-
200
-
201
-
202
-
203
-
204
-
205
-
206
-
207
-
208
-
209
-
210
-
211
-
212
-
213
-
214
-
215
 |
 |
