ZyXEL P-320W User Guide - Page 75
Starting OTIST, Notes on OTIST - review
 |
View all ZyXEL P-320W manuals
Add to My Manuals
Save this manual to your list of manuals |
Page 75 highlights
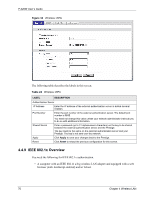
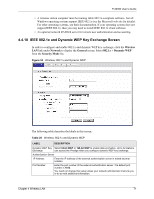
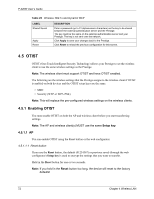
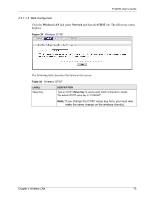
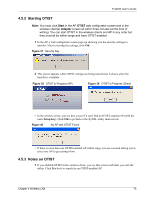
P-320W User's Guide 4.5.2 Starting OTIST Note: You must click Start in the AP OTIST web configurator screen and in the wireless client(s) Adapter screen all within three minutes (at the time of writing). You can start OTIST in the wireless clients and AP in any order but they must all be within range and have OTIST enabled. 1 In the AP, a web configurator screen pops up showing you the security settings to transfer. After reviewing the settings, click OK. Figure 37 Security Key 2 This screen appears while OTIST settings are being transferred. It closes when the transfer is complete. Figure 38 OTIST in Progress (AP) Figure 39 OTIST in Progress (Client) • In the wireless client, you see this screen if it can't find an OTIST-enabled AP (with the same Setup key). Click OK to go back to the ZyXEL utility main screen. Figure 40 No AP with OTIST Found • If there is more than one OTIST-enabled AP within range, you see a screen asking you to select one AP to get settings from. 4.5.3 Notes on OTIST 1 If you enabled OTIST in the wireless client, you see this screen each time you start the utility. Click Yes for it to search for an OTIST-enabled AP. Chapter 4 Wireless LAN 75
-
 1
1 -
2
-
3
-
4
-
5
-
6
-
7
-
8
-
9
-
10
-
11
-
12
-
13
-
14
-
15
-
16
-
17
-
18
-
19
-
20
-
21
-
22
-
23
-
24
-
25
-
26
-
27
-
28
-
29
-
30
-
31
-
32
-
33
-
34
-
35
-
36
-
37
-
38
-
39
-
40
-
41
-
42
-
43
-
44
-
45
-
46
-
47
-
48
-
49
-
50
-
51
-
52
-
53
-
54
-
55
-
56
-
57
-
58
-
59
-
60
-
61
-
62
-
63
-
64
-
65
-
66
-
67
-
68
-
69
-
 70
70 -
 71
71 -
 72
72 -
 73
73 -
 74
74 -
 75
75 -
 76
76 -
 77
77 -
 78
78 -
 79
79 -
 80
80 -
81
-
82
-
83
-
84
-
85
-
86
-
87
-
88
-
89
-
90
-
91
-
92
-
93
-
94
-
95
-
96
-
97
-
98
-
99
-
100
-
101
-
102
-
103
-
104
-
105
-
106
-
107
-
108
-
109
-
110
-
111
-
112
-
113
-
114
-
115
-
116
-
117
-
118
-
119
-
120
-
121
-
122
-
123
-
124
-
125
-
126
-
127
-
128
-
129
-
130
-
131
-
132
-
133
-
134
-
135
-
136
-
137
-
138
-
139
-
140
-
141
-
142
-
143
-
144
-
145
-
146
-
147
-
148
-
149
-
150
-
151
-
152
-
153
-
154
-
155
-
156
-
157
-
158
-
159
-
160
-
161
-
162
-
163
-
164
-
165
-
166
-
167
-
168
-
169
-
170
-
171
-
172
-
173
-
174
-
175
-
176
-
177
-
178
-
179
-
180
-
181
-
182
-
183
-
184
-
185
-
186
-
187
-
188
-
189
-
190
-
191
-
192
-
193
-
194
-
195
-
196
-
197
-
198
-
199
-
200
-
201
-
202
-
203
-
204
-
205
-
206
-
207
-
208
-
209
-
210
-
211
-
212
-
213
-
214
-
215
 |
 |
