ZyXEL P-320W User Guide - Page 40
P-320W User's Guide, Introducing the Web Configurator, Screens Summary
 |
View all ZyXEL P-320W manuals
Add to My Manuals
Save this manual to your list of manuals |
Page 40 highlights
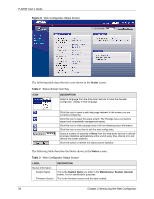
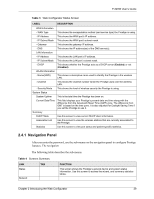
P-320W User's Guide Table 4 Screens Summary LINK TAB FUNCTION Wireless LAN General OTIST MAC Filter WAN LAN DHCP Server Advanced Internet Connection Advanced Traffic Redirect IP General Static DHCP Client List NAT Security Firewall General Port Forwarding Trigger Port General Services Management Static Route Static Route Rules Remote MGMT WWW SNMP UPnP Maintenance System Logs Security General General Dynamic DNS Time Setting View Log Log Settings Use this screen to configure wireless LAN. This screen allows you to assign wireless clients the Prestige's wireless security settings. Use the MAC filter screen to configure the Prestige to block access to devices or block the devices from accessing the Prestige. This screen allows you to configure other advanced WLAN properties. This screen allows you to configure ISP parameters, WAN IP address assignment and the WAN MAC address. Use this screen to configure DNS servers. Use this screen to configure your traffic redirect properties and parameters. Use this screen to configure LAN settings. Use this screen to enable the Prestige's DHCP server and to have DNS servers assigned by the DHCP server. Use this screen to assign IP addresses on the LAN to specific individual computers based on their MAC addresses. Use this screen to view current DHCP client information and to always assign an IP address to a MAC address (and host name). Use this screen to enable NAT. Use this screen to configure servers behind the Prestige. Use this screen to change your Prestige's port triggering settings. Use this screen to activate/deactivate the firewall. This screen shows a summary of the firewall rules, and allows you to edit/ add a firewall rule. Use this screen to configure IP static routes. Use this screen to configure through which interface(s) and from which IP address(es) users can use HTTP to manage the Prestige. Use this screen to configure your Prestige's settings for Simple Network Management Protocol management. Use this screen to change your anti-probing settings. Use this screen to enable UPnP on the Prestige. This screen contains administrative. Use this screen to set up dynamic DNS. Use this screen to change your Prestige's time and date. Use this screen to view the logs for the categories that you selected. Use this screen to change your Prestige's log settings. 40 Chapter 2 Introducing the Web Configurator
-
 1
1 -
2
-
3
-
4
-
5
-
6
-
7
-
8
-
9
-
10
-
11
-
12
-
13
-
14
-
15
-
16
-
17
-
18
-
19
-
20
-
21
-
22
-
23
-
24
-
25
-
26
-
27
-
28
-
29
-
30
-
31
-
32
-
33
-
34
-
 35
35 -
 36
36 -
 37
37 -
 38
38 -
 39
39 -
 40
40 -
 41
41 -
 42
42 -
 43
43 -
 44
44 -
 45
45 -
46
-
47
-
48
-
49
-
50
-
51
-
52
-
53
-
54
-
55
-
56
-
57
-
58
-
59
-
60
-
61
-
62
-
63
-
64
-
65
-
66
-
67
-
68
-
69
-
70
-
71
-
72
-
73
-
74
-
75
-
76
-
77
-
78
-
79
-
80
-
81
-
82
-
83
-
84
-
85
-
86
-
87
-
88
-
89
-
90
-
91
-
92
-
93
-
94
-
95
-
96
-
97
-
98
-
99
-
100
-
101
-
102
-
103
-
104
-
105
-
106
-
107
-
108
-
109
-
110
-
111
-
112
-
113
-
114
-
115
-
116
-
117
-
118
-
119
-
120
-
121
-
122
-
123
-
124
-
125
-
126
-
127
-
128
-
129
-
130
-
131
-
132
-
133
-
134
-
135
-
136
-
137
-
138
-
139
-
140
-
141
-
142
-
143
-
144
-
145
-
146
-
147
-
148
-
149
-
150
-
151
-
152
-
153
-
154
-
155
-
156
-
157
-
158
-
159
-
160
-
161
-
162
-
163
-
164
-
165
-
166
-
167
-
168
-
169
-
170
-
171
-
172
-
173
-
174
-
175
-
176
-
177
-
178
-
179
-
180
-
181
-
182
-
183
-
184
-
185
-
186
-
187
-
188
-
189
-
190
-
191
-
192
-
193
-
194
-
195
-
196
-
197
-
198
-
199
-
200
-
201
-
202
-
203
-
204
-
205
-
206
-
207
-
208
-
209
-
210
-
211
-
212
-
213
-
214
-
215
 |
 |
