ZyXEL P-320W User Guide - Page 72
Enabling OTIST
 |
View all ZyXEL P-320W manuals
Add to My Manuals
Save this manual to your list of manuals |
Page 72 highlights
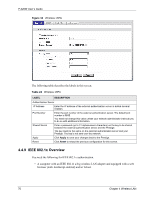
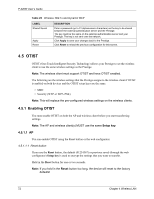
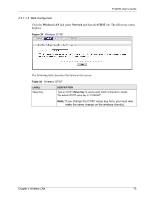
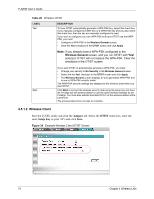
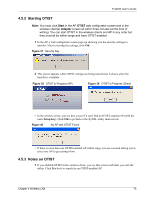
P-320W User's Guide Table 25 Wireless: 802.1x and Dynamic WEP LABEL Shared Secret Apply Reset DESCRIPTION Enter a password (up to 31 alphanumeric characters) as the key to be shared between the external authentication server and the Prestige. The key must be the same on the external authentication server and your Prestige. The key is not sent over the network. Click Apply to save your changes back to the Prestige. Click Reset to reload the previous configuration for this screen. 4.5 OTIST OTIST (One-Touch Intelligent Security Technology) allows your Prestige to set the wireless client to use the same wireless settings as the Prestige. Note: The wireless client must support OTIST and have OTIST enabled. The following are the wireless settings that the Prestige assigns to the wireless client if OTIST is enabled on both devices and the OTIST setup keys are the same. • SSID • Security (WEP or WPA-PSK) Note: This will replace the pre-configured wireless settings on the wireless clients. 4.5.1 Enabling OTIST You must enable OTIST on both the AP and wireless client before you start transferring settings. Note: The AP and wireless client(s) MUST use the same Setup key. 4.5.1.1 AP You can enable OTIST using the Reset button or the web configurator. 4.5.1.1.1 Reset button If you use the Reset button, the default (01234567) or previous saved (through the web configurator) Setup key is used to encrypt the settings that you want to transfer. Hold in the Reset button for one or two seconds. Note: If you hold in the Reset button too long, the device will reset to the factory defaults! 72 Chapter 4 Wireless LAN
-
 1
1 -
2
-
3
-
4
-
5
-
6
-
7
-
8
-
9
-
10
-
11
-
12
-
13
-
14
-
15
-
16
-
17
-
18
-
19
-
20
-
21
-
22
-
23
-
24
-
25
-
26
-
27
-
28
-
29
-
30
-
31
-
32
-
33
-
34
-
35
-
36
-
37
-
38
-
39
-
40
-
41
-
42
-
43
-
44
-
45
-
46
-
47
-
48
-
49
-
50
-
51
-
52
-
53
-
54
-
55
-
56
-
57
-
58
-
59
-
60
-
61
-
62
-
63
-
64
-
65
-
66
-
 67
67 -
 68
68 -
 69
69 -
 70
70 -
 71
71 -
 72
72 -
 73
73 -
 74
74 -
 75
75 -
 76
76 -
 77
77 -
78
-
79
-
80
-
81
-
82
-
83
-
84
-
85
-
86
-
87
-
88
-
89
-
90
-
91
-
92
-
93
-
94
-
95
-
96
-
97
-
98
-
99
-
100
-
101
-
102
-
103
-
104
-
105
-
106
-
107
-
108
-
109
-
110
-
111
-
112
-
113
-
114
-
115
-
116
-
117
-
118
-
119
-
120
-
121
-
122
-
123
-
124
-
125
-
126
-
127
-
128
-
129
-
130
-
131
-
132
-
133
-
134
-
135
-
136
-
137
-
138
-
139
-
140
-
141
-
142
-
143
-
144
-
145
-
146
-
147
-
148
-
149
-
150
-
151
-
152
-
153
-
154
-
155
-
156
-
157
-
158
-
159
-
160
-
161
-
162
-
163
-
164
-
165
-
166
-
167
-
168
-
169
-
170
-
171
-
172
-
173
-
174
-
175
-
176
-
177
-
178
-
179
-
180
-
181
-
182
-
183
-
184
-
185
-
186
-
187
-
188
-
189
-
190
-
191
-
192
-
193
-
194
-
195
-
196
-
197
-
198
-
199
-
200
-
201
-
202
-
203
-
204
-
205
-
206
-
207
-
208
-
209
-
210
-
211
-
212
-
213
-
214
-
215
 |
 |
