1994 Chevrolet Camaro Owner's Manual - Page 86
1994 Chevrolet Camaro Manual

Page 86 highlights
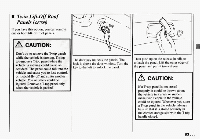
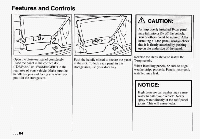
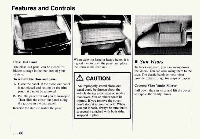
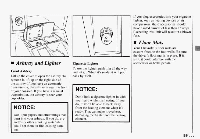
Features and Controls Open the close-out panel completely. Place the panel in the correct slot ("DRIVER" or "PASSENGER') in the rear area of your vehicle. Make sure the handle is open and facing you when you put it in the storage slot. 'ush'thehandle closed to secure the pane n the slot. To lock each panel in the torage area, use your door key. Reverse the steps above to install the T-top panels. When installing panels, be sure to align weatherstrips properly. Panels incorrectly installed may leak. I NOTICE: High pressure car washes may cause water to enter your vehicle. Never spray water directly at the roof panel joints. This will cause leaks. ...84
-
 1
1 -
2
-
3
-
4
-
5
-
6
-
7
-
8
-
9
-
10
-
11
-
12
-
13
-
14
-
15
-
16
-
17
-
18
-
19
-
20
-
21
-
22
-
23
-
24
-
25
-
26
-
27
-
28
-
29
-
30
-
31
-
32
-
33
-
34
-
35
-
36
-
37
-
38
-
39
-
40
-
41
-
42
-
43
-
44
-
45
-
46
-
47
-
48
-
49
-
50
-
51
-
52
-
53
-
54
-
55
-
56
-
57
-
58
-
59
-
60
-
61
-
62
-
63
-
64
-
65
-
66
-
67
-
68
-
69
-
70
-
71
-
72
-
73
-
74
-
75
-
76
-
77
-
78
-
79
-
80
-
 81
81 -
 82
82 -
 83
83 -
 84
84 -
 85
85 -
 86
86 -
 87
87 -
 88
88 -
 89
89 -
 90
90 -
 91
91 -
92
-
93
-
94
-
95
-
96
-
97
-
98
-
99
-
100
-
101
-
102
-
103
-
104
-
105
-
106
-
107
-
108
-
109
-
110
-
111
-
112
-
113
-
114
-
115
-
116
-
117
-
118
-
119
-
120
-
121
-
122
-
123
-
124
-
125
-
126
-
127
-
128
-
129
-
130
-
131
-
132
-
133
-
134
-
135
-
136
-
137
-
138
-
139
-
140
-
141
-
142
-
143
-
144
-
145
-
146
-
147
-
148
-
149
-
150
-
151
-
152
-
153
-
154
-
155
-
156
-
157
-
158
-
159
-
160
-
161
-
162
-
163
-
164
-
165
-
166
-
167
-
168
-
169
-
170
-
171
-
172
-
173
-
174
-
175
-
176
-
177
-
178
-
179
-
180
-
181
-
182
-
183
-
184
-
185
-
186
-
187
-
188
-
189
-
190
-
191
-
192
-
193
-
194
-
195
-
196
-
197
-
198
-
199
-
200
-
201
-
202
-
203
-
204
-
205
-
206
-
207
-
208
-
209
-
210
-
211
-
212
-
213
-
214
-
215
-
216
-
217
-
218
-
219
-
220
-
221
-
222
-
223
-
224
-
225
-
226
-
227
-
228
-
229
-
230
-
231
-
232
-
233
-
234
-
235
-
236
-
237
-
238
-
239
-
240
-
241
-
242
-
243
-
244
-
245
-
246
-
247
-
248
-
249
-
250
-
251
-
252
-
253
-
254
-
255
-
256
-
257
-
258
-
259
-
260
-
261
-
262
-
263
-
264
-
265
-
266
-
267
-
268
-
269
-
270
-
271
-
272
-
273
-
274
-
275
-
276
-
277
-
278
-
279
-
280
-
281
-
282
-
283
-
284
-
285
-
286
-
287
-
288
-
289
-
290
-
291
-
292
 |
 |

Features
and
Controls
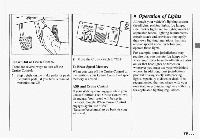
Open
the
close-out panel completely.
Place the panel
in
the correct slot
(“DRIVER”
or “PASSENGER’)
in
the
rear area
of
your vehicle. Make sure the
handle
is
open and facing you
when
you
put
it
in
the storage slot.
’ush’the handle closed
to
secure
the
pane
n
the slot.
To
lock each panel
in
the
torage area, use your door key.
Reverse the steps above
to
install the
T-top panels.
When installing panels, be sure
to
align
weatherstrips properly. Panels incorrectly
installed may leak.
I
NOTICE:
High pressure car washes may cause
water to enter your vehicle. Never
spray water directly at
the
roof
panel
joints.
This
will cause leaks.
...
84