Brother International BAS-760 Instruction Manual - English
Brother International BAS-760 Manual
 |
View all Brother International BAS-760 manuals
Add to My Manuals
Save this manual to your list of manuals |
Brother International BAS-760 manual content summary:
- Brother International BAS-760 | Instruction Manual - English - Page 1
AUTOMATIC POCKET SETTER INSTRUCTION MANUAL BAS-760 86 -40 - Brother International BAS-760 | Instruction Manual - English - Page 2
CONTENTS ( NAMES OF THE PARTS ) 1 ( NOTES ON THE CONTROL BOX AND THE FOOT-SWITCHES ) 3 ( INSTALLATION ) of the foot-switch connector 6 Connection of the air hose 7 Positioning of the front supporter 7 Installation of the folding group assembly 8 ( LUBRICATION ) 9 (CORRECT OPERATION) - Brother International BAS-760 | Instruction Manual - English - Page 3
( PROGRAMMING PROCEDURES ) 26 Preliminary procedure 26 Programming a pattern one stitch at a time 27 Programming a pattern containing numerous straight lines 27 Programming a skipped start sewing 29 Programming a pattern by employing the smoothing operation 30 Programming a pattern by - Brother International BAS-760 | Instruction Manual - English - Page 4
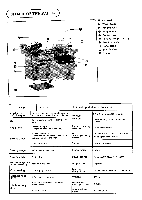
( NAMES OF THE PARTS 0- 4 ;r -g-----i,llN,tij;Pz)4•) 0'i t . 'i.f111•5 riffirirr".'- -- ' crILI M Iftli I if Folding group assembly O Front supporter C) Spool stand • Machine head Cl Stacker Model Appl icable machine type Use Cycle time Sewing speed BAS-760 Automatic pocket setter (for - Brother International BAS-760 | Instruction Manual - English - Page 5
used can be the DB2-B737 bobbin which can also be used together with the double hook. • Rotary hook Parts code 524903-001 For BAS-760 • Bobbin case assembly Parts code 523845-001 For DB2-B737 wreee3T (524904-001) Piz -5.7-37.- r e . CAS 7 Cr). (523847-001) * When inserting the bobbin case - Brother International BAS-760 | Instruction Manual - English - Page 6
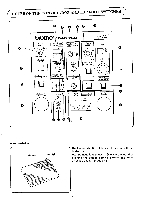
( NOTES ON THE CONTROL BOX AND THE FOOT-SWITCHES 0 0 00 brother BAS - SD f -H MODE AUT02 MANUAL PRO A NO. _t THR AO MONIT SPEED 5 (A) la M POWER 5'7\ I-TEST AUTO1 LABEL O 4 `M STEP 70x;0- FLOPPY FOOT X1000 Ac0:13Z34 BOBBIN CHANGE START co Cb- STACKER - Brother International BAS-760 | Instruction Manual - English - Page 7
O MODE LABEL MANUAL AUTO1 AUTO2 • STEP • STACKER ON • OFF O FOLDER RESET O PROGRAM NO. @ FLOPPY 0 THREAD MONITOR O FOOT O SPEED O BOBBIN CHANGE 0 TEST @ START @ STEP BACK O FAST EM STOP O ALARM lamp @ ALARM CODE and PIECE COUNTER • COUNTER DEC • BOBBIN COUNTER €1:1 SET 0 READ Pressing the right - Brother International BAS-760 | Instruction Manual - English - Page 8
C INSTALLATION * Supply power directly from a receptacle for the machine's exclusive use. 0 Be sure to power off when installating. 111 Installation of the machine table 1. Secure the level adjusters 0 so that the table top remain level. 2. The table has eight level adjusters. If the table does - Brother International BAS-760 | Instruction Manual - English - Page 9
connectors to control box 0 and tighten screws O. 4. Remove clamping screw 0. 5. Attach a grounding wire and tighten clamping screw O. 6. Secure panel supporting stud @ with screw O. 7. Install pocket bearing CI on control box 0 with screws Q. 0 El Connection of the foot-switch connector 1. Connect - Brother International BAS-760 | Instruction Manual - English - Page 10
air unit valve upward and adjust the air pressure to 5 kgf/cm2. 3. After adjustment, move the cap downward and lock. El Positioning of the front supporter 1. Loosen bolts 0 and position front suppoter in the most appropriate position. 2. Tighten bolts 0 to secure the - Brother International BAS-760 | Instruction Manual - English - Page 11
E Installation of the folding group assembly * Apply air pressure. * Turn on power switch 0 to return the machine to the home position. *Turn valve switch 61 to OFF (lower) side and "U82" will flash on the display. 0 1. Install folding clamp assembly ® onto folding base 0. 2. Attach multi-connector - Brother International BAS-760 | Instruction Manual - English - Page 12
( LUBRICATION ® * Check for sufficient oil through oil gauge windows ® and on the machine head and the table. If the oil amount is not sufficient, be sure to replenish it. 1. How to oil the machine head Replenish the oil through oil port 0. 2. How to oil the machine table (1) Apply air pressure and - Brother International BAS-760 | Instruction Manual - English - Page 13
CCORRECT OPERATION ./ M Needle attachment * Fully insert needle 0, with its long groove to the left, and secure it with screw P. El Upper threading 1. Apply air pressure and turn on power switch. The machine will move to the home position. Press FOOT button 0 and lower presser foot 0. 2. Pass - Brother International BAS-760 | Instruction Manual - English - Page 14
2 Bobbin case threading 1. Removal of the bobbin case .m, irttg:ED) BOBBIN CHANGE r START eah FAST I STEP BACK U (1) Press BOBBIN CHANGE button 0 and the machine will move toward you and stop; "U99" will flash on the display. (2) Take out bobbin case 0. Replace the bobbin. After replacing - Brother International BAS-760 | Instruction Manual - English - Page 15
es. * Thread take-up spring 6 5mm 5mm 50- 60 g 1. The standard thread take-up spring height is 5 mm from the lower end of the thread guide. The standard thread take-up spring force is 50 to 60 g. 2. To adjust the thread take-up spring height, loosen set-screw 0 and turn the - Brother International BAS-760 | Instruction Manual - English - Page 16
If an alarm lamp comes on at this time, read the following notes: brother BAB-760 MODE AUTOR YMCA 70/"LMg PROGRAM NO ttfr9 THREAD MOMTOR 01 LABEL 75027 switch to OFF and then turn it to ON again. In addition, if error codes U94 or U 95 are displayed, move the sewing clamp or the machine head - Brother International BAS-760 | Instruction Manual - English - Page 17
in the FDD U73 Write protected --)Change the disk window U93 Over-area during programming operation U94 X-origin switch fault, or the X origin Press FLOPPY button G. (4) At the end of floppy disk reading, the ALARM CODE/PIECE COUNTER will display the program number. (5) Check if the number of sewing - Brother International BAS-760 | Instruction Manual - English - Page 18
Press SET button 0 when setting the same quantity after changing the bobbin. Check if the display shows the set-up quantity. 1F7FD,x1SET O pj - L - 1ALARM CODE * The maximum setting valve is 399; even if a larger valve is input, the setting is fixed at 399. 7 TINA% READ 1 PIECE COUNTER 1960 - Brother International BAS-760 | Instruction Manual - English - Page 19
AUTO1: For standard sewing AUTO2: For sewing with pattern alignment operation MANUAL: For folder action checking * Set STACKER ON • OFF button O. will be regained. [ In a case of upper thread breakage • If the ALARM CODE lamp comes on with a display of U52, refer to "To continue sewing and To - Brother International BAS-760 | Instruction Manual - English - Page 20
pocket material are carried to the machine and sewing will start. 7. After completing sewing, the machine will return to the shunting position. MODE AUTOS MANUAL AUTOI IAPEL STEP 2,9,V13 - STACKER ON OFF 4 IPOSUts/P FOLDER RESET X If the STEP switch 0 is pressed at the same time as the FOLDER - Brother International BAS-760 | Instruction Manual - English - Page 21
0 are carried to the machine and sewing starts. 8. After sewing is completed, the machine will return to the standby condition. 0 MODE 0 ALU02 MANUAL AUTOI LABEL 2.7 v7 STEP STACKERON OFF FOLDER RESET \ N e X If the STEP switch is pressed at the same time as the FOLDER RESET ® button - Brother International BAS-760 | Instruction Manual - English - Page 22
X When attaching labels in alternating steps, setting DIP switch 2-1 on the folder circuit board to OFF will enable the machine to be set to alternating label attachment mode. (If the DIP switch is ON, label attachment is always performed in continuous label attachment mode.) X When the power - Brother International BAS-760 | Instruction Manual - English - Page 23
-V MODE AUT02 MANUAL AUT0I LABEL A5->7. STEP 4 0 e =I= 0 O O ON OFF EIHTMEE1 I 2345678 DIP switch 2 For 01 For ®, set the DIP switch 2-1 on the folder circuit board to ON. The - Brother International BAS-760 | Instruction Manual - English - Page 24
the side on which the material is set. The labels will be attached to the right side material. The stacker operation will not alternate in MANUAL mode. The mode and stacker roller movement are reset when either the MODE switch or stacker switch is operated, and alternating mode commences from this - Brother International BAS-760 | Instruction Manual - English - Page 25
0. The machine will stop and display "U80". Find the cause of the trouble. b(Other BAS-760 elDgessilie PROGRAM NO ±Wers9 DREAD PONTOS 0O STEP FOOT 0 noOT-oga "W" 4 indicate U52 at a thread breakage. The ALARM CODE lamp will come on. brother BAS-760 000,019 PROSE M NO Yee-e9 TREADMONITOR - Brother International BAS-760 | Instruction Manual - English - Page 26
needle will not contact sewing clamp. bather BAS-760 MODE 7.0UMLIMG PROGRAM NO. t*ent9 1PREAD BACK • theLPOwS FOLDER RESET 0 O WW- WD- P ALARM CODE D 25PARIL EM STOP 0 O C 0 / READ 1W7SM display matches the folding assembly number. 3. Select MANUAL on MODE switch ®. 4. Press TEST button - Brother International BAS-760 | Instruction Manual - English - Page 27
C OPERATION OF THE PROGRAMMER Key switches and the displays Feed key This key is used for skipped start sewing after thread trimming. Mirror key This key is used to program a smoothing operation. Command lamps After pressing the Feed key, the Mirror key, the Cancel key or the Line key, the - Brother International BAS-760 | Instruction Manual - English - Page 28
El Command list • Refer to this command list for using exact commands when programming. 111 END 2 2 2 E DATA CLEAR 2 LI Sri DOUBLE-ROW SEWING (Specify the width.) 555O TRACE 7 7 7 0 PARALLEL SHIFT El] SMOOTHING Ex. 030M: A stitch length of 3 mm (Specify the stitch If not specified: 3 mm - Brother International BAS-760 | Instruction Manual - English - Page 29
C PROGRAMMING PROCEDURES Outline the pattern to the actual size. Design the pattern with a maximum stitch length of 6.0 mm. • The maximum number of stitches is 1,000. • The maximum pattern size is 220 mm in the X direction and 250 mm in the Y direction. • There are no limits in - Brother International BAS-760 | Instruction Manual - English - Page 30
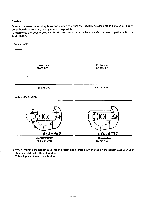
ID Programming a pattern one stitch at a time Final stitch Initial stitch Example: Program the pattern at above. (1) Press the 1C key. The sewing clamp assembly will come down and the displays X, Y and STEP will indicate "0"; command lamp [ F ] will come on. (2) Use the jog keys to move the - Brother International BAS-760 | Instruction Manual - English - Page 31
OO ©key © ©key ©key (3) When the needle tip is aligned with initial stitch position ®, press the E key. This will program the initial stitch. (4) Use the ten-keys to specify the stitch length and indicate it on the STEP display. To input the stitch length, divide the actual stitch length (mm) by - Brother International BAS-760 | Instruction Manual - English - Page 32
Ei Programming a skipped start sewing To continue sewing after trimming, use theE key for easier programming. Example: Program the pattern illustrated at left. (1) Press the E key. The sewing clamp assembly will come down and the displays X, Y and STEP will indicate "0"; command lamp [ F ] will come - Brother International BAS-760 | Instruction Manual - English - Page 33
ID Programming a pattern by employing the smoothing operation • To program a pattern smoothly by utilizing a smoothing function, instead of programming one stitch at a time, use the ten-keys and the El key. Example: Program the pattern illustrated below. (1) Press the E key. The sewing clamp - Brother International BAS-760 | Instruction Manual - English - Page 34
into a stage where keys Eh O, E and El have been pressed, and the computer will start processing. Note 4: If a smoothing position close to the sewing area border is loaded, the sewing data may exceed the range. In this case, press keys El, E, E and E to sound the buzzer; the needle will return - Brother International BAS-760 | Instruction Manual - English - Page 35
origin. (10) Write the program to the floppy disk (refer to page 38). (11) Press the© key. The display will go off. Note 1: To perform areas requiring careful attention, such as acute angles, press the El key for better results. Note 2: During programming, the (11, and n keys may be used. If - Brother International BAS-760 | Instruction Manual - English - Page 36
Programming bar tacking • Programming of bar tacking can be easily carried out by using the Ill key. Pattern 1 ©r© Example: Program the pattern illustrated at left. (1) Press the E key. The sewing clamp assembly will lower and the X, Y and STEP displays will indicate "0"; the command lamp [F I - Brother International BAS-760 | Instruction Manual - English - Page 37
Partial low speed In the partial low speed program, the speed of the variable points in the initially created program can be reduced. (A) To reduce speed to 3000 spm for 3 needles (1) Press the ©key. The sewing clamp assembly will lower and the X, Y and STEP displays will indicate "0"; the command - Brother International BAS-760 | Instruction Manual - English - Page 38
CI Example of program [Example 1] 905 Jill 8 020 J ill rsosJEI Of 032 J El 111 [020J PAI E 11 0 LI © LI The program as shown in the illustration at left will be created. (1) Press the E key. The sewing clamp assembly will lower and the X, Y and STEP displays will show "0"; the command lamp - Brother International BAS-760 | Instruction Manual - English - Page 39
values. [Example 2] The program as shown in the illustration below will be created. If this example is used as a reference when programming, problems with lifting of the bobbin thread, incorrect cutting of the needle thread and uneven needle distribution on corners in the needle down position can - Brother International BAS-760 | Instruction Manual - English - Page 40
No Notes when programming * Because the BAS-760 has a continuous-feed sewing clamp, there may be differences between the created program and the number of stitches actually sewn. (This tendency is shown in - Brother International BAS-760 | Instruction Manual - English - Page 41
El Data storage on a floppy disk • Follow the procedures below to write data to a floppy disk. Protection- 7 7075hZ§ PROGRAM NO. FLOPPY X Perform these procedures right after programming. X Release the write protection for the floppy disk before writing (close the window). After inputting data, - Brother International BAS-760 | Instruction Manual - English - Page 42
( PROGRAM MODIFICATION * Use the ri (clear) key when modifying a written program pattern due to a design change or when correcting an in-process program due to erroneous operation. * The smoothing function is not effective during modification work. Modify the program using any function except - Brother International BAS-760 | Instruction Manual - English - Page 43
El Cancelling the initial sewing stitch in a programmed stitch pattern (1) Turn the power switch to ON. (2) Press the EJ key. The sewing clamp assembly will come down and the displays X, Y and STEP will indicate "0"; command lamp F] will come on. 2 (3) Insert the floppy disk containing the - Brother International BAS-760 | Instruction Manual - English - Page 44
ID Adding a sewing operation before an initial sewing stitch in a programmed stitch pattern (1) Turn the power switch to ON. (2) Press the 0 key. The sewing clamp assembly will come down and the displays X, Y and STEP will indicate "0"; command lamp F will come on. 1 (3) Insert the floppy - Brother International BAS-760 | Instruction Manual - English - Page 45
ID Shifting a shunting point from point A to point B A B •-• 1 • 2 • 3 4 • 5 6 • 7 (1) Apply air pressure and turn on the power switch. (2) Press the E key. The sewing clamp assembly will come down and the displays X, Y and STEP will indicate "0"; command lamp [ F will come on. (3) Insert the - Brother International BAS-760 | Instruction Manual - English - Page 46
E] Parallel-shifting a programmed stitch pattern A. When the initial stitch is a programmed sewing point (1) Turn the power switch to ON. (2) Press the E key. The sewing clamp assembly will come down and the displays X, Y and STEP will indicate "0"; command lamp I F ) will come on. A (3) Insert - Brother International BAS-760 | Instruction Manual - English - Page 47
LI Cancelling points 7 and 8 after locating an error 4 56 78 (1) Press the key; the command lamp C ] will come on. (2) Use the ten-keys to indicate on the STEP display the number of steps to be cancelled (in this case, indicate "002" on the STEP display since points 7 and 8 are to be cancelled). - Brother International BAS-760 | Instruction Manual - English - Page 48
be supplied. such as to make U80 (emergency stop) come on in the manual mode. M Needle-bar height adjustment 4 Gauge 1 t 10 X When needle then bottom-plunger ®. 3. Remove screw 0 and then needle ® and needle thread guide ®. 4. Remove screw @ and then work clamp assembly (D. 5. Remove oil cap - Brother International BAS-760 | Instruction Manual - English - Page 49
LI Presser foot height adjustment 37mm O ITAIZ FOOT O 14.5mm The standard presser foot height is 14.5 mm above the needle plate when presser foot 0 is raised. 1. Loosen nut© and then pressure adjusting screw ®. 2. Press the FOOT button to raise working presser foot 0. 3. Remove face-plate oil cap - Brother International BAS-760 | Instruction Manual - English - Page 50
Removal of the movable knife // 0 1. Remove clamping screw 0 and then presser foot assembly @. 2. Turn the pulley and stop the needle bar at its highest position. 3. Remove clamping screws @ and then bottom-plunger 0. O. 4. Push thread trimming rod in the arrowed direction and stop where flat-head - Brother International BAS-760 | Instruction Manual - English - Page 51
0 Stacker roller adjustment 1. Remove clamping screws 0 to remove roller cover 0. 2. To adjust the roller rotation amount, remove bolt 0 and change the position of the rack stopper 0; tighten bolt 0. 3. To adjust the roller © position sideways, loosen setscrews 0 and re-tighten after adjustment. 4. - Brother International BAS-760 | Instruction Manual - English - Page 52
El Sewing clamp assembly number selection Slit D Slit C O ol I Clamping screw 3 x 5 Spring washer Co Sewing clamp assembly X Attach slit C and slit D to the sewing clamp assembly by a clamping screw and a spring washer. See the table below for the sewing clamp assembly numbers. Sewing clamp - Brother International BAS-760 | Instruction Manual - English - Page 53
USING THE DIP SWITCHES >K Always be sure to turn the power OFF when changing the settings of the DIP switches. The functions of the DIP switches are subject to changes without notification. 1. Functions of DIP switches on main circuit board a DIP switch 3 ON OFF I U DIP switch 1 D LI "DIP - Brother International BAS-760 | Instruction Manual - English - Page 54
2. Functions of DIP switches on folder circuit board rO 0 ON C El 1 OFF 12 345678 I 0 DIP switch 2 DIP switch • DIP switch 1 No. 1 2 3 4 5 6 7 8 Functions when ON • DIP switch 2 No. ... 1 2 3 4 5 6 7 8 Functions when ON Continuous label and stacker mode X Blank DIP switches are spare. - Brother International BAS-760 | Instruction Manual - English - Page 55
C FLOPPY DISK USE AND CARE X Observe the following for the longer life of floppy disks. When using a floppy disk pay careful attention to its magnetic properties. When handling a disk, hold it close to the label, and draw it out of the envelope. Do not touch the magnetic surface with your bare hand - Brother International BAS-760 | Instruction Manual - English - Page 56
BROTHER INDUSTRIES, LTD. NAGOYA, JAPAN 151-760 192760-002 1992, 04. H 0 Printed in Japan
-
 1
1 -
 2
2 -
 3
3 -
 4
4 -
 5
5 -
 6
6 -
 7
7 -
8
-
9
-
10
-
11
-
12
-
13
-
14
-
15
-
16
-
17
-
18
-
19
-
20
-
21
-
22
-
23
-
24
-
25
-
26
-
27
-
28
-
29
-
30
-
31
-
32
-
33
-
34
-
35
-
36
-
37
-
38
-
39
-
40
-
41
-
42
-
43
-
44
-
45
-
46
-
47
-
48
-
49
-
50
-
51
-
52
-
53
-
54
-
55
-
56
 |
 |
AUTOMATIC
POCKET
SETTER
INSTRUCTION
MANUAL
-40
BAS
-760
86