Brother International BAS-760 Instruction Manual - English - Page 11
production
 |
View all Brother International BAS-760 manuals
Add to My Manuals
Save this manual to your list of manuals |
Page 11 highlights
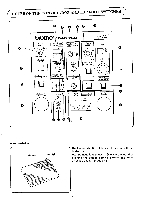
E Installation of the folding group assembly * Apply air pressure. * Turn on power switch 0 to return the machine to the home position. *Turn valve switch 61 to OFF (lower) side and "U82" will flash on the display. 0 1. Install folding clamp assembly ® onto folding base 0. 2. Attach multi-connector O. 3. While pushing the folding clamp assembly® downwards with your hand, install the inner clamp assembly @ to the folding base 0. For models with a label attachment device 0, install the plug 0 of the label attachment device 0 to the socket ®. At this time, set the label attachment device 0 so that it is in a ready condition on top of the inner clamp assembly. (Refer to page 18.) If it is reversed, it will turn downward. 4. Install center blade assembly 0 on folding base 0. 5. Install sewing clamp assembly m on sewing clamp assembly arm base ®. 6. Turn valve switch @ to ON (upper) side, when "U82" goes off to display the production piece number. 7. Move folding clamp assembly ®, inner clamp assembly @, center blade assembly 0 and sewing clamp assembly m back and forth, and right and left, to ensure they are secured. -8-
-
 1
1 -
2
-
3
-
4
-
5
-
 6
6 -
 7
7 -
 8
8 -
 9
9 -
 10
10 -
 11
11 -
 12
12 -
 13
13 -
 14
14 -
 15
15 -
 16
16 -
17
-
18
-
19
-
20
-
21
-
22
-
23
-
24
-
25
-
26
-
27
-
28
-
29
-
30
-
31
-
32
-
33
-
34
-
35
-
36
-
37
-
38
-
39
-
40
-
41
-
42
-
43
-
44
-
45
-
46
-
47
-
48
-
49
-
50
-
51
-
52
-
53
-
54
-
55
-
56
 |
 |
