Brother International DCP-8155DN Software User's Guide - English - Page 188
SCAN, Default: Apple Preview, Default: TextEdit, Using Presto, Manager
 |
View all Brother International DCP-8155DN manuals
Add to My Manuals
Save this manual to your list of manuals |
Page 188 highlights
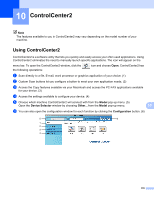
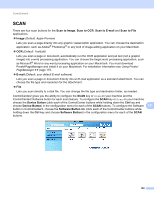
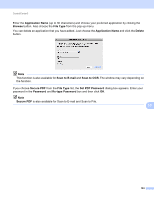
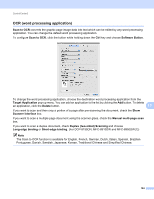
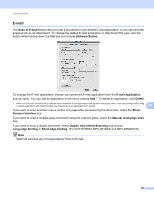
ControlCenter2 SCAN 10 There are four scan buttons for the Scan to Image, Scan to OCR, Scan to E-mail and Scan to File applications. Image (Default: Apple Preview) Lets you scan a page directly into any graphic viewer/editor application. You can choose the destination application, such as Adobe® Photoshop® or any kind of image editing application on your Macintosh. OCR (Default: TextEdit) Lets you scan a page or document, automatically run the OCR application and put text (not a graphic image) into a word processing application. You can choose the target word processing application, such as Microsoft® Word or any word processing application on your Macintosh. You must download Presto!PageManager and install it on your Macintosh. For installation information see Using Presto! PageManager uu page 175. E-mail (Default: your default E-mail software) Lets you scan a page or document directly into an E-mail application as a standard attachment. You can choose the file type and resolution for the attachment. File Lets you scan directly to a disk file. You can change the file type and destination folder, as needed. ControlCenter2 gives you the ability to configure the SCAN key or Scan on your machine and the ControlCenter2 Software button for each scan feature. To configure the SCAN key or Scan on your machine choose the Device Button (click each of the ControlCenter buttons while holding down the Ctrl key and choose Device Button) in the configuration menu for each of the SCAN buttons. To configure the Software 10 button in ControlCenter2, choose the Software Button tab (click each of the ControlCenter buttons while holding down the Ctrl key and choose Software Button) in the configuration menu for each of the SCAN buttons. 180
-
 1
1 -
2
-
3
-
4
-
5
-
6
-
7
-
8
-
9
-
10
-
11
-
12
-
13
-
14
-
15
-
16
-
17
-
18
-
19
-
20
-
21
-
22
-
23
-
24
-
25
-
26
-
27
-
28
-
29
-
30
-
31
-
32
-
33
-
34
-
35
-
36
-
37
-
38
-
39
-
40
-
41
-
42
-
43
-
44
-
45
-
46
-
47
-
48
-
49
-
50
-
51
-
52
-
53
-
54
-
55
-
56
-
57
-
58
-
59
-
60
-
61
-
62
-
63
-
64
-
65
-
66
-
67
-
68
-
69
-
70
-
71
-
72
-
73
-
74
-
75
-
76
-
77
-
78
-
79
-
80
-
81
-
82
-
83
-
84
-
85
-
86
-
87
-
88
-
89
-
90
-
91
-
92
-
93
-
94
-
95
-
96
-
97
-
98
-
99
-
100
-
101
-
102
-
103
-
104
-
105
-
106
-
107
-
108
-
109
-
110
-
111
-
112
-
113
-
114
-
115
-
116
-
117
-
118
-
119
-
120
-
121
-
122
-
123
-
124
-
125
-
126
-
127
-
128
-
129
-
130
-
131
-
132
-
133
-
134
-
135
-
136
-
137
-
138
-
139
-
140
-
141
-
142
-
143
-
144
-
145
-
146
-
147
-
148
-
149
-
150
-
151
-
152
-
153
-
154
-
155
-
156
-
157
-
158
-
159
-
160
-
161
-
162
-
163
-
164
-
165
-
166
-
167
-
168
-
169
-
170
-
171
-
172
-
173
-
174
-
175
-
176
-
177
-
178
-
179
-
180
-
181
-
182
-
 183
183 -
 184
184 -
 185
185 -
 186
186 -
 187
187 -
 188
188 -
 189
189 -
 190
190 -
 191
191 -
 192
192 -
 193
193 -
194
-
195
-
196
-
197
-
198
-
199
-
200
-
201
-
202
-
203
-
204
-
205
-
206
-
207
-
208
-
209
-
210
-
211
-
212
-
213
-
214
-
215
-
216
-
217
-
218
-
219
-
220
-
221
-
222
-
223
-
224
-
225
-
226
-
227
-
228
-
229
-
230
-
231
-
232
-
233
-
234
-
235
-
236
-
237
-
238
-
239
-
240
-
241
-
242
-
243
-
244
-
245
-
246
-
247
-
248
-
249
-
250
-
251
-
252
-
253
-
254
-
255
-
256
-
257
-
258
-
259
-
260
-
261
-
262
-
263
-
264
-
265
-
266
-
267
-
268
-
269
-
270
-
271
 |
 |