Brother International DCP-8155DN Software User's Guide - English - Page 91
Set PDF Password, OCR Language
 |
View all Brother International DCP-8155DN manuals
Add to My Manuals
Save this manual to your list of manuals |
Page 91 highlights
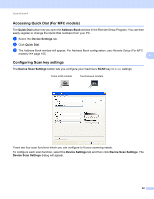
ControlCenter4 Image tab 4 Lets you configure settings for Scan to Image by pressing the SCAN key or Scan on your Brother machine. Choose the settings for File Type, Target Application, File size, Resolution, Scan Type, Document Size, Brightness and Contrast as needed. Click OK. If you choose Secure PDF from the File Type drop-down list, click the (Set PDF Password) button. The Set PDF Password dialog box will appear. Enter your password in the Password and Re-type Password boxes and then click OK. Note 4 • Secure PDF is also available for Scan to E-mail and Scan to File. • You can change the data compression ratio of the scanned image with File size. OCR tab 4 Lets you configure settings for Scan to OCR by pressing the SCAN key or Scan on your Brother machine. Choose the settings for File Type, Target Application, OCR Language, Resolution, Scan Type, Document Size, Brightness and Contrast as needed. Click OK. E-mail tab 4 Lets you configure settings for Scan to E-mail by pressing the SCAN key or Scan on your Brother machine. Choose the settings for File Type, File size, Resolution, Scan Type, Document Size, Brightness and Contrast as needed. Click OK. Note You can change the data compression ratio of the scanned image with File size. File tab 4 Lets you configure settings for Scan to E-mail by pressing the SCAN key or Scan on your Brother machine. Choose the settings for File Type, File Name, Destination Folder, Show Folder, File size, Resolution, Scan Type, Document Size, Brightness and Contrast as needed. Click OK. Note • If Show Folder is checked, the destination of the scanned image will be shown after scanning. • You can change the data compression ratio of the scanned image with File size. 83
-
 1
1 -
2
-
3
-
4
-
5
-
6
-
7
-
8
-
9
-
10
-
11
-
12
-
13
-
14
-
15
-
16
-
17
-
18
-
19
-
20
-
21
-
22
-
23
-
24
-
25
-
26
-
27
-
28
-
29
-
30
-
31
-
32
-
33
-
34
-
35
-
36
-
37
-
38
-
39
-
40
-
41
-
42
-
43
-
44
-
45
-
46
-
47
-
48
-
49
-
50
-
51
-
52
-
53
-
54
-
55
-
56
-
57
-
58
-
59
-
60
-
61
-
62
-
63
-
64
-
65
-
66
-
67
-
68
-
69
-
70
-
71
-
72
-
73
-
74
-
75
-
76
-
77
-
78
-
79
-
80
-
81
-
82
-
83
-
84
-
85
-
 86
86 -
 87
87 -
 88
88 -
 89
89 -
 90
90 -
 91
91 -
 92
92 -
 93
93 -
 94
94 -
 95
95 -
 96
96 -
97
-
98
-
99
-
100
-
101
-
102
-
103
-
104
-
105
-
106
-
107
-
108
-
109
-
110
-
111
-
112
-
113
-
114
-
115
-
116
-
117
-
118
-
119
-
120
-
121
-
122
-
123
-
124
-
125
-
126
-
127
-
128
-
129
-
130
-
131
-
132
-
133
-
134
-
135
-
136
-
137
-
138
-
139
-
140
-
141
-
142
-
143
-
144
-
145
-
146
-
147
-
148
-
149
-
150
-
151
-
152
-
153
-
154
-
155
-
156
-
157
-
158
-
159
-
160
-
161
-
162
-
163
-
164
-
165
-
166
-
167
-
168
-
169
-
170
-
171
-
172
-
173
-
174
-
175
-
176
-
177
-
178
-
179
-
180
-
181
-
182
-
183
-
184
-
185
-
186
-
187
-
188
-
189
-
190
-
191
-
192
-
193
-
194
-
195
-
196
-
197
-
198
-
199
-
200
-
201
-
202
-
203
-
204
-
205
-
206
-
207
-
208
-
209
-
210
-
211
-
212
-
213
-
214
-
215
-
216
-
217
-
218
-
219
-
220
-
221
-
222
-
223
-
224
-
225
-
226
-
227
-
228
-
229
-
230
-
231
-
232
-
233
-
234
-
235
-
236
-
237
-
238
-
239
-
240
-
241
-
242
-
243
-
244
-
245
-
246
-
247
-
248
-
249
-
250
-
251
-
252
-
253
-
254
-
255
-
256
-
257
-
258
-
259
-
260
-
261
-
262
-
263
-
264
-
265
-
266
-
267
-
268
-
269
-
270
-
271
 |
 |