Brother International DCP-8155DN Software User's Guide - English - Page 241
Using a One Touch or Speed Dial number, Duplex, Start, For Touchscreen models
 |
View all Brother International DCP-8155DN manuals
Add to My Manuals
Save this manual to your list of manuals |
Page 241 highlights
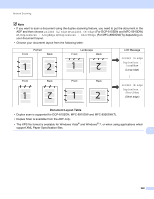
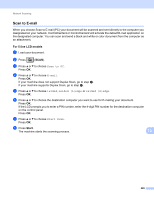
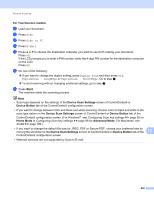
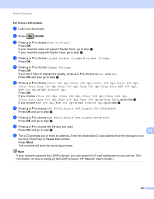
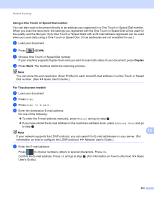
Network Scanning Using a One Touch or Speed Dial number 13 You can also scan a document directly to an address you registered in a One Touch or Speed Dial number. When you scan the document, the settings you registered with the One Touch or Speed Dial will be used for the quality and the file type. Only One Touch or Speed Dials with an E-mail address registered can be used when you scan data using a One Touch or Speed Dial. (I-Fax addresses are not available for use.) a Load your document. b Press (SCAN). c Choose One Touch or Speed Dial number. If your machine supports Duplex Scan and you want to scan both sides of your document, press Duplex. d Press Start. The machine starts the scanning process. Note You can store the scan resolution (Scan Profile) for each stored E-mail address in a One Touch or Speed Dial number. (See uu Basic User's Guide.) For Touchscreen models 13 a Load your document. b Press Scan. c Press Scan to E-mail. d Enter the destination E-mail address. Do one of the following: To enter the E-mail address manually, press Manual and go to step e. If you have stored the E-mail address to the machine's address book, press Address Book and go to step f. Note 13 If your network supports the LDAP protocol, you can search for E-mail addresses on your server. (For information on how to configure the LDAP protocol: uu Network User's Guide.) e Enter the E-mail address. Press to choose numbers, letters or special characters. Press OK. Confirm the E-mail address. Press OK and go to step g. (For information on how to enter text: uu Basic User's Guide.) 233
-
 1
1 -
2
-
3
-
4
-
5
-
6
-
7
-
8
-
9
-
10
-
11
-
12
-
13
-
14
-
15
-
16
-
17
-
18
-
19
-
20
-
21
-
22
-
23
-
24
-
25
-
26
-
27
-
28
-
29
-
30
-
31
-
32
-
33
-
34
-
35
-
36
-
37
-
38
-
39
-
40
-
41
-
42
-
43
-
44
-
45
-
46
-
47
-
48
-
49
-
50
-
51
-
52
-
53
-
54
-
55
-
56
-
57
-
58
-
59
-
60
-
61
-
62
-
63
-
64
-
65
-
66
-
67
-
68
-
69
-
70
-
71
-
72
-
73
-
74
-
75
-
76
-
77
-
78
-
79
-
80
-
81
-
82
-
83
-
84
-
85
-
86
-
87
-
88
-
89
-
90
-
91
-
92
-
93
-
94
-
95
-
96
-
97
-
98
-
99
-
100
-
101
-
102
-
103
-
104
-
105
-
106
-
107
-
108
-
109
-
110
-
111
-
112
-
113
-
114
-
115
-
116
-
117
-
118
-
119
-
120
-
121
-
122
-
123
-
124
-
125
-
126
-
127
-
128
-
129
-
130
-
131
-
132
-
133
-
134
-
135
-
136
-
137
-
138
-
139
-
140
-
141
-
142
-
143
-
144
-
145
-
146
-
147
-
148
-
149
-
150
-
151
-
152
-
153
-
154
-
155
-
156
-
157
-
158
-
159
-
160
-
161
-
162
-
163
-
164
-
165
-
166
-
167
-
168
-
169
-
170
-
171
-
172
-
173
-
174
-
175
-
176
-
177
-
178
-
179
-
180
-
181
-
182
-
183
-
184
-
185
-
186
-
187
-
188
-
189
-
190
-
191
-
192
-
193
-
194
-
195
-
196
-
197
-
198
-
199
-
200
-
201
-
202
-
203
-
204
-
205
-
206
-
207
-
208
-
209
-
210
-
211
-
212
-
213
-
214
-
215
-
216
-
217
-
218
-
219
-
220
-
221
-
222
-
223
-
224
-
225
-
226
-
227
-
228
-
229
-
230
-
231
-
232
-
233
-
234
-
235
-
 236
236 -
 237
237 -
 238
238 -
 239
239 -
 240
240 -
 241
241 -
 242
242 -
 243
243 -
 244
244 -
 245
245 -
 246
246 -
247
-
248
-
249
-
250
-
251
-
252
-
253
-
254
-
255
-
256
-
257
-
258
-
259
-
260
-
261
-
262
-
263
-
264
-
265
-
266
-
267
-
268
-
269
-
270
-
271
 |
 |