Brother International Innov-is NQ1600E Operation Manual - Page 13
Caution
 |
View all Brother International Innov-is NQ1600E manuals
Add to My Manuals
Save this manual to your list of manuals |
Page 13 highlights
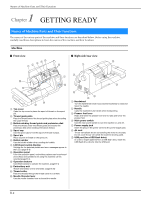
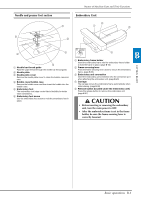
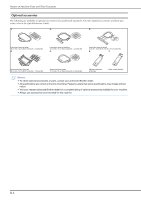
Needle and presser foot section f Names of Machine Parts and Their Functions Embroidery Unit b a a c b e c d 1 Needle bar thread guide Pass the upper thread through the needle bar thread guide. 2 Needle plate 3 Needle plate cover Remove the needle plate cover to clean the bobbin case and race. 4 Bobbin cover/bobbin case Remove the bobbin cover and then insert the bobbin into the bobbin case. 5 Embroidery foot The embroidery foot helps control fabric flexibility for better stitch consistency. 6 Embroidery foot screw Use the embroidery foot screw to hold the embroidery foot in place. e d 1 Embroidery frame holder Insert the embroidery frame into the embroidery frame holder to hold the frame in place. (page B-33) 2 Frame-securing lever Press the frame-securing lever down to secure the embroidery frame. (page B-33) 3 Embroidery unit connection Insert the embroidery unit connection into the connection port when attaching the embroidery unit. (page B-26) 4 Carriage The carriage moves the embroidery frame automatically when embroidering. (page B-26) 5 Release button (located under the embroidery unit) Press the release button to remove the embroidery unit. (page B-27) GETTING READY B CAUTION • Before inserting or removing the embroidery unit, turn the main power to OFF. • After the embroidery frame is set in the frame holder, be sure the frame-securing lever is correctly lowered. Basic operations B-3
-
 1
1 -
2
-
3
-
4
-
5
-
6
-
7
-
 8
8 -
 9
9 -
 10
10 -
 11
11 -
 12
12 -
 13
13 -
 14
14 -
 15
15 -
 16
16 -
 17
17 -
 18
18 -
19
-
20
-
21
-
22
-
23
-
24
-
25
-
26
-
27
-
28
-
29
-
30
-
31
-
32
-
33
-
34
-
35
-
36
-
37
-
38
-
39
-
40
-
41
-
42
-
43
-
44
-
45
-
46
-
47
-
48
-
49
-
50
-
51
-
52
-
53
-
54
-
55
-
56
-
57
-
58
-
59
-
60
-
61
-
62
-
63
-
64
-
65
-
66
-
67
-
68
-
69
-
70
-
71
-
72
-
73
-
74
-
75
-
76
-
77
-
78
-
79
-
80
-
81
-
82
-
83
-
84
-
85
-
86
-
87
-
88
-
89
-
90
-
91
-
92
-
93
-
94
-
95
-
96
-
97
-
98
-
99
-
100
 |
 |
