Brother International Innov-is NQ1600E Operation Manual - Page 53
Editing Patterns
 |
View all Brother International Innov-is NQ1600E manuals
Add to My Manuals
Save this manual to your list of manuals |
Page 53 highlights
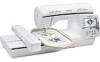
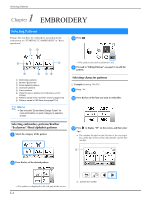
Editing Patterns Editing Patterns When a pattern is selected in the pattern selection screen and is pressed, the pattern editing screen appears. To finish editing, press to continue to the embroidery settings screen. ■ Pattern editing screen 12 3 4 F 5 E 6 D 7 8 CB A 0 9 Memo • If a key display is light gray, you cannot use that function with the selected pattern. E CAUTION • When you have revised the pattern, check the display of available embroidery frames and use an appropriate frame. If you use an embroidery frame not displayed as available for use, the presser foot may strike the frame and possibly cause injury. EMBROIDERY No. Display Key Name 1 Magnify key Explanation Press this key to magnify the pattern in the screen. Page E-8 2 Embroidery frame Shows the embroidery frames that can be used. - 3 Pattern size Shows the size of the entire combined pattern. - 4 Preview key Press this key to show sewn image. For details, refer to "Previewing the selected - pattern" in the "Basic operations" section. 5 Rotate key Press this key to rotate the pattern. You can rotate a pattern one degree, ten degrees E-6 or ninety degrees at a time. 6 Thread palette key Press this key to change the colors of the displayed pattern. E-7 7 Delete key Press this key to delete the selected pattern (the pattern outlined by the red box). E-7 8 Font edit key Press this key to display the font editing screen. For details, refer to "Editing All E-9 Patterns". 9 Edit End key Press this key to call up the frame layout screen. For details, refer to "Editing E-15 Character Patterns". 0 Memory key Press this key to save patterns to the machine's memory or USB flash drive. E-32 A Pattern select key When a combined pattern is selected, use these keys to select a part of the pattern to E-14 edit. B Add key Press this key to add another embroidery pattern to currently displayed pattern. E-13 C Horizontal mirror image Press this key to make a horizontal mirror image of the selected pattern. E-7 key D Thread density key Press this key to change thread density for some alphabet character and frame E-7 patterns. E Move key Press these keys to move the pattern. E-6 F Size key Press this key to change the size of the pattern. Patterns can be enlarged or reduced. E-6 Embroidering E-5
-
 1
1 -
2
-
3
-
4
-
5
-
6
-
7
-
8
-
9
-
10
-
11
-
12
-
13
-
14
-
15
-
16
-
17
-
18
-
19
-
20
-
21
-
22
-
23
-
24
-
25
-
26
-
27
-
28
-
29
-
30
-
31
-
32
-
33
-
34
-
35
-
36
-
37
-
38
-
39
-
40
-
41
-
42
-
43
-
44
-
45
-
46
-
47
-
 48
48 -
 49
49 -
 50
50 -
 51
51 -
 52
52 -
 53
53 -
 54
54 -
 55
55 -
 56
56 -
 57
57 -
 58
58 -
59
-
60
-
61
-
62
-
63
-
64
-
65
-
66
-
67
-
68
-
69
-
70
-
71
-
72
-
73
-
74
-
75
-
76
-
77
-
78
-
79
-
80
-
81
-
82
-
83
-
84
-
85
-
86
-
87
-
88
-
89
-
90
-
91
-
92
-
93
-
94
-
95
-
96
-
97
-
98
-
99
-
100
 |
 |
