Brother International MFC 8300 Users Manual - English - Page 74
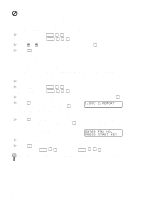
Print Sample Call Back Message, Delayed Fax, DOC 2.MEMORY
 |
UPC - 012502564614
View all Brother International MFC 8300 manuals
Add to My Manuals
Save this manual to your list of manuals |
Page 74 highlights
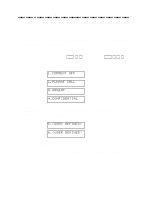
You cannot use auto redial with Call Reservation. You cannot use Call Reservation with Delayed Transmission or with Polling. You must register your Station ID to set Call Back Message to ON. Print Sample Call Back Message 1 For the FAX, press Function , 3 , 6 . For the MFC, press Function , 1 , 3 , 6 . 2 Press or to select PRINT SAMPLE? and press Set . 3 Press Start . Delayed Fax During the day you can store up to 50 documents into memory for delayed sending. Transmission of these documents will begin at the time of day you enter in Step 3. If you have set up in the Delayed Timer function, page 4-6, you can accept it in Step 3 or enter another time for this fax. 1 Insert the document in the feeder. 2 For the FAX, press Function , 3 , 7 . For the MFC, press Function , 1 , 3 , 7 . 3 Accept the displayed time or enter another time for this fax and press Set . 4 Press 1 to leave the originals waiting in 1.DOC 2.MEMORY the document feeder-OR-Press 2 to scan the document into memory. (See Interrupting Delayed Fax and Polling Transmit Jobs, page 6-13.) 5 Press 1 if you want to select additional settings. The display returns to the SETUP SEND menu-OR-Press 2 if you are finished choosing settings and go to step 5. The screen will prompt you to enter the fax number. ENTER FAX NO. PRESS START KEY 6 Enter the fax number. 7 Press Start . The machine will wait to send the fax at the time you set up. (For the FAX, Function , 1 , 6 . For the MFC, Function , 1 , 1 , 6 .) The number of documents you can scan into memory varies with the data they contain. 6 - 10 SETUP SEND
-
 1
1 -
2
-
3
-
4
-
5
-
6
-
7
-
8
-
9
-
10
-
11
-
12
-
13
-
14
-
15
-
16
-
17
-
18
-
19
-
20
-
21
-
22
-
23
-
24
-
25
-
26
-
27
-
28
-
29
-
30
-
31
-
32
-
33
-
34
-
35
-
36
-
37
-
38
-
39
-
40
-
41
-
42
-
43
-
44
-
45
-
46
-
47
-
48
-
49
-
50
-
51
-
52
-
53
-
54
-
55
-
56
-
57
-
58
-
59
-
60
-
61
-
62
-
63
-
64
-
65
-
66
-
67
-
68
-
 69
69 -
 70
70 -
 71
71 -
 72
72 -
 73
73 -
 74
74 -
 75
75 -
 76
76 -
 77
77 -
 78
78 -
 79
79 -
80
-
81
-
82
-
83
-
84
-
85
-
86
-
87
-
88
-
89
-
90
-
91
-
92
-
93
-
94
-
95
-
96
-
97
-
98
-
99
-
100
-
101
-
102
-
103
-
104
-
105
-
106
-
107
-
108
-
109
-
110
-
111
-
112
-
113
-
114
-
115
-
116
-
117
-
118
-
119
-
120
-
121
-
122
-
123
-
124
-
125
-
126
-
127
-
128
-
129
-
130
-
131
-
132
-
133
-
134
-
135
-
136
-
137
-
138
-
139
-
140
-
141
-
142
-
143
-
144
-
145
-
146
-
147
-
148
-
149
-
150
-
151
-
152
-
153
-
154
-
155
-
156
-
157
-
158
-
159
-
160
-
161
-
162
-
163
-
164
-
165
-
166
-
167
-
168
-
169
-
170
-
171
-
172
-
173
-
174
-
175
-
176
-
177
-
178
-
179
-
180
-
181
-
182
-
183
 |
 |
