Brother International MFC-9970CDW Software Users Manual - English - Page 222
FTP/Network Scan Profile, Administrator Settings, FTP/Network Scan, Settings
 |
UPC - 012502625131
View all Brother International MFC-9970CDW manuals
Add to My Manuals
Save this manual to your list of manuals |
Page 222 highlights
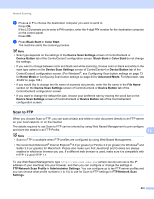
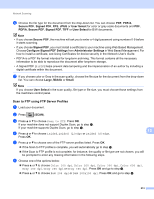
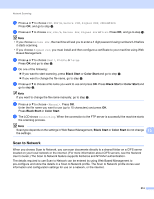
Network Scanning Note • Scan to Network is available when Scan to Network profiles are configured by using Web Based Management. • YOU MUST CONFIGURE THE SNTP PROTOCOL (NETWORK TIME SERVER), OR YOU MUST SET THE DATE, TIME AND TIME ZONE CORRECTLY FOR AUTHENTICATION. FOR MORE INFORMATION, SEE NETWORK USER'S GUIDE. To use Web Based Management, type http://xxx.xxx.xxx.xxx (where xxx.xxx.xxx.xxx is the IP address of your machine) into your browser, and then you can configure or change the settings in FTP/Network Scan Profile in Administrator Settings. You can configure up to ten Scan to Network profiles and you can choose what profile numbers (1 to 10) to use for Scan to Network settings in FTP/Network Scan Settings. In addition to the seven preset file names you can store two user defined file names that can be used for creating an Scan to Network profile. Choose FTP/Network Scan Settings in Web Based Management. In Create a User Defined File Name, enter a file name in one of the two user defined fields and click Submit. A maximum of 64 characters can be entered in each of the user defined name fields. 13 Note Using certain characters or symbols in a file name may cause a problem accessing the file. We recommend to only use combinations of the following characters in a file name. 215
-
 1
1 -
2
-
3
-
4
-
5
-
6
-
7
-
8
-
9
-
10
-
11
-
12
-
13
-
14
-
15
-
16
-
17
-
18
-
19
-
20
-
21
-
22
-
23
-
24
-
25
-
26
-
27
-
28
-
29
-
30
-
31
-
32
-
33
-
34
-
35
-
36
-
37
-
38
-
39
-
40
-
41
-
42
-
43
-
44
-
45
-
46
-
47
-
48
-
49
-
50
-
51
-
52
-
53
-
54
-
55
-
56
-
57
-
58
-
59
-
60
-
61
-
62
-
63
-
64
-
65
-
66
-
67
-
68
-
69
-
70
-
71
-
72
-
73
-
74
-
75
-
76
-
77
-
78
-
79
-
80
-
81
-
82
-
83
-
84
-
85
-
86
-
87
-
88
-
89
-
90
-
91
-
92
-
93
-
94
-
95
-
96
-
97
-
98
-
99
-
100
-
101
-
102
-
103
-
104
-
105
-
106
-
107
-
108
-
109
-
110
-
111
-
112
-
113
-
114
-
115
-
116
-
117
-
118
-
119
-
120
-
121
-
122
-
123
-
124
-
125
-
126
-
127
-
128
-
129
-
130
-
131
-
132
-
133
-
134
-
135
-
136
-
137
-
138
-
139
-
140
-
141
-
142
-
143
-
144
-
145
-
146
-
147
-
148
-
149
-
150
-
151
-
152
-
153
-
154
-
155
-
156
-
157
-
158
-
159
-
160
-
161
-
162
-
163
-
164
-
165
-
166
-
167
-
168
-
169
-
170
-
171
-
172
-
173
-
174
-
175
-
176
-
177
-
178
-
179
-
180
-
181
-
182
-
183
-
184
-
185
-
186
-
187
-
188
-
189
-
190
-
191
-
192
-
193
-
194
-
195
-
196
-
197
-
198
-
199
-
200
-
201
-
202
-
203
-
204
-
205
-
206
-
207
-
208
-
209
-
210
-
211
-
212
-
213
-
214
-
215
-
216
-
 217
217 -
 218
218 -
 219
219 -
 220
220 -
 221
221 -
 222
222 -
 223
223 -
 224
224 -
 225
225 -
 226
226 -
 227
227 -
228
-
229
 |
 |
