Brother International MFC-9970CDW Software Users Manual - English - Page 225
Scan to Network using Scan to Network Profiles, Use PIN for authentication, FTP/Network Scan Profile
 |
UPC - 012502625131
View all Brother International MFC-9970CDW manuals
Add to My Manuals
Save this manual to your list of manuals |
Page 225 highlights
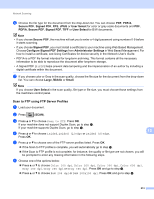
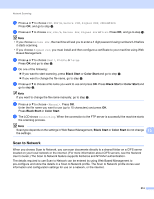
Network Scanning Scan to Network using Scan to Network Profiles 13 a Load your document. b Press (SCAN). c Press a or b to choose Scan to Network. Press OK. If your machine does not support Duplex Scan, go to step e. If your machine supports Duplex Scan, go to step d. d Press a or b to choose 1sided, 2sided (L)edge or 2sided (S)edge. Press OK. e Press a or b to choose one of the profiles listed. Press OK. f If you check Use PIN for authentication in FTP/Network Scan Profile of Web Based Management, the LCD will prompts you to enter a PIN number. Enter the 4-digit PIN number and then press OK. If the profile is complete, you will automatically go to step k. If the profile is not complete, for instance, the quality or file type are not chosen, you will be prompted to enter any missing information in the following steps. g Choose one of the options below: Press a or b to choose Color 100 dpi, Color 200 dpi, Color 300 dpi, Color 600 dpi, Gray 100 dpi, Gray 200 dpi or Gray 300 dpi. Press OK and go to step h. Press a or b to choose B&W 200 dpi or B&W 200x100 dpi. Press OK and go to step i. h Press a or b to choose PDF, PDF/A, Secure PDF, Signed PDF, JPEG or XPS. Press OK, and go to step j. i Press a or b to choose PDF, PDF/A, Secure PDF, Signed PDF, or TIFF. Press OK, and go to step k. Note • If you chose Secure PDF, the machine will ask you to enter a 4 digit password using numbers 0-9 before it starts scanning. 13 • If you choose Signed PDF, you must install and then configure a certificate to your machine using Web Based Management. j Press a or b to choose Small, Middle or Large. Press OK and go to step k. k Do one of the following: If you want to start scanning, press Black Start or Color Start. If you want to change the file name, go to step l. 218
-
 1
1 -
2
-
3
-
4
-
5
-
6
-
7
-
8
-
9
-
10
-
11
-
12
-
13
-
14
-
15
-
16
-
17
-
18
-
19
-
20
-
21
-
22
-
23
-
24
-
25
-
26
-
27
-
28
-
29
-
30
-
31
-
32
-
33
-
34
-
35
-
36
-
37
-
38
-
39
-
40
-
41
-
42
-
43
-
44
-
45
-
46
-
47
-
48
-
49
-
50
-
51
-
52
-
53
-
54
-
55
-
56
-
57
-
58
-
59
-
60
-
61
-
62
-
63
-
64
-
65
-
66
-
67
-
68
-
69
-
70
-
71
-
72
-
73
-
74
-
75
-
76
-
77
-
78
-
79
-
80
-
81
-
82
-
83
-
84
-
85
-
86
-
87
-
88
-
89
-
90
-
91
-
92
-
93
-
94
-
95
-
96
-
97
-
98
-
99
-
100
-
101
-
102
-
103
-
104
-
105
-
106
-
107
-
108
-
109
-
110
-
111
-
112
-
113
-
114
-
115
-
116
-
117
-
118
-
119
-
120
-
121
-
122
-
123
-
124
-
125
-
126
-
127
-
128
-
129
-
130
-
131
-
132
-
133
-
134
-
135
-
136
-
137
-
138
-
139
-
140
-
141
-
142
-
143
-
144
-
145
-
146
-
147
-
148
-
149
-
150
-
151
-
152
-
153
-
154
-
155
-
156
-
157
-
158
-
159
-
160
-
161
-
162
-
163
-
164
-
165
-
166
-
167
-
168
-
169
-
170
-
171
-
172
-
173
-
174
-
175
-
176
-
177
-
178
-
179
-
180
-
181
-
182
-
183
-
184
-
185
-
186
-
187
-
188
-
189
-
190
-
191
-
192
-
193
-
194
-
195
-
196
-
197
-
198
-
199
-
200
-
201
-
202
-
203
-
204
-
205
-
206
-
207
-
208
-
209
-
210
-
211
-
212
-
213
-
214
-
215
-
216
-
217
-
218
-
219
-
 220
220 -
 221
221 -
 222
222 -
 223
223 -
 224
224 -
 225
225 -
 226
226 -
 227
227 -
 228
228 -
 229
229
 |
 |
