Brother International PC-420PRW Users Manual - English - Page 119
Sewing the Various Built-In Decorative Patterns, Sewing beautiful patterns, Sewing patterns
 |
View all Brother International PC-420PRW manuals
Add to My Manuals
Save this manual to your list of manuals |
Page 119 highlights
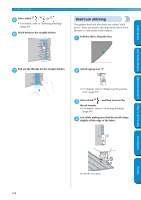
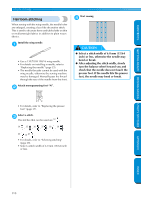
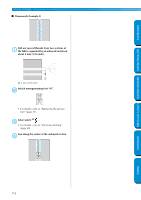
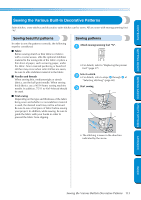
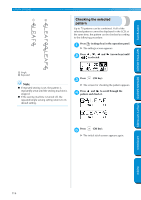
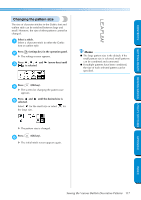
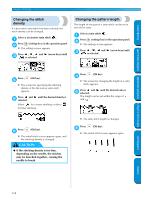
CONTENTS GETTING READY SEWING BASICS UTILITY STITCHES Sewing the Various Built-In Decorative Patterns Satin stitches, cross-stitches and decorative satin stitches can be sewn. All are sewn with monogramming foot "N". Sewing beautiful patterns In order to sew the patterns correctly, the following must be considered. ■ Fabric Before sewing stretch or thin fabrics or fabrics with a coarse weave, affix the optional stabilizer material to the wrong side of the fabric or place a thin sheet of paper, such as tracing paper, under the fabric. Since material puckering or bunched stitches may occur when satin stitches are sewn, be sure to affix stabilizer material to the fabric. ■ Needles and threads When sewing thin, mediumweight or stretch fabrics, use the ball point needle. When sewing thick fabrics, use a 90/14 home sewing machine needle. In addition, 75/11 to 90/14 thread should be used. ■ Trial sewing Depending on the type and thickness of the fabric being sewn and whether or not stabilizer material is used, the desired result may not be achieved. Be sure to sew a trial piece of fabric before sewing your project. In addition, while sewing, be sure to guide the fabric with your hands in order to prevent the fabric from slipping. Sewing patterns Attach monogramming foot "N". 1 • For details, refer to "Replacing the presser foot" (page 37). Select a stitch. 2 • For details, refer to steps 4 through 9 of "Selecting stitching" (page 68). Start sewing. 3 • The stitching is sewn in the direction indicated by the arrow. APPENDIX INDEX Sewing the Various Built-In Decorative Patterns 113
-
 1
1 -
2
-
3
-
4
-
5
-
6
-
7
-
8
-
9
-
10
-
11
-
12
-
13
-
14
-
15
-
16
-
17
-
18
-
19
-
20
-
21
-
22
-
23
-
24
-
25
-
26
-
27
-
28
-
29
-
30
-
31
-
32
-
33
-
34
-
35
-
36
-
37
-
38
-
39
-
40
-
41
-
42
-
43
-
44
-
45
-
46
-
47
-
48
-
49
-
50
-
51
-
52
-
53
-
54
-
55
-
56
-
57
-
58
-
59
-
60
-
61
-
62
-
63
-
64
-
65
-
66
-
67
-
68
-
69
-
70
-
71
-
72
-
73
-
74
-
75
-
76
-
77
-
78
-
79
-
80
-
81
-
82
-
83
-
84
-
85
-
86
-
87
-
88
-
89
-
90
-
91
-
92
-
93
-
94
-
95
-
96
-
97
-
98
-
99
-
100
-
101
-
102
-
103
-
104
-
105
-
106
-
107
-
108
-
109
-
110
-
111
-
112
-
113
-
 114
114 -
 115
115 -
 116
116 -
 117
117 -
 118
118 -
 119
119 -
 120
120 -
 121
121 -
 122
122 -
 123
123 -
 124
124 -
125
-
126
-
127
-
128
-
129
-
130
-
131
-
132
-
133
-
134
-
135
-
136
-
137
-
138
-
139
-
140
-
141
-
142
-
143
-
144
-
145
-
146
-
147
-
148
-
149
-
150
-
151
-
152
-
153
 |
 |