Brother International PC-420PRW Users Manual - English - Page 53
General sewing procedure, Turn on the, machine., Select the stitch., Attach the presser, foot.
 |
View all Brother International PC-420PRW manuals
Add to My Manuals
Save this manual to your list of manuals |
Page 53 highlights
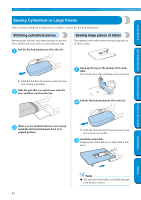
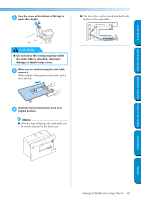
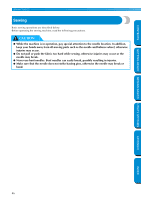
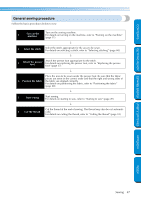
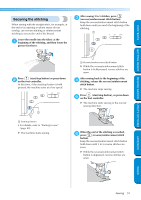
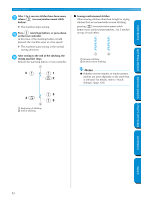
CONTENTS GETTING READY SEWING BASICS UTILITY STITCHES General sewing procedure Follow the basic procedures below to sew. 1 Turn on the machine. Turn on the sewing machine. For details on turning on the machine, refer to "Turning on the machine" (page 11). ↓ 2 Select the stitch. Select the stitch appropriate for the area to be sewn. For details on selecting a stitch, refer to "Selecting stitching" (page 68). ↓ 3 Attach the presser foot. Attach the presser foot appropriate for the stitch. For details on replacing the presser foot, refer to "Replacing the presser foot" (page 37). ↓ Place the area to be sewn under the presser foot. Be sure that the fabric pieces are sewn in the correct order and that the right and wrong sides of 4 Position the fabric. the fabric are aligned correctly. For details on positioning the fabric, refer to "Positioning the fabric" (page 48). ↓ 5 Start sewing. Start sewing. For details on starting to sew, refer to "Starting to sew" (page 49). ↓ Cut the thread at the end of sewing. The thread may also be cut automati6 Cut the thread. cally. For details on cutting the thread, refer to "Cutting the thread" (page 53). APPENDIX INDEX Sewing 47
-
 1
1 -
2
-
3
-
4
-
5
-
6
-
7
-
8
-
9
-
10
-
11
-
12
-
13
-
14
-
15
-
16
-
17
-
18
-
19
-
20
-
21
-
22
-
23
-
24
-
25
-
26
-
27
-
28
-
29
-
30
-
31
-
32
-
33
-
34
-
35
-
36
-
37
-
38
-
39
-
40
-
41
-
42
-
43
-
44
-
45
-
46
-
47
-
 48
48 -
 49
49 -
 50
50 -
 51
51 -
 52
52 -
 53
53 -
 54
54 -
 55
55 -
 56
56 -
 57
57 -
 58
58 -
59
-
60
-
61
-
62
-
63
-
64
-
65
-
66
-
67
-
68
-
69
-
70
-
71
-
72
-
73
-
74
-
75
-
76
-
77
-
78
-
79
-
80
-
81
-
82
-
83
-
84
-
85
-
86
-
87
-
88
-
89
-
90
-
91
-
92
-
93
-
94
-
95
-
96
-
97
-
98
-
99
-
100
-
101
-
102
-
103
-
104
-
105
-
106
-
107
-
108
-
109
-
110
-
111
-
112
-
113
-
114
-
115
-
116
-
117
-
118
-
119
-
120
-
121
-
122
-
123
-
124
-
125
-
126
-
127
-
128
-
129
-
130
-
131
-
132
-
133
-
134
-
135
-
136
-
137
-
138
-
139
-
140
-
141
-
142
-
143
-
144
-
145
-
146
-
147
-
148
-
149
-
150
-
151
-
152
-
153
 |
 |