Brother International PC-420PRW Users Manual - English - Page 26
CAUTION, the needle may break.
 |
View all Brother International PC-420PRW manuals
Add to My Manuals
Save this manual to your list of manuals |
Page 26 highlights
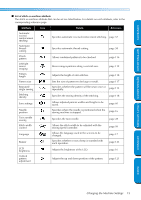
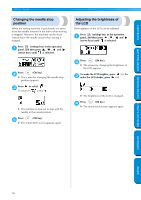
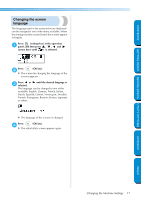
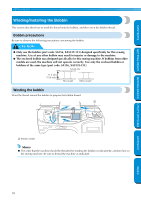
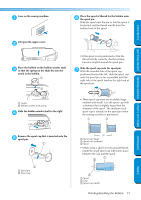
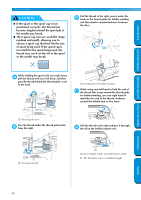
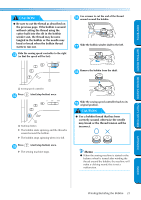
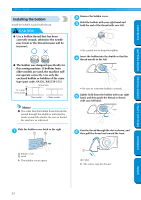
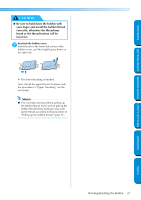
GETTING READY CONTENTS CAUTION ● If the spool or the spool cap is not positioned correctly, the thread may become tangled around the spool pin or the needle may break. ● Three spool cap sizes are available (large, medium and small), allowing you to choose a spool cap that best fits the size of spool being used. If the spool cap is too small for the spool being used, the thread may catch on the slit in the spool or the needle may break. Pull the thread to the right, pass it under the 0 hook on the thread guide for bobbin winding, and then wind it counterclockwise between the discs. 1 1 GETTING READY SEWING BASICS UTILITY STITCHES While holding the spool with your right hand, 8 pull the thread with your left hand, and then pass the thread behind the thread guide cover to the front. 1 1 Thread guide for bobbin winding While using your left hand to hold the end of a the thread that wraps around the thread guide for bobbin winding, use your right hand to wind the free end of the thread clockwise around the bobbin four or five times. 1 Thread guide cover Pass the thread under the thread guide plate 9 from the right. Pull the thread to the right and pass it through b the slit in the bobbin winder seat. APPENDIX 1 1 Thread guide plate 1 1 Slit in bobbin winder seat (with built-in cutter) X The thread is cut to a suitable length. INDEX 20
-
 1
1 -
2
-
3
-
4
-
5
-
6
-
7
-
8
-
9
-
10
-
11
-
12
-
13
-
14
-
15
-
16
-
17
-
18
-
19
-
20
-
 21
21 -
 22
22 -
 23
23 -
 24
24 -
 25
25 -
 26
26 -
 27
27 -
 28
28 -
 29
29 -
 30
30 -
 31
31 -
32
-
33
-
34
-
35
-
36
-
37
-
38
-
39
-
40
-
41
-
42
-
43
-
44
-
45
-
46
-
47
-
48
-
49
-
50
-
51
-
52
-
53
-
54
-
55
-
56
-
57
-
58
-
59
-
60
-
61
-
62
-
63
-
64
-
65
-
66
-
67
-
68
-
69
-
70
-
71
-
72
-
73
-
74
-
75
-
76
-
77
-
78
-
79
-
80
-
81
-
82
-
83
-
84
-
85
-
86
-
87
-
88
-
89
-
90
-
91
-
92
-
93
-
94
-
95
-
96
-
97
-
98
-
99
-
100
-
101
-
102
-
103
-
104
-
105
-
106
-
107
-
108
-
109
-
110
-
111
-
112
-
113
-
114
-
115
-
116
-
117
-
118
-
119
-
120
-
121
-
122
-
123
-
124
-
125
-
126
-
127
-
128
-
129
-
130
-
131
-
132
-
133
-
134
-
135
-
136
-
137
-
138
-
139
-
140
-
141
-
142
-
143
-
144
-
145
-
146
-
147
-
148
-
149
-
150
-
151
-
152
-
153
 |
 |
